Epson AcuLaser CX11NF Basics - Page 106
Problems Using the Scanning Software, Scan Quality Problems
 |
View all Epson AcuLaser CX11NF manuals
Add to My Manuals
Save this manual to your list of manuals |
Page 106 highlights
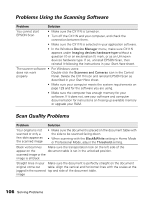
Problems Using the Scanning Software Problem Solution You cannot start EPSON Scan • Make sure the CX11N is turned on. • Turn off the CX11N and your computer, and check the connection between them. • Make sure the CX11N is selected in your application software. • In the Windows Device Manager menu, make sure CX11N appears under Imaging devices hardware type without a question (?) or an exclamation (!) mark, or as an Unknown devices hardware type. If so, uninstall EPSON Scan, then reinstall it following the instructions in your Start Here sheet. The scanner software • For Windows users: does not work Double-click the Scanners and Cameras icon in the Control properly Panel. Delete the CX11N icon and reinstall EPSON Scan as described in your Start Here sheet. • Make sure your computer meets the system requirements on page 129 and for the software you are using. • Make sure the computer has enough memory for your software. If it does not, see your software and computer documentation for instructions on freeing up available memory or upgrade your RAM. Scan Quality Problems Problem Solution Your original is not scanned or only a few dots appear as the scanned image • Make sure the document is placed on the document table with the side to be scanned facing down. • When scanning with the Black&White setting in Home Mode or Professional Mode, adjust the Threshold setting. Black vertical lines Make sure the transportation lock on the left side of the appear on the document table is set in the unlocked position. scanned image or the image is all black Straight lines in your Make sure the document is perfectly straight on the document original come out table. Align the vertical and horizontal lines with the scales at the jagged in the scanned top and side of the document table. image 106 Solving Problems
-
 1
1 -
2
-
3
-
4
-
5
-
6
-
7
-
8
-
9
-
10
-
11
-
12
-
13
-
14
-
15
-
16
-
17
-
18
-
19
-
20
-
21
-
22
-
23
-
24
-
25
-
26
-
27
-
28
-
29
-
30
-
31
-
32
-
33
-
34
-
35
-
36
-
37
-
38
-
39
-
40
-
41
-
42
-
43
-
44
-
45
-
46
-
47
-
48
-
49
-
50
-
51
-
52
-
53
-
54
-
55
-
56
-
57
-
58
-
59
-
60
-
61
-
62
-
63
-
64
-
65
-
66
-
67
-
68
-
69
-
70
-
71
-
72
-
73
-
74
-
75
-
76
-
77
-
78
-
79
-
80
-
81
-
82
-
83
-
84
-
85
-
86
-
87
-
88
-
89
-
90
-
91
-
92
-
93
-
94
-
95
-
96
-
97
-
98
-
99
-
100
-
 101
101 -
 102
102 -
 103
103 -
 104
104 -
 105
105 -
 106
106 -
 107
107 -
 108
108 -
 109
109 -
 110
110 -
 111
111 -
112
-
113
-
114
-
115
-
116
-
117
-
118
-
119
-
120
-
121
-
122
-
123
-
124
-
125
-
126
-
127
-
128
-
129
-
130
-
131
-
132
-
133
-
134
-
135
-
136
-
137
-
138
-
139
-
140
-
141
-
142
-
143
-
144
 |
 |