Epson AcuLaser CX11NF Basics - Page 53
scan area. See for instructions., To zoom in on an image
 |
View all Epson AcuLaser CX11NF manuals
Add to My Manuals
Save this manual to your list of manuals |
Page 53 highlights
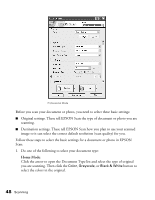
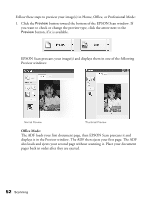
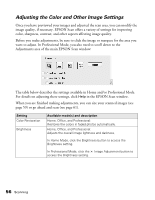
2. If you are viewing the Thumbnail preview, you can do the following to adjust the image(s): ■ To zoom in on an image, double-click its thumbnail, or click the thumbnail and then click the Full Size tab near the top of the Preview window. (Available only when you've scanned multiple images at one time.) ■ To rotate an image or flip it horizontally (like a mirror image), click its thumbnail and then click the rotation icon or mirroring icon. ■ To adjust the scan area to crop your image, you can create and move a marquee that marks the edges of your scan. See page 54 for instructions. ■ To adjust the image quality, click the image(s) you want to modify and make the adjustments as described on page 56. If you want to apply the adjustments you have made to all your images, click the All button. 3. If you are viewing the Normal preview, you can do the following to adjust the image(s): ■ To select your scan area, click the auto locate icon to place a marquee that marks the edges of your image area. You can move the marquee to change the scan area. See page 54 for instructions. Note: If you are going to scan at a different size than your original, you must first select your Target Size and automatically create a marquee that is proportioned to that size. See page 59 for instructions. You can then copy the marquee and place it on each image you will scan at that size. ■ To zoom in on an image, click inside the scan area and click the Zoom button. EPSON Scan prescans again and displays a larger preview on the Zoom tab. (Your other images are still previewed at the original size on the Preview tab.) ■ To adjust the image quality, click the image(s) you want to modify and make the adjustments as described on page 56. 4. When you have finished adjusting the scan area, and modifying the color and image settings, you can select the size of your scanned image, if you have not already selected it. See page 59 for instructions. Selecting EPSON Scan Settings 53
-
 1
1 -
2
-
3
-
4
-
5
-
6
-
7
-
8
-
9
-
10
-
11
-
12
-
13
-
14
-
15
-
16
-
17
-
18
-
19
-
20
-
21
-
22
-
23
-
24
-
25
-
26
-
27
-
28
-
29
-
30
-
31
-
32
-
33
-
34
-
35
-
36
-
37
-
38
-
39
-
40
-
41
-
42
-
43
-
44
-
45
-
46
-
47
-
 48
48 -
 49
49 -
 50
50 -
 51
51 -
 52
52 -
 53
53 -
 54
54 -
 55
55 -
 56
56 -
 57
57 -
 58
58 -
59
-
60
-
61
-
62
-
63
-
64
-
65
-
66
-
67
-
68
-
69
-
70
-
71
-
72
-
73
-
74
-
75
-
76
-
77
-
78
-
79
-
80
-
81
-
82
-
83
-
84
-
85
-
86
-
87
-
88
-
89
-
90
-
91
-
92
-
93
-
94
-
95
-
96
-
97
-
98
-
99
-
100
-
101
-
102
-
103
-
104
-
105
-
106
-
107
-
108
-
109
-
110
-
111
-
112
-
113
-
114
-
115
-
116
-
117
-
118
-
119
-
120
-
121
-
122
-
123
-
124
-
125
-
126
-
127
-
128
-
129
-
130
-
131
-
132
-
133
-
134
-
135
-
136
-
137
-
138
-
139
-
140
-
141
-
142
-
143
-
144
 |
 |