Epson AcuLaser CX11NF Basics - Page 83
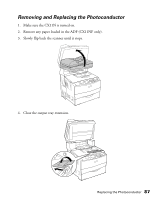
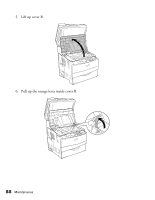
Changing a Low Toner Cartridge, Removing and Replacing an Empty Toner Cartridge - toner cartridges
 |
View all Epson AcuLaser CX11NF manuals
Add to My Manuals
Save this manual to your list of manuals |
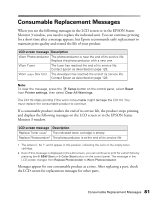
Page 83 highlights
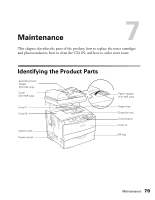
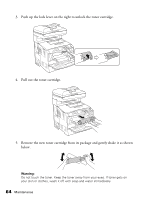
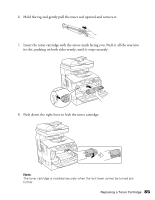
Changing a Low Toner Cartridge 1. Make sure the CX11N is turned on, then press the Setup button. The Setup light turns on and the LCD screen displays Setup Mode for a few seconds, then changes to the Setup menu screen. 2. Use the u or d button to select Printer Settings, then press the r button. 3. Use the u or d button to select Reset Menu, then press the r button. 4. Use the u or d button to select Change Toner C/M/Y/K for the color of the toner cartridge you want to change, then press the r button. 5. Continue with the steps in the next section to remove and replace the toner cartridge. Removing and Replacing an Empty Toner Cartridge 1. Make sure the CX11N is turned on. 2. Check the color of the low or empty toner cartridge in the LCD screen, then open cover A. Replacing a Toner Cartridge 83
-
 1
1 -
2
-
3
-
4
-
5
-
6
-
7
-
8
-
9
-
10
-
11
-
12
-
13
-
14
-
15
-
16
-
17
-
18
-
19
-
20
-
21
-
22
-
23
-
24
-
25
-
26
-
27
-
28
-
29
-
30
-
31
-
32
-
33
-
34
-
35
-
36
-
37
-
38
-
39
-
40
-
41
-
42
-
43
-
44
-
45
-
46
-
47
-
48
-
49
-
50
-
51
-
52
-
53
-
54
-
55
-
56
-
57
-
58
-
59
-
60
-
61
-
62
-
63
-
64
-
65
-
66
-
67
-
68
-
69
-
70
-
71
-
72
-
73
-
74
-
75
-
76
-
77
-
 78
78 -
 79
79 -
 80
80 -
 81
81 -
 82
82 -
 83
83 -
 84
84 -
 85
85 -
 86
86 -
 87
87 -
 88
88 -
89
-
90
-
91
-
92
-
93
-
94
-
95
-
96
-
97
-
98
-
99
-
100
-
101
-
102
-
103
-
104
-
105
-
106
-
107
-
108
-
109
-
110
-
111
-
112
-
113
-
114
-
115
-
116
-
117
-
118
-
119
-
120
-
121
-
122
-
123
-
124
-
125
-
126
-
127
-
128
-
129
-
130
-
131
-
132
-
133
-
134
-
135
-
136
-
137
-
138
-
139
-
140
-
141
-
142
-
143
-
144
 |
 |