Epson AcuLaser CX11NF Basics - Page 62
PICT *.PICT Mac OS X only, EPS format *.EPS
 |
View all Epson AcuLaser CX11NF manuals
Add to My Manuals
Save this manual to your list of manuals |
Page 62 highlights
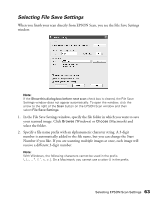
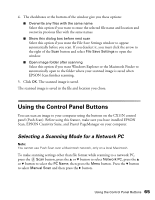
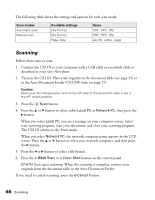
What happens after you scan depends on how you started your scan: ■ If you started your scan by running EPSON Scan as a standalone program, you see the File Save Settings window. This lets you select the name and location of your saved scan files. See page 63 for details. ■ If you started your scan from a scanning program (such as Adobe® Photoshop Elements), your scanned image(s) open in the program window. Click Close to close the EPSON Scan window and view your image(s) in the program. Be sure to save your images. The steps below are for saving images in Adobe Photoshop Elements: 1. Select Save As from the File menu. 2. Type a file name and select a file format. The following formats are available: ■ BITMAP (*.BMP) (windows only) ■ EPS format (*.EPS) ■ JPEG (*.JPG) ■ Multi-TIFF (*.TIF) ■ PDF (*.PDF) ■ PICT (*.PICT) (Mac OS X only) ■ PNG format (*.PNG) ■ TIFF (*.TIF) 3. Click Save. For details on file formats, see the Help topics in the application you are using. 62 Scanning
-
 1
1 -
2
-
3
-
4
-
5
-
6
-
7
-
8
-
9
-
10
-
11
-
12
-
13
-
14
-
15
-
16
-
17
-
18
-
19
-
20
-
21
-
22
-
23
-
24
-
25
-
26
-
27
-
28
-
29
-
30
-
31
-
32
-
33
-
34
-
35
-
36
-
37
-
38
-
39
-
40
-
41
-
42
-
43
-
44
-
45
-
46
-
47
-
48
-
49
-
50
-
51
-
52
-
53
-
54
-
55
-
56
-
 57
57 -
 58
58 -
 59
59 -
 60
60 -
 61
61 -
 62
62 -
 63
63 -
 64
64 -
 65
65 -
 66
66 -
 67
67 -
68
-
69
-
70
-
71
-
72
-
73
-
74
-
75
-
76
-
77
-
78
-
79
-
80
-
81
-
82
-
83
-
84
-
85
-
86
-
87
-
88
-
89
-
90
-
91
-
92
-
93
-
94
-
95
-
96
-
97
-
98
-
99
-
100
-
101
-
102
-
103
-
104
-
105
-
106
-
107
-
108
-
109
-
110
-
111
-
112
-
113
-
114
-
115
-
116
-
117
-
118
-
119
-
120
-
121
-
122
-
123
-
124
-
125
-
126
-
127
-
128
-
129
-
130
-
131
-
132
-
133
-
134
-
135
-
136
-
137
-
138
-
139
-
140
-
141
-
142
-
143
-
144
 |
 |