Epson AcuLaser CX11NF Basics - Page 107
Problem, Solution, Clear Unsharp Mask Filter - problems
 |
View all Epson AcuLaser CX11NF manuals
Add to My Manuals
Save this manual to your list of manuals |
Page 107 highlights
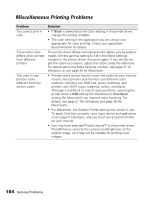
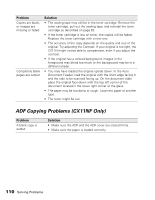
Problem Solution The image is • Make sure the document is flat against the document table. distorted or blurred • Do not move the document while scanning. • Change the Display Gamma setting for your output device, such as a monitor or the CX11N, in the Configuration window. • Select Unsharp Mask Filter in Professional Mode. • Select Color Control and check Continuous auto exposure in the Configuration window, or click the Auto Exposure button in the Professional Mode. • Change the Resolution setting for your scan. Colors are patchy or distorted at the edges of the image • If your original is very thick or warped at the edges, cover the edges with paper to block external light. • Adjust the Gamma setting in the Histogram Adjustment window in Professional Mode. The image is too dark • Check the Brightness setting using the Image Adjustment window in Home Mode, or the Histogram Adjustment window and the Image Adjustment window in Professional Mode. • Check the brightness and contrast settings of your monitor. • Select Color Control and check Continuous auto exposure in the Configuration window, or click the Auto Exposure button in Professional Mode. • Change the Display Gamma setting for your output device, such as a monitor or CX11N, in the Configuration window. • Change the Destination setting in Home Mode or Professional Mode. Moiré (crosshatch) When you scan printed materials, interference can occur due to patterns appear in the the difference between the pitches of the scanning and the scanned image halftone screens. Try one or more of the following solutions: • Select the Descreening Filter in Home or Professional Mode. • In Professional Mode, set the Screen Ruling of the Descreening Filter setting to an appropriate setting for your document. • Deselect Clear Unsharp Mask Filter in Professional Mode. • Place a transparent sheet, such as an overhead projector sheet, between your original and the document table. • Reposition your original slightly. • Make the image size slightly smaller. Scanning Problems 107
-
 1
1 -
2
-
3
-
4
-
5
-
6
-
7
-
8
-
9
-
10
-
11
-
12
-
13
-
14
-
15
-
16
-
17
-
18
-
19
-
20
-
21
-
22
-
23
-
24
-
25
-
26
-
27
-
28
-
29
-
30
-
31
-
32
-
33
-
34
-
35
-
36
-
37
-
38
-
39
-
40
-
41
-
42
-
43
-
44
-
45
-
46
-
47
-
48
-
49
-
50
-
51
-
52
-
53
-
54
-
55
-
56
-
57
-
58
-
59
-
60
-
61
-
62
-
63
-
64
-
65
-
66
-
67
-
68
-
69
-
70
-
71
-
72
-
73
-
74
-
75
-
76
-
77
-
78
-
79
-
80
-
81
-
82
-
83
-
84
-
85
-
86
-
87
-
88
-
89
-
90
-
91
-
92
-
93
-
94
-
95
-
96
-
97
-
98
-
99
-
100
-
101
-
 102
102 -
 103
103 -
 104
104 -
 105
105 -
 106
106 -
 107
107 -
 108
108 -
 109
109 -
 110
110 -
 111
111 -
 112
112 -
113
-
114
-
115
-
116
-
117
-
118
-
119
-
120
-
121
-
122
-
123
-
124
-
125
-
126
-
127
-
128
-
129
-
130
-
131
-
132
-
133
-
134
-
135
-
136
-
137
-
138
-
139
-
140
-
141
-
142
-
143
-
144
 |
 |