Epson AcuLaser CX11NF Basics - Page 51
Previewing and Adjusting the Scan Area, Normal preview, Thumbnail preview
 |
View all Epson AcuLaser CX11NF manuals
Add to My Manuals
Save this manual to your list of manuals |
Page 51 highlights
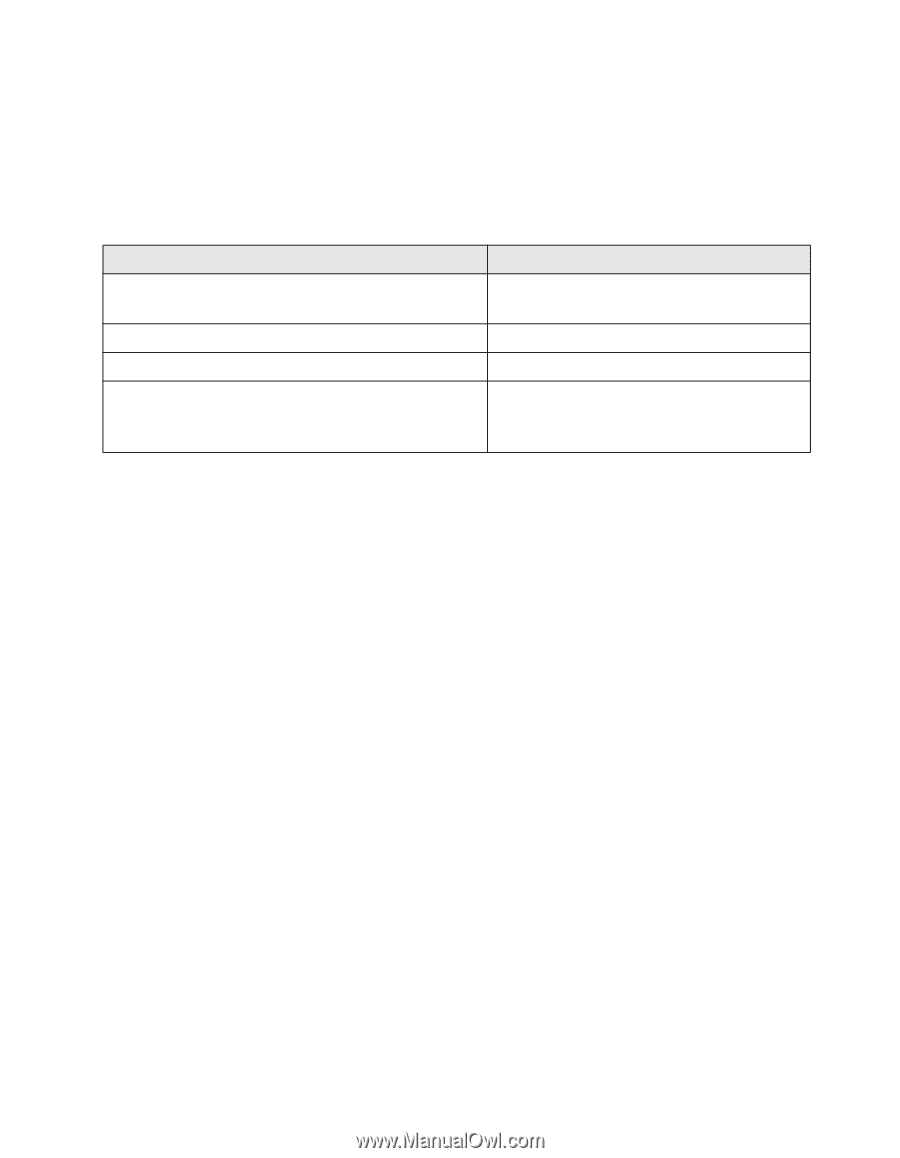
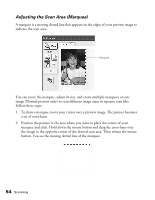
example, if the resolution is 300 dpi (dots per inch), but you will increase the image size by 200% in an image-editing program, change the Resolution setting to 600 dpi in EPSON Scan. Click the arrow next to the Resolution list and select the number of dots per inch at which you want to scan. See the table below for some guidelines: What you will do with the scanned image Suggested scan resolution Send via e-mail, upload to web, or view only on 96 to 150 dpi the screen Print, or convert to editable text (OCR) 300 dpi Fax 200 dpi Enlarge after scanning at 100% Increase Resolution setting by same percentage you will increase image size after scanning After selecting the Resolution, you can preview your image and make any necessary adjustments. See below to continue scanning. Previewing and Adjusting the Scan Area Once you have selected your basic settings and resolution, you can preview your image and select or adjust the area of the image(s) you want to scan. EPSON Scan displays the preview image(s) in a separate Preview window on your screen. There are two types of preview: ■ Normal preview displays your previewed images in their entirety. You must select the scan area and make any image quality adjustments manually. Normal is the default preview type in Professional Mode, but you can also select it in Home Mode, if available. ■ Thumbnail preview displays your previewed images as thumbnails. EPSON Scan automatically locates the edges of your scan area and applies automatic exposure settings to the images. Thumbnail is the default preview type in Home Mode, but you can also select it in Professional Mode, if available. Note: Depending on your document type and other settings, Normal preview may be automatically selected and you will not be able to change to Thumbnail preview. Selecting EPSON Scan Settings 51
-
 1
1 -
2
-
3
-
4
-
5
-
6
-
7
-
8
-
9
-
10
-
11
-
12
-
13
-
14
-
15
-
16
-
17
-
18
-
19
-
20
-
21
-
22
-
23
-
24
-
25
-
26
-
27
-
28
-
29
-
30
-
31
-
32
-
33
-
34
-
35
-
36
-
37
-
38
-
39
-
40
-
41
-
42
-
43
-
44
-
45
-
 46
46 -
 47
47 -
 48
48 -
 49
49 -
 50
50 -
 51
51 -
 52
52 -
 53
53 -
 54
54 -
 55
55 -
 56
56 -
57
-
58
-
59
-
60
-
61
-
62
-
63
-
64
-
65
-
66
-
67
-
68
-
69
-
70
-
71
-
72
-
73
-
74
-
75
-
76
-
77
-
78
-
79
-
80
-
81
-
82
-
83
-
84
-
85
-
86
-
87
-
88
-
89
-
90
-
91
-
92
-
93
-
94
-
95
-
96
-
97
-
98
-
99
-
100
-
101
-
102
-
103
-
104
-
105
-
106
-
107
-
108
-
109
-
110
-
111
-
112
-
113
-
114
-
115
-
116
-
117
-
118
-
119
-
120
-
121
-
122
-
123
-
124
-
125
-
126
-
127
-
128
-
129
-
130
-
131
-
132
-
133
-
134
-
135
-
136
-
137
-
138
-
139
-
140
-
141
-
142
-
143
-
144
 |
 |