Epson AcuLaser CX11NF Basics - Page 43
Scanning, Starting EPSON Scan, Scanning Modes - support
 |
View all Epson AcuLaser CX11NF manuals
Add to My Manuals
Save this manual to your list of manuals |
Page 43 highlights
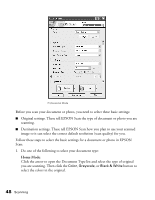
Scanning 5 This chapter describes how to scan an image using EPSON Scan (either as a standalone program or through any TWAIN-compliant application) or the control panel on the product. Starting EPSON Scan If you want to scan an image and save it directly to a file, you can start EPSON Scan as a "standalone" program. You can also access EPSON Scan from any application that supports the TWAIN standard. When you are finished, the scanned image opens in your scanning program so you can modify, print, and save it. Note: In this chapter, the operation of EPSON Scan is explained using Windows examples. Scanning Modes EPSON Scan offers three scanning modes that let you control all aspects of scanning: ■ Home Mode lets you customize scanning settings and check their effects with a preview image. Home Mode is best when you want to preview images of photos before scanning them. You can size the image as you scan, adjust the scan area, and adjust many image settings, including color restoration. ■ Office Mode lets you quickly scan multi-page documents of the same size using the Auto Document Feeder. Office Mode is available only with the CX11NF. ■ Professional Mode gives you total control of your scanning settings and lets you check their effects with a preview image. Scanning 43
-
 1
1 -
2
-
3
-
4
-
5
-
6
-
7
-
8
-
9
-
10
-
11
-
12
-
13
-
14
-
15
-
16
-
17
-
18
-
19
-
20
-
21
-
22
-
23
-
24
-
25
-
26
-
27
-
28
-
29
-
30
-
31
-
32
-
33
-
34
-
35
-
36
-
37
-
 38
38 -
 39
39 -
 40
40 -
 41
41 -
 42
42 -
 43
43 -
 44
44 -
 45
45 -
 46
46 -
 47
47 -
 48
48 -
49
-
50
-
51
-
52
-
53
-
54
-
55
-
56
-
57
-
58
-
59
-
60
-
61
-
62
-
63
-
64
-
65
-
66
-
67
-
68
-
69
-
70
-
71
-
72
-
73
-
74
-
75
-
76
-
77
-
78
-
79
-
80
-
81
-
82
-
83
-
84
-
85
-
86
-
87
-
88
-
89
-
90
-
91
-
92
-
93
-
94
-
95
-
96
-
97
-
98
-
99
-
100
-
101
-
102
-
103
-
104
-
105
-
106
-
107
-
108
-
109
-
110
-
111
-
112
-
113
-
114
-
115
-
116
-
117
-
118
-
119
-
120
-
121
-
122
-
123
-
124
-
125
-
126
-
127
-
128
-
129
-
130
-
131
-
132
-
133
-
134
-
135
-
136
-
137
-
138
-
139
-
140
-
141
-
142
-
143
-
144
 |
 |