Epson AcuLaser CX11NF Basics - Page 33
Macintosh, Network Printing for Macintosh - network setup
 |
View all Epson AcuLaser CX11NF manuals
Add to My Manuals
Save this manual to your list of manuals |
Page 33 highlights
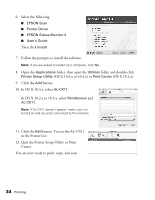
Macintosh To cancel printing, open the Printer Setup Utility (Mac OS® X 10.3 or 10.4) or Print Center (Mac OS X 10.2) and double-click your printer in the print queue. Then select Delete Job from the jobs menu. After the last page is output to the tray, the Print (green) light turns on. The current job is canceled. You can also cancel the current print job by pressing the y Cancel button on the control panel. Be careful not to cancel print jobs sent by other users. Network Printing for Macintosh Note: The CX11N must be turned on and securely connected to the network before installing the software. For details, see your Start Here sheet. The software must be installed on each computer that will be using the CX11N on the network. 1. Insert the Epson CD-ROM into the CD drive of your computer. Double-click the EPSON icon. 2. Make sure you close all other applications. When you see the following screen, click Continue. 3. Read the license agreement that appears and click Agree. 4. For the type of installation, select Local. 5. Select Custom. Network Printing for Macintosh 33
-
 1
1 -
2
-
3
-
4
-
5
-
6
-
7
-
8
-
9
-
10
-
11
-
12
-
13
-
14
-
15
-
16
-
17
-
18
-
19
-
20
-
21
-
22
-
23
-
24
-
25
-
26
-
27
-
 28
28 -
 29
29 -
 30
30 -
 31
31 -
 32
32 -
 33
33 -
 34
34 -
 35
35 -
 36
36 -
 37
37 -
 38
38 -
39
-
40
-
41
-
42
-
43
-
44
-
45
-
46
-
47
-
48
-
49
-
50
-
51
-
52
-
53
-
54
-
55
-
56
-
57
-
58
-
59
-
60
-
61
-
62
-
63
-
64
-
65
-
66
-
67
-
68
-
69
-
70
-
71
-
72
-
73
-
74
-
75
-
76
-
77
-
78
-
79
-
80
-
81
-
82
-
83
-
84
-
85
-
86
-
87
-
88
-
89
-
90
-
91
-
92
-
93
-
94
-
95
-
96
-
97
-
98
-
99
-
100
-
101
-
102
-
103
-
104
-
105
-
106
-
107
-
108
-
109
-
110
-
111
-
112
-
113
-
114
-
115
-
116
-
117
-
118
-
119
-
120
-
121
-
122
-
123
-
124
-
125
-
126
-
127
-
128
-
129
-
130
-
131
-
132
-
133
-
134
-
135
-
136
-
137
-
138
-
139
-
140
-
141
-
142
-
143
-
144
 |
 |