Epson AcuLaser CX11NF Basics - Page 57
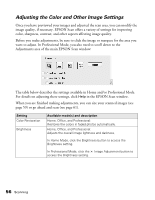
In Professional Mode, click the, Home, Office, and Professional
 |
View all Epson AcuLaser CX11NF manuals
Add to My Manuals
Save this manual to your list of manuals |
Page 57 highlights
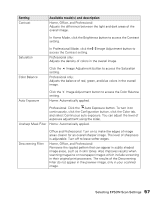
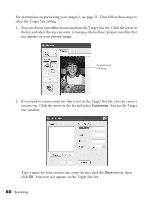
Setting Contrast Available mode(s) and description Home, Office, and Professional: Adjusts the difference between the light and dark areas of the overall image. In Home Mode, click the Brightness button to access the Contrast setting. Saturation In Professional Mode, click the Image Adjustment button to access the Contrast setting. Professional only: Adjusts the density of colors in the overall image. Color Balance Click the Image Adjustment button to access the Saturation setting. Professional only: Adjusts the balance of red, green, and blue colors in the overall image. Auto Exposure Click the Image Adjustment button to access the Color Balance setting. Home: Automatically applied. Professional: Click the Auto Exposure button. To turn it on continuously, click the Configuration button, click the Color tab, and select Continuous auto exposure. You can adjust the level of exposure adjustment using the slider. Unsharp Mask Filter Home: Automatically applied. Descreening Filter Office and Professional: Turn on to make the edges of image areas clearer for an overall sharper image. The level of sharpness is adjustable. Turn off to leave softer edges. Home, Office, and Professional: Removes the rippled pattern that can appear in subtly shaded image areas, such as in skin tones. Also improves results when scanning magazine or newspaper images which include screening in their original print processes. The results of the Descreening Filter do not appear in the preview image, only in your scanned image. Selecting EPSON Scan Settings 57
-
 1
1 -
2
-
3
-
4
-
5
-
6
-
7
-
8
-
9
-
10
-
11
-
12
-
13
-
14
-
15
-
16
-
17
-
18
-
19
-
20
-
21
-
22
-
23
-
24
-
25
-
26
-
27
-
28
-
29
-
30
-
31
-
32
-
33
-
34
-
35
-
36
-
37
-
38
-
39
-
40
-
41
-
42
-
43
-
44
-
45
-
46
-
47
-
48
-
49
-
50
-
51
-
 52
52 -
 53
53 -
 54
54 -
 55
55 -
 56
56 -
 57
57 -
 58
58 -
 59
59 -
 60
60 -
 61
61 -
 62
62 -
63
-
64
-
65
-
66
-
67
-
68
-
69
-
70
-
71
-
72
-
73
-
74
-
75
-
76
-
77
-
78
-
79
-
80
-
81
-
82
-
83
-
84
-
85
-
86
-
87
-
88
-
89
-
90
-
91
-
92
-
93
-
94
-
95
-
96
-
97
-
98
-
99
-
100
-
101
-
102
-
103
-
104
-
105
-
106
-
107
-
108
-
109
-
110
-
111
-
112
-
113
-
114
-
115
-
116
-
117
-
118
-
119
-
120
-
121
-
122
-
123
-
124
-
125
-
126
-
127
-
128
-
129
-
130
-
131
-
132
-
133
-
134
-
135
-
136
-
137
-
138
-
139
-
140
-
141
-
142
-
143
-
144
 |
 |