HP Visualize J5000 hp Visualize J5000, J7000 workstations owner's guide (a4476 - Page 155
Adding a, Hard Drive
 |
View all HP Visualize J5000 manuals
Add to My Manuals
Save this manual to your list of manuals |
Page 155 highlights
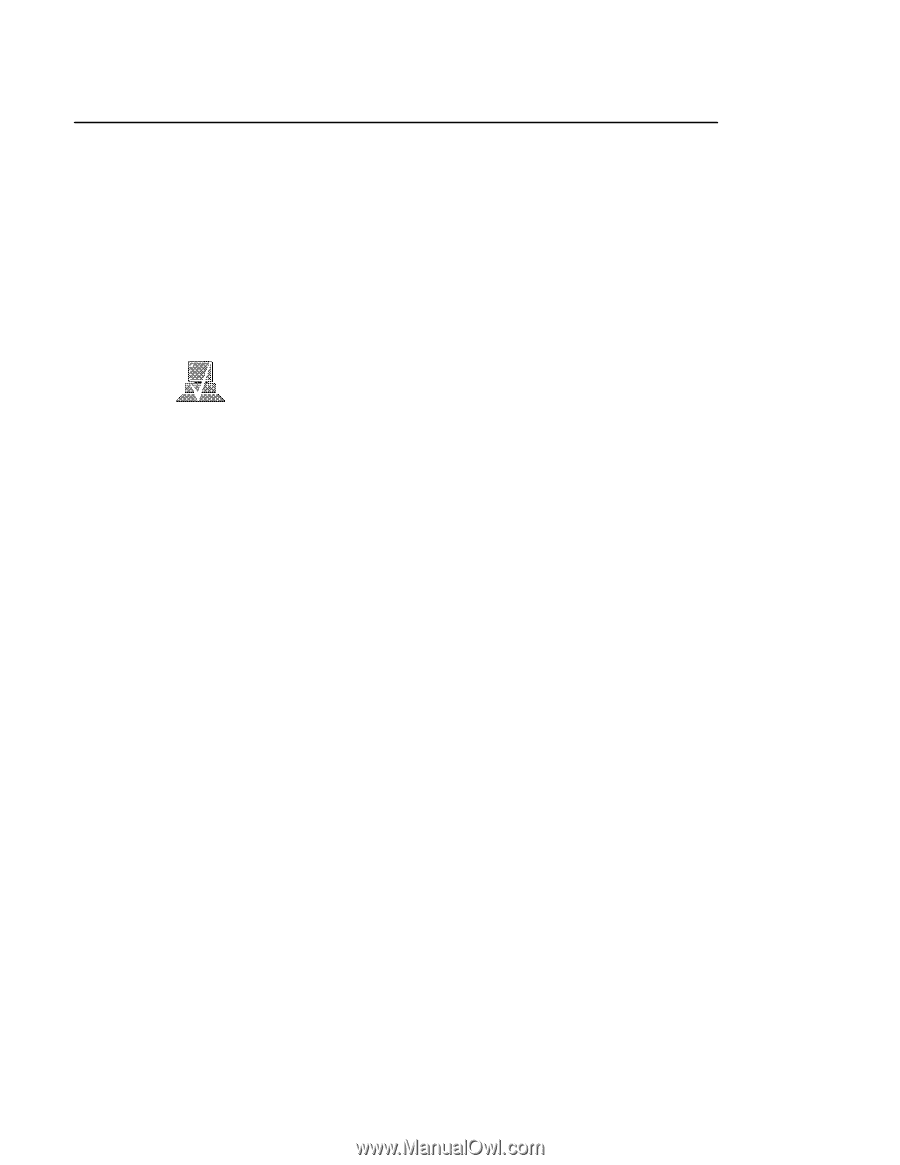
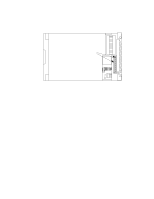
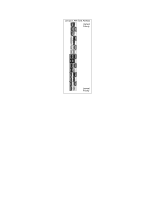
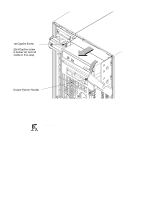
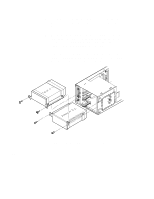
Adding a Hard Drive This section describes how to add a hard drive to your workstation. The first part deals with installing a hard drive and the second part tells you how to configure your hard disk after it is installed. Your workstation can have two hard drives. The hard drive that came with your workstation was set to SCSI ID 6. If you are adding a second hard disk, the second hard disk will use SCSI ID 5. If another device on your workstation is using SCSI ID 5, change the hard disk's SCSI ID to an unused SCSI ID. NOTICE: Do not use SCSI ID 7 for your hard drive's SCSI address. The host SCSI controller uses SCSI ID 7. If you are adding a second hard drive, we advise you not to use SCSI ID 6 which is normally reserved for the boot disk drive. Check the jumpers on the hard drive you plan to install. Figure A-15 shows the correct SCSI address for the jumpers on your drive. These jumpers are the only jumpers you may need to change on the drive. 1. Use a pair of small needle-nose pliers to set the SCSI ID jumpers to SCSI ID 5 if you are adding a second hard drive, or SCSI ID 6 if this is the first hard drive (you are running diskless). Check that the other jumpers are set correctly. 2. If you removed the disk drive mounting bracket from the disk drive, replace it now, making sure not to over-tighten the screws. Figure A-16 shows the orientation of the drive in the bracket for both drives and the position of the screws holding the drive bracket in place. Be sure the printed circuit side of one drive is facing the printed circuit side of the other drive. B-27
-
 1
1 -
2
-
3
-
4
-
5
-
6
-
7
-
8
-
9
-
10
-
11
-
12
-
13
-
14
-
15
-
16
-
17
-
18
-
19
-
20
-
21
-
22
-
23
-
24
-
25
-
26
-
27
-
28
-
29
-
30
-
31
-
32
-
33
-
34
-
35
-
36
-
37
-
38
-
39
-
40
-
41
-
42
-
43
-
44
-
45
-
46
-
47
-
48
-
49
-
50
-
51
-
52
-
53
-
54
-
55
-
56
-
57
-
58
-
59
-
60
-
61
-
62
-
63
-
64
-
65
-
66
-
67
-
68
-
69
-
70
-
71
-
72
-
73
-
74
-
75
-
76
-
77
-
78
-
79
-
80
-
81
-
82
-
83
-
84
-
85
-
86
-
87
-
88
-
89
-
90
-
91
-
92
-
93
-
94
-
95
-
96
-
97
-
98
-
99
-
100
-
101
-
102
-
103
-
104
-
105
-
106
-
107
-
108
-
109
-
110
-
111
-
112
-
113
-
114
-
115
-
116
-
117
-
118
-
119
-
120
-
121
-
122
-
123
-
124
-
125
-
126
-
127
-
128
-
129
-
130
-
131
-
132
-
133
-
134
-
135
-
136
-
137
-
138
-
139
-
140
-
141
-
142
-
143
-
144
-
145
-
146
-
147
-
148
-
149
-
 150
150 -
 151
151 -
 152
152 -
 153
153 -
 154
154 -
 155
155 -
 156
156 -
 157
157 -
 158
158 -
 159
159 -
 160
160 -
161
-
162
-
163
-
164
-
165
-
166
-
167
-
168
-
169
-
170
-
171
-
172
-
173
-
174
-
175
-
176
-
177
-
178
-
179
-
180
-
181
-
182
-
183
-
184
-
185
-
186
-
187
-
188
-
189
-
190
-
191
-
192
-
193
-
194
-
195
-
196
-
197
-
198
-
199
-
200
-
201
-
202
-
203
-
204
-
205
-
206
-
207
-
208
-
209
-
210
-
211
-
212
-
213
-
214
-
215
-
216
-
217
-
218
-
219
-
220
-
221
-
222
-
223
-
224
-
225
-
226
-
227
-
228
-
229
-
230
-
231
-
232
-
233
-
234
-
235
-
236
-
237
-
238
-
239
-
240
-
241
-
242
-
243
-
244
-
245
-
246
-
247
-
248
-
249
-
250
-
251
-
252
-
253
-
254
-
255
-
256
-
257
-
258
-
259
-
260
-
261
-
262
-
263
-
264
-
265
-
266
-
267
-
268
-
269
-
270
-
271
-
272
-
273
 |
 |