HP Visualize J5000 hp Visualize J5000, J7000 workstations owner's guide (a4476 - Page 158
Installing a Hard Disk Drive
 |
View all HP Visualize J5000 manuals
Add to My Manuals
Save this manual to your list of manuals |
Page 158 highlights
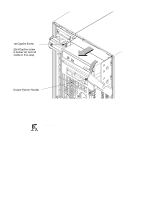
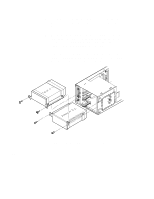
Installing a Hard Disk Drive Perform the following steps to install a hard disk drive. NOTICE: Before opening the system unit, follow the instructions in "Checking the SCSI IDs," earlier in this appendix, to determine the SCSI IDs currently in use on your workstation. 1. Open the system unit according to the directions in "Opening the System Unit," earlier in this appendix. 2. Unscrew the two captive screws on the left side of the Storage Assembly and pull down the drawer ejector handle on the right side of the Storage Assembly, as shown in Figure A-17. The Storage Assembly slides partway out of the drawer. B-30
-
 1
1 -
2
-
3
-
4
-
5
-
6
-
7
-
8
-
9
-
10
-
11
-
12
-
13
-
14
-
15
-
16
-
17
-
18
-
19
-
20
-
21
-
22
-
23
-
24
-
25
-
26
-
27
-
28
-
29
-
30
-
31
-
32
-
33
-
34
-
35
-
36
-
37
-
38
-
39
-
40
-
41
-
42
-
43
-
44
-
45
-
46
-
47
-
48
-
49
-
50
-
51
-
52
-
53
-
54
-
55
-
56
-
57
-
58
-
59
-
60
-
61
-
62
-
63
-
64
-
65
-
66
-
67
-
68
-
69
-
70
-
71
-
72
-
73
-
74
-
75
-
76
-
77
-
78
-
79
-
80
-
81
-
82
-
83
-
84
-
85
-
86
-
87
-
88
-
89
-
90
-
91
-
92
-
93
-
94
-
95
-
96
-
97
-
98
-
99
-
100
-
101
-
102
-
103
-
104
-
105
-
106
-
107
-
108
-
109
-
110
-
111
-
112
-
113
-
114
-
115
-
116
-
117
-
118
-
119
-
120
-
121
-
122
-
123
-
124
-
125
-
126
-
127
-
128
-
129
-
130
-
131
-
132
-
133
-
134
-
135
-
136
-
137
-
138
-
139
-
140
-
141
-
142
-
143
-
144
-
145
-
146
-
147
-
148
-
149
-
150
-
151
-
152
-
 153
153 -
 154
154 -
 155
155 -
 156
156 -
 157
157 -
 158
158 -
 159
159 -
 160
160 -
 161
161 -
 162
162 -
 163
163 -
164
-
165
-
166
-
167
-
168
-
169
-
170
-
171
-
172
-
173
-
174
-
175
-
176
-
177
-
178
-
179
-
180
-
181
-
182
-
183
-
184
-
185
-
186
-
187
-
188
-
189
-
190
-
191
-
192
-
193
-
194
-
195
-
196
-
197
-
198
-
199
-
200
-
201
-
202
-
203
-
204
-
205
-
206
-
207
-
208
-
209
-
210
-
211
-
212
-
213
-
214
-
215
-
216
-
217
-
218
-
219
-
220
-
221
-
222
-
223
-
224
-
225
-
226
-
227
-
228
-
229
-
230
-
231
-
232
-
233
-
234
-
235
-
236
-
237
-
238
-
239
-
240
-
241
-
242
-
243
-
244
-
245
-
246
-
247
-
248
-
249
-
250
-
251
-
252
-
253
-
254
-
255
-
256
-
257
-
258
-
259
-
260
-
261
-
262
-
263
-
264
-
265
-
266
-
267
-
268
-
269
-
270
-
271
-
272
-
273
 |
 |
B-30
Installing a Hard Disk Drive
Perform the following steps to install a hard disk drive.
NOTICE:
Before opening the system unit, follow the
instructions in “Checking the SCSI IDs,” earlier
in this appendix, to determine the SCSI IDs
currently in use on your workstation.
1.
Open the system unit according to the directions in “Opening the
System Unit,” earlier in this appendix.
2.
Unscrew the two captive screws on the left side of the Storage
Assembly and pull down the drawer ejector handle on the right
side of the Storage Assembly, as shown in Figure A–17.
The Storage Assembly slides partway out of the drawer.