HP Visualize J5000 hp Visualize J5000, J7000 workstations owner's guide (a4476 - Page 169
A-23., Installing Memory Cards
 |
View all HP Visualize J5000 manuals
Add to My Manuals
Save this manual to your list of manuals |
Page 169 highlights
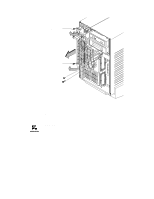
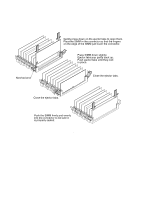
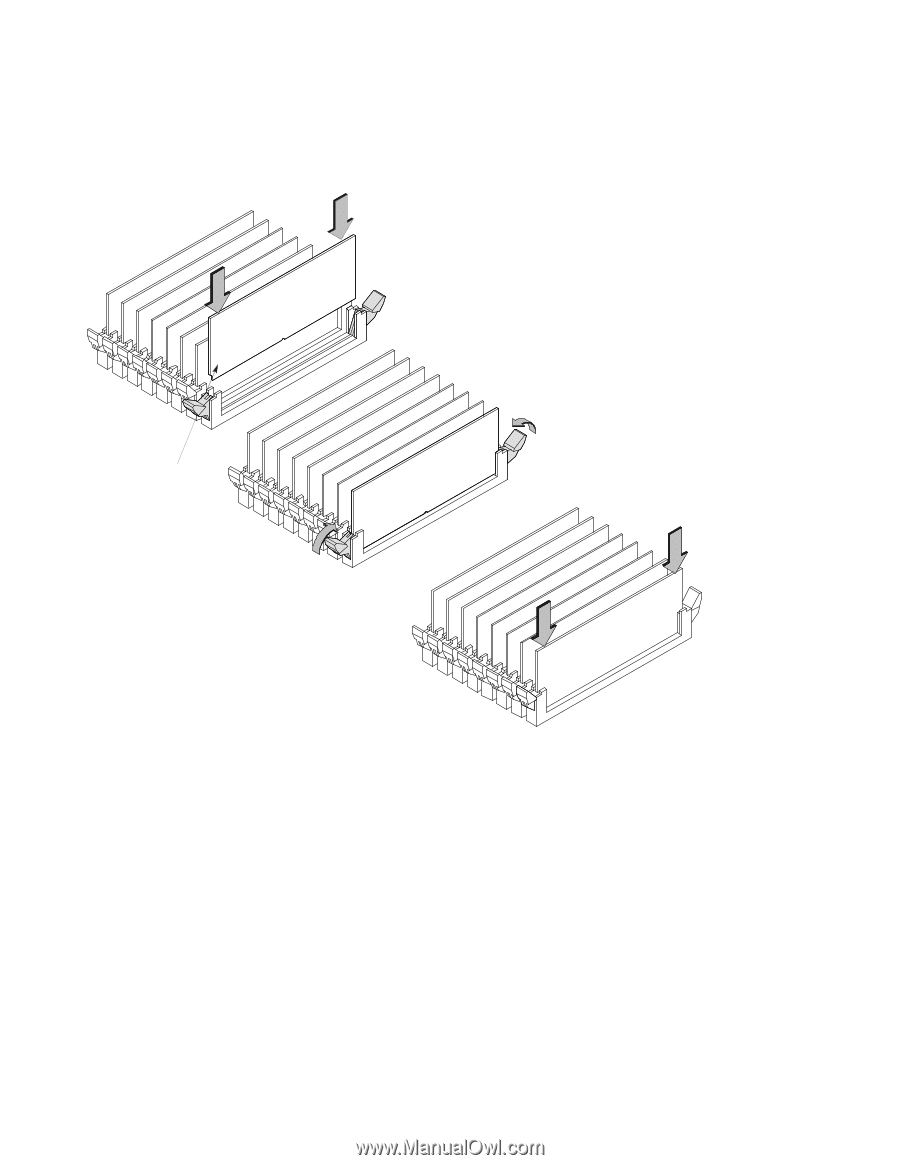
Notched end 10. Place the SIMM in the connector, lining it up with the guides. Make sure to put the notched end toward the ejector handle (to the left). Gently press down on the ejector tabs to open them. Place the SIMM in the connector so that the fingers on the edge of the SIMM just touch the connector. Press SIMM down slightly. Ejector tabs pop partly back up. Push ejector tabs until they lock in place. Close the ejector tabs. Close the ejector tabs. Push the SIMM firmly and evenly into the connector to be sure it is properly seated. Figure A-23. Installing Memory Cards 11. Close the ejector tab. B-41
-
 1
1 -
2
-
3
-
4
-
5
-
6
-
7
-
8
-
9
-
10
-
11
-
12
-
13
-
14
-
15
-
16
-
17
-
18
-
19
-
20
-
21
-
22
-
23
-
24
-
25
-
26
-
27
-
28
-
29
-
30
-
31
-
32
-
33
-
34
-
35
-
36
-
37
-
38
-
39
-
40
-
41
-
42
-
43
-
44
-
45
-
46
-
47
-
48
-
49
-
50
-
51
-
52
-
53
-
54
-
55
-
56
-
57
-
58
-
59
-
60
-
61
-
62
-
63
-
64
-
65
-
66
-
67
-
68
-
69
-
70
-
71
-
72
-
73
-
74
-
75
-
76
-
77
-
78
-
79
-
80
-
81
-
82
-
83
-
84
-
85
-
86
-
87
-
88
-
89
-
90
-
91
-
92
-
93
-
94
-
95
-
96
-
97
-
98
-
99
-
100
-
101
-
102
-
103
-
104
-
105
-
106
-
107
-
108
-
109
-
110
-
111
-
112
-
113
-
114
-
115
-
116
-
117
-
118
-
119
-
120
-
121
-
122
-
123
-
124
-
125
-
126
-
127
-
128
-
129
-
130
-
131
-
132
-
133
-
134
-
135
-
136
-
137
-
138
-
139
-
140
-
141
-
142
-
143
-
144
-
145
-
146
-
147
-
148
-
149
-
150
-
151
-
152
-
153
-
154
-
155
-
156
-
157
-
158
-
159
-
160
-
161
-
162
-
163
-
 164
164 -
 165
165 -
 166
166 -
 167
167 -
 168
168 -
 169
169 -
 170
170 -
 171
171 -
 172
172 -
 173
173 -
 174
174 -
175
-
176
-
177
-
178
-
179
-
180
-
181
-
182
-
183
-
184
-
185
-
186
-
187
-
188
-
189
-
190
-
191
-
192
-
193
-
194
-
195
-
196
-
197
-
198
-
199
-
200
-
201
-
202
-
203
-
204
-
205
-
206
-
207
-
208
-
209
-
210
-
211
-
212
-
213
-
214
-
215
-
216
-
217
-
218
-
219
-
220
-
221
-
222
-
223
-
224
-
225
-
226
-
227
-
228
-
229
-
230
-
231
-
232
-
233
-
234
-
235
-
236
-
237
-
238
-
239
-
240
-
241
-
242
-
243
-
244
-
245
-
246
-
247
-
248
-
249
-
250
-
251
-
252
-
253
-
254
-
255
-
256
-
257
-
258
-
259
-
260
-
261
-
262
-
263
-
264
-
265
-
266
-
267
-
268
-
269
-
270
-
271
-
272
-
273
 |
 |
B-41
10.
Place the SIMM in the connector, lining it up with the guides.
Make sure to put the notched end toward the ejector handle (to
the left).
Gently press down on the ejector tabs to open them.
Press SIMM down slightly.
Push the SIMM firmly and evenly
Ejector tabs pop partly back up.
Push ejector tabs until they lock
Notched end
the SIMM in the connector so that the fingers
on the edge of the SIMM just touch the connector.
Close the ejector tabs.
into the connector to be sure it
is properly seated.
in place.
Close the ejector tabs.
Place
Figure A–23.
Installing Memory Cards
11.
Close the ejector tab.