HP t310 PCoIP Administrator's Guide
HP t310 Manual
 |
View all HP t310 manuals
Add to My Manuals
Save this manual to your list of manuals |
HP t310 manual content summary:
- HP t310 | PCoIP Administrator's Guide - Page 1
PCoIP Administrator's Guide TER0606004 Issue 16 - HP t310 | PCoIP Administrator's Guide - Page 2
PCoIP Administrator's Guide Teradici Corporation #101-4621 Canada Way, Burnaby, BC V5G 4X8 Canada p +1 604 451 5800 f +1 604 451 5818 www.teradici.com The information contained in this document represents the current view laws is the responsibility of the user. Without limiting the rights under - HP t310 | PCoIP Administrator's Guide - Page 3
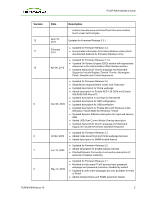
PCoIP Administrator's Guide Revision History Version 16 Date Description May 18, 2012 Updated for Firmware Release 4.0.0 l Security enhancement when connecting to VMware View Connection server: New VCS Certificate Check Mode options allow users to configure the client to reject, warn, or allow - HP t310 | PCoIP Administrator's Guide - Page 4
disconnects l New hotkey to reset zero client to factory default configuration l New Session Connection Type field l New Pipeline Processing Rate field September 16, 2011 Updated for Firmware Release 3.4.1 l Support for .Net cards June 8, 2011 Updated for Firmware Release 3.4.0 l New banner at - HP t310 | PCoIP Administrator's Guide - Page 5
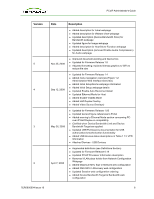
l Updated Appendix B: Client Language and Keyboard Support to include the Korean dubeolsik keyboard Oct 22, 2009 l Updated for Firmware Release l Updated for Firmware Release 2.1 l Modified to note some PCoIP devices have password webpage and password protection disabled by default l Updated to - HP t310 | PCoIP Administrator's Guide - Page 6
PCoIP Administrator's Guide Version 5 4 3 2 Date Description l Added description for Label webpage l Added description for VMware View webpage l Updated description (Device Bandwidth Floor) for Bandwidth webpage l Updated figure for Image webpage l Added description for Host Driver Function - HP t310 | PCoIP Administrator's Guide - Page 7
OSD information l Clarified Bandwidth and Image Configuration Example l Removed TERA1x00 Firmware Defaults appendix to enhance in separate Application Note l Updated for Firmware Release 0.20 l Added Bandwidth Statistics l Updated RDP compatibility information Initial release TER0606004 Issue 16 7 - HP t310 | PCoIP Administrator's Guide - Page 8
Supported Setup Page 4.2 Configuring the Network Settings 4.3 Configuring the IPv6 Settings for a Device 4.4 Adding Custom Information for the Device 4.5 Configuring the Discovery Mechanism 4.6 Configuring the SNMP Agent 4.7 Configuring the Session TER0606004 Issue 16 PCoIP Administrator's Guide - HP t310 | PCoIP Administrator's Guide - Page 9
the User Interface Language 86 4.10 Configuring the OSD Screen-saver Timeout 88 4.11 Adjusting the Image Quality 89 4.12 Enabling the Host Driver Function 94 4.13 Configuring the NTP Parameters 95 4.14 Updating the Password for a Device 96 4.15 Resetting the Parameters to Factory Default - HP t310 | PCoIP Administrator's Guide - Page 10
Guide 8.1.1 Firmware Upload Process Example: 128 8.2 Uploading a Logo to the Device 129 8.2.1 OSD Logo Upload Process Example 130 8.3 Uploading the Certificate 130 8.3.1 Uploading Certificates for 802.1X Authentication 131 9 Configuring the User Settings 132 9.1 Configuring VMware View - HP t310 | PCoIP Administrator's Guide - Page 11
PCoIP Administrator's Guide A.2 DHCP and Enable Host Discovery Example 154 A.2.1 Configuring the Client for DHCP and SLP Discovery 154 Appendix B: Client Language and Keyboard Support 161 B.1 Languages Supported by the Client 161 B.2 Keyboard Layouts Supported by the Client 161 TER0606004 - HP t310 | PCoIP Administrator's Guide - Page 12
PCoIP Administrator's Guide Table of Figures Figure 2-1: Administrative Web Interface Home Page (Host) 26 Figure 2-2: Administrative Web Interface Log In Page 28 Figure 2-3: Administrative Web Interface Home Page (Host) 29 Figure 2-4: Administrative Web Interface Home Page (Client) 30 - HP t310 | PCoIP Administrator's Guide - Page 13
Web Interface Time Page 95 Figure 4-47: Administrative Web Interface Change Password Page 96 Figure 4-48: OSD Change Password Page 97 Figure 4-49: Administrative Web Interface Reset Page (Client) 98 Figure 4-50: OSD Reset Page 98 Figure 4-51: OSD Display Page 100 Figure 4-52 - HP t310 | PCoIP Administrator's Guide - Page 14
PCoIP Administrator's Guide Figure 6-1: Client) 126 Figure 8-1: Administrative Web Interface Firmware Page 128 Figure 8-2: Administrative Web Interface OSD Logo Upload Page (Client) 129 Figure 8-3: Administrative Web Interface Certificate Upload Page 130 Figure 9-1: VMware View - HP t310 | PCoIP Administrator's Guide - Page 15
PCoIP Administrator's Guide Figure 11-2: Select Certificate Prompt 149 Figure 11-3: Certificate Details Window 149 Figure 11-4: Smart Card Holder Verification Window 150 Figure 12-1: Peer-to-Peer Connect Screen 153 Figure 12-2: Client Network Page DHCP Configuration 156 Figure 12-3: Host - HP t310 | PCoIP Administrator's Guide - Page 16
PCoIP Administrator's Guide Table of Tables Table 1-1: Configuration Menu 22 Table 1-2: Permissions Menu 22 Table 1-3: Diagnostics Menu 23 Table 1-4: Info Menu 23 Table 1-5: Upload Menu 23 Table 1-6: User Settings Menu 24 Table 2-1: Home Page Statistics 30 Table 4-1: Audio Parameters - HP t310 | PCoIP Administrator's Guide - Page 17
PCoIP Administrator's Guide Table 5-3: Audio Page Parameters 107 Table 5-4: Power Page Parameter 108 Table 6-1: Event Firmware Page Parameters 128 Table 8-2: OSD Logo Page Parameters 129 Table 8-3: Administrative Web Interface Certificate Upload Page Parameters 130 Table 9-1: VMware View - HP t310 | PCoIP Administrator's Guide - Page 18
PCoIP Administrator's Guide Definitions Definition CA CMI CMS DDC DHCP DNS DNS SRV EDID FQDN GPU GUI HPDET MC MIB MTU NTP OS OSD PC-over-IP® PCoIP® PCoIP Zero Client Description Certificate Authorities Connection Management Interface - interface provided by the host or client, used to communicate - HP t310 | PCoIP Administrator's Guide - Page 19
PCoIP Administrator's Guide Definition PCoIP Host RDP SLAAC SLP SNMP SSL TERA1100 TERA1200 VPD VPN Zero client Description Host side of PC-over-IP system Remote Desktop Protocol Note: RDP is not supported in firmware releases after 3.2.2 Stateless Address Auto-configuration Service Location - HP t310 | PCoIP Administrator's Guide - Page 20
Web Interface. Note: This guide describes the interface for PCoIP protocol devices such as PCoIP zero clients and PCoIP host cards. This document does not describe the Administrative Web Interface for PCoIP software integrated into products such as VMware View®. The configuration features are also - HP t310 | PCoIP Administrator's Guide - Page 21
PCoIP Administrator's Guide Title Description Section Tools available from the Diagnostic menu. These options help you troubleshoot the device by letting you view device statistics, generate test tones and patterns, reset the device, ping the device, and so on. Viewing Device Information This - HP t310 | PCoIP Administrator's Guide - Page 22
PCoIP Administrator's Guide Table 1-1: Configuration Menu Page Name Initial Setup Network IPv6 Label Discovery SNMP Session Bandwidth Language OSD Image Note: In the OSD, this page is available from the Options->User Settings menu Host Driver Function Time Display Password Reset Parameters Monitor - HP t310 | PCoIP Administrator's Guide - Page 23
Attached Devices Table 1-5: Upload Menu Page Name Firmware OSD Logo Certificate TER0606004 Issue 16 PCoIP Administrator's Guide Administrative Web Interface (AWI), OSD, or Both Client, Host, or Both Section AWI Both 5.2 AWI Client 5.3 Administrative Web Interface (AWI), OSD, or Both - HP t310 | PCoIP Administrator's Guide - Page 24
Table 1-6: User Settings Menu Page Name VMware View Mouse Keyboard Image Display Topology Touch Screen PCoIP Administrator's Guide Administrative Web Interface (AWI), OSD, or Both Client, Host, or Both Section OSD Client 9.1 OSD Client 9.2 OSD Client 9.3 OSD Client 4.11 OSD Client - HP t310 | PCoIP Administrator's Guide - Page 25
out and end your Administrative Web Interface. PCoIP endpoint: Displays PCoIP endpoint information: l PCoIP® host card l PCoIP® zero client Home button: Click to navigate to the the edited parameters in flash. l Cancel: Reset the edited parameters to the values currently stored in flash. TER0606004 - HP t310 | PCoIP Administrator's Guide - Page 26
PCoIP Administrator's Guide Figure 2-1: Administrative Web Interface Home Page (Host) 2.2 Supported Web Browsers The webpage servers on the host and client are compatible with the following web browsers: l Firefox 8.0 or earlier l Internet Explorer 6.0, 7.0, 8.0 Note: Other browsers may also be - HP t310 | PCoIP Administrator's Guide - Page 27
or Mozilla Firefox browser to avoid browser security warnings. The certificate file ("cacert.pem") is part of the firmware release. You can also download this file directly from the Teradici support site. For detailed instructions on how to install the CA root certificate, see Knowledge Base - HP t310 | PCoIP Administrator's Guide - Page 28
the device status. If configured in the firmware defaults, the Initial Setup page appears the first time you log in. Note: Some PCoIP devices have password protection disabled by default. You do not need a password to login. You can enable or disable password protection for the Log In page using the - HP t310 | PCoIP Administrator's Guide - Page 29
PCoIP Administrator's Guide Figure 2-3: Administrative Web Interface Home Page (Host) TER0606004 Issue 16 29 - HP t310 | PCoIP Administrator's Guide - Page 30
Boot Length of time that the PCoIP processor has been running. See section 6.3 PCoIP Device Name The logical name for the device. This field is the name the host or client registers with the DNS server if: l DHCP is enabled l the system is configured to support registering the hostname with the - HP t310 | PCoIP Administrator's Guide - Page 31
PCoIP Administrator's Guide Statistics Description For Further Details Connection State Possible states: Disconnected, Connection Pending, Connected. Click the hyperlinked IP address to access the Administrative Web Interfaces for the peer of the host or client. See section 6.3 802.1X - HP t310 | PCoIP Administrator's Guide - Page 32
PCoIP Administrator's Guide Statistics user is doing (such as cursor movement, email editing, or streaming video). Note: This option is only available on the host. It does not appear on the client you set up the client permissions for the USB, audio, and power. See section 5. TER0606004 Issue 16 32 - HP t310 | PCoIP Administrator's Guide - Page 33
PCoIP Administrator's Guide Diagnostics: The pages off this menu help you troubleshoot the device. See section 6. Info: The pages off this menu let you view firmware information and the devices currently attached to the device. See section 7. Upload: The pages off this menu let you upload a new - HP t310 | PCoIP Administrator's Guide - Page 34
PCoIP Administrator's Guide 2.7.2 Viewing the Permissions Menu The Permissions menu contains links to pages that define the range of functionality exposed to the user. For details on each of the Permissions options, see section 5. 2.7.3 Viewing the Diagnostics Menu The Diagnostics menu contains - HP t310 | PCoIP Administrator's Guide - Page 35
PCoIP Administrator's Guide 3 Working with the On Screen Display (OSD) The On Screen Display (OSD) local GUI appears on the client when the device is powered on and a PCoIP session is not in progress. The OSD lets the user connect to a host device through the Connect window. The Connect window lets - HP t310 | PCoIP Administrator's Guide - Page 36
lets you view certain details about the device. For details, see section 7. User Settings: This option lets the user define mouse and keyboard settings, as well as the PCoIP protocol image quality. For details, see section 5. Password: This option lets you update the administrative password for the - HP t310 | PCoIP Administrator's Guide - Page 37
time for new users to establish a session between a PCoIP zero client and PCoIP host card in a remote workstation. More complex environments that use host discovery or connection management systems require further configuration. If configured in the firmware defaults, the Initial Setup page appears - HP t310 | PCoIP Administrator's Guide - Page 38
PCoIP Administrator's Guide Figure 4-1: Initial Setup Page (Host) TER0606004 Issue 16 38 - HP t310 | PCoIP Administrator's Guide - Page 39
PCoIP Administrator's Guide Figure 4-2: Initial Setup Page (Client) Table 4-1: Audio Parameters For details on configuring the full set of Audio parameters, see section 5.2. Parameter Description Enable HD Audio Enables audio support on the host or client. Enable Microsoft® Windows Vista® 64- - HP t310 | PCoIP Administrator's Guide - Page 40
PCoIP Administrator's Guide Parameter Description Follow the onscreen instructions if you have Windows Vista or Windows 7 installed on the device. Note: This option is only available on the host. It does not appear on the client. Table 4-2: Network Parameters For details on configuring the full - HP t310 | PCoIP Administrator's Guide - Page 41
PCoIP Administrator's Guide Note: When Host Discovery or connection management is configured on the client, you cannot modify the client session parameters. A message appears on the Initial Setup Client and client network settings from the Initial Setup page or Network page. After you update the - HP t310 | PCoIP Administrator's Guide - Page 42
an IP address, subnet mask, gateway IP address, and DNS servers. The firmware requests a domain name (option 15), host name (option 12), and client FQDN (option 81). When disabled: You must set these parameters manually. IP Address The device's IP address. If DHCP is disabled, you must set - HP t310 | PCoIP Administrator's Guide - Page 43
PCoIP Administrator's Guide operating at half-duplex (which is not supported by the PCoIP protocol). The session will be severely degraded client. The Maximum MTU Size range is 600 to 1500 bytes for all firmware versions. Note: The default MTU is 1400 for sessions between PCoIP zero clients and PCoIP - HP t310 | PCoIP Administrator's Guide - Page 44
PCoIP Administrator's Guide Parameter Description The default MTU is 1300 for sessions with PCoIP software (in the host or client) such as VMware View. Enable 802.1X Security Enable this field for each of your hosts and zero clients if your network uses 802.1X security. If enabled, configure - HP t310 | PCoIP Administrator's Guide - Page 45
PCoIP Administrator's Guide Figure 4-5: Administrative Web Interface IPv6 Page TER0606004 Issue 16 45 - HP t310 | PCoIP Administrator's Guide - Page 46
PCoIP Administrator's Guide Figure 4-6: OSD IPv6 Page Table 4-6: IPv6 Page Parameters Note: When you make a change to one of the settings on this page, you must reboot your device for the change to take effect. Parameter Description Enable IPv6 Enable this field to enable IPv6 for your PCoIP - HP t310 | PCoIP Administrator's Guide - Page 47
PCoIP Administrator's Guide Parameter Description Domain Name The domain name used (for example, 'domain.local') for the host or client. If DHCPv6 is enabled, this field is automatically populated by the DHCPv6 server. FQDN The fully qualified domain name for the host or client. If DHCPv6 is - HP t310 | PCoIP Administrator's Guide - Page 48
you give the host or client a logical name. The default is pcoiphost- or pcoip-portal- where is the device's MAC address. This field is the name the host or client registers with the DNS server if DHCP is enabled and the system is configured to support registering the hostname with - HP t310 | PCoIP Administrator's Guide - Page 49
PCoIP Administrator's Guide 4.5 Configuring the Discovery Mechanism Use the settings on the Discovery Configuration page to ease the discovery of hosts and clients in your PCoIP system and dramatically reduce the configuration and maintenance effort for complex systems. This discovery mechanism is - HP t310 | PCoIP Administrator's Guide - Page 50
PCoIP Administrator's Guide Figure 4-10: OSD Discovery Page Table 4-8: Discovery Page Parameters Parameters Description Enable SLP Discovery When enabled, the hosts and clients can be dynamically discovered by SLP management entities without requiring prior knowledge of their locations in the - HP t310 | PCoIP Administrator's Guide - Page 51
the SNMP Agent The SNMP page lets you enable or disable the host or client SNMP agent. Note: For more information on using the PCoIP SNMP Agent, see Using SNMP with a PCoIP Device User Guide (TER0805002). Figure 4-11: Administrative Web Interface SNMP Agent Page Table 4-9: SNMP Agent Page - HP t310 | PCoIP Administrator's Guide - Page 52
PCoIP Administrator's Guide Direct from Client Direct to Host Direct to Host + SLP Host Discovery View Connection Server View Connection Server + Auto-Logon View Connection Server + Kiosk View Connection Server + Imprivata OneSign Connection Management Interface Host Client Client Client Client - HP t310 | PCoIP Administrator's Guide - Page 53
PCoIP Administrator's Guide 4.7.1 Configuring a Direct Session When you select a direct session connection type from the Session page, specific configuration options appear. Note: The parameters on this page are different for the host and client. If a host is configured to accept any peer, some of - HP t310 | PCoIP Administrator's Guide - Page 54
PCoIP Administrator's Guide Figure 4-16: OSD Session Connection Type - Direct to Host Figure 4-17: OSD Session Connection Type - Direct to Host (Advanced Settings) TER0606004 Issue 16 54 - HP t310 | PCoIP Administrator's Guide - Page 55
is connected to a different network from the zero client. Note: l The feature only works with hardware hosts. (It does not work with software hosts as they cannot be put into a low-power state.) l The hardware host must be able to support waking from low power state (off/hibernate/sleep) when it - HP t310 | PCoIP Administrator's Guide - Page 56
client. By default, PCoIP Zero Clients with VMware View for more information.) Note: The enabled encryption mode must match between the host and client for a session to be established. If both modes are enabled, the firmware selects: l Host to client: AES-128-GCM for the PCoIP session l VMware View - HP t310 | PCoIP Administrator's Guide - Page 57
Parameters TER0606004 Issue 16 PCoIP Administrator's Guide Description l You have been disconnected because an administrator disconnected you. l You have been disconnected because you logged in from another location. l You have been disconnected - HP t310 | PCoIP Administrator's Guide - Page 58
PCoIP Administrator's Guide Parameters Description 4. Show None - Don't show any disconnect messages. Note: This setting is only available for the client. 4.7.2 Configuring a Direct Session with SLP Host Discovery If you are connecting a client to a host using SLP discovery, select the Direct to - HP t310 | PCoIP Administrator's Guide - Page 59
PCoIP Administrator's Guide Figure 4-19: OSD Session Connection Type - Direct to Host with SLP Host Discovery Figure 4-20: OSD Session Connection Type - Direct to Host with SLP Host Discovery TER0606004 Issue 16 59 - HP t310 | PCoIP Administrator's Guide - Page 60
Using PCoIP Zero Clients with VMware View for more information.) Note: The enabled encryption mode must match between the host and client for a session to be established. If both modes are enabled, the firmware selects: l Host to client: AES-128-GCM for the PCoIP session l VMware View 4.5 and - HP t310 | PCoIP Administrator's Guide - Page 61
PCoIP Administrator's Guide Parameters Disconnect Message Filter Description This field lets you control what type of messages appear when a session is disconnected. There are three categories: Information: User or administrator initiated actions affecting the session. l You have been disconnected - HP t310 | PCoIP Administrator's Guide - Page 62
PCoIP Administrator's Guide Parameters Description 2. Show Error and Warnings Only - This option hides VMware View Connection The Session page lets you configure your client for use with a VMware View Connection server. When you select View Connection Server as the Session Connection Type, specific - HP t310 | PCoIP Administrator's Guide - Page 63
PCoIP Administrator's Guide Figure 4-22: OSD Session Connection Type - View Connection Server Figure 4-23: OSD Session Connection Type - View Connection Server (Advanced Settings) TER0606004 Issue 16 63 - HP t310 | PCoIP Administrator's Guide - Page 64
PCoIP Administrator's Guide Table 4-12: VMware View Page Parameters Parameter Description DNS Name or IP Address Enter the VMware View Connection server's DNS name or IP address. Desktop Name to Select Enter the pool/desktop name used by a zero client when starting a session. Note: This - HP t310 | PCoIP Administrator's Guide - Page 65
for View Banner When enabled, the PCoIP zero client OSD logo appears during login in place of the VMware View banner. You can upload a custom OSD logo via the Administrative Web Interface. Prefer GSC-IS When selected, the GSC-IS interface is used if a smart card supports more than one interface - HP t310 | PCoIP Administrator's Guide - Page 66
Using PCoIP Zero Clients with VMware View for more information.) Note: The enabled encryption mode must match between the host and client for a session to be established. If both modes are enabled, the firmware selects: l Host to client: AES-128-GCM for the PCoIP session l VMware View 4.5 and - HP t310 | PCoIP Administrator's Guide - Page 67
PCoIP Administrator's Guide Parameter Description l You have been disconnected due to a configuration self-help link for users that appears on the Connect window. Configuring the logon details ensures that user is automatically logged into the virtual machine when the user clicks the self-help - HP t310 | PCoIP Administrator's Guide - Page 68
want to appear as hyperlinked text on the Connect window. Configuring the VMware View Connection with Auto- Logon You can set up the client so that the user does not need to enter a username or password to start a VMware View session (that is, the usual login details are automatically entered for - HP t310 | PCoIP Administrator's Guide - Page 69
PCoIP Administrator's Guide Figure 4-25: AWI View Connection Server with Auto-Logon TER0606004 Issue 16 69 - HP t310 | PCoIP Administrator's Guide - Page 70
PCoIP Administrator's Guide Figure 4-26: OSD View Connection Server with Auto-Logon Table 4-13: View Connection Server + Auto-Logon Parameters Parameter Description Logon Username Enter the username for the client. Logon Password Enter the password. Logon Domain Name Enter the domain name. - HP t310 | PCoIP Administrator's Guide - Page 71
PCoIP Administrator's Guide Figure 4-27: AWI Session Connection Type View Connection Server + Kiosk TER0606004 Issue 16 71 - HP t310 | PCoIP Administrator's Guide - Page 72
PCoIP Administrator's Guide Figure 4-28: OSD View Connection Server + Kiosk Advanced Options Figure 4-29: OSD View Connection Server + Kiosk (Advanced Settings) TER0606004 Issue 16 72 - HP t310 | PCoIP Administrator's Guide - Page 73
Enter the username for the zero client. This username has the prefix "Custom". Password To password protect the virtual machine for the kiosk, enter a password in this field. This password must match the one entered for the device in the View Connection Server. By default this field is blank, and - HP t310 | PCoIP Administrator's Guide - Page 74
Using PCoIP Zero Clients with VMware View for more information.) Note: The enabled encryption mode must match between the host and client for a session to be established. If both modes are enabled, the firmware selects: l Host to client: AES-128-GCM for the PCoIP session l VMware View 4.5 and - HP t310 | PCoIP Administrator's Guide - Page 75
Parameters PCoIP Administrator's Guide Description another location. l You have been disconnected because you disconnected from your workstation. Warning: System-initiated, but expected actions affecting the session. This occurs when a - HP t310 | PCoIP Administrator's Guide - Page 76
PCoIP Administrator's Guide 4.7.5 Configuring a View Connection Server + Imprivata OneSign Connection If you want the zero client to authenticate through the Imprivata OneSign system, configure the View Connection Server + Imprivata OneSign option as the Session Connection Type on the Session page - HP t310 | PCoIP Administrator's Guide - Page 77
PCoIP Administrator's Guide Figure 4-31: OSD Session Connection Type - View Connection Server + Imprivata OneSign Figure 4-32: OSD View Connection Server + Imprivata OneSign (Advanced Settings) TER0606004 Issue 16 77 - HP t310 | PCoIP Administrator's Guide - Page 78
also appears in the case of a virtual desktop such as VMware View. Normal hypervisor scheduling delays can falsely trigger this message. This option is disabled by default. Note: This option is only available for a zero client. Desktop applications that require the peer loss notification should re - HP t310 | PCoIP Administrator's Guide - Page 79
Using PCoIP Zero Clients with VMware View for more information.) Note: The enabled encryption mode must match between the host and client for a session to be established. If both modes are enabled, the firmware selects: l Host to client: AES-128-GCM for the PCoIP session l VMware View 4.5 and - HP t310 | PCoIP Administrator's Guide - Page 80
PCoIP Administrator's Guide Parameter Description The following are Error messages: l You have been disconnected. l Unable to connect ( specify the IP address of the connection manager that is not VMware View. In a managed connection, an external connection manager server: TER0606004 Issue 16 80 - HP t310 | PCoIP Administrator's Guide - Page 81
PCoIP Administrator's Guide l communicates with and can remotely control and configure the device. l can locate an appropriate peer for the device to connect to and initiate the connection. l - HP t310 | PCoIP Administrator's Guide - Page 82
PCoIP Administrator's Guide Figure 4-34: OSD Session Page - Connection Management Interface Figure 4-35: OSD Session Page - Connection Management Interface (Advanced Settings) TER0606004 Issue 16 82 - HP t310 | PCoIP Administrator's Guide - Page 83
Using PCoIP Zero Clients with VMware View for more information.) Note: The enabled encryption mode must match between the host and client for a session to be established. If both modes are enabled, the firmware selects: l Host to client: AES-128-GCM for the PCoIP session l VMware View 4.5 and - HP t310 | PCoIP Administrator's Guide - Page 84
Parameter Filter TER0606004 Issue 16 PCoIP Administrator's Guide Description session is disconnected. There are three categories: Information: User or administrator initiated actions affecting the session. l You have been disconnected because you logged in from another location or your host was - HP t310 | PCoIP Administrator's Guide - Page 85
PCoIP Administrator's Guide PCoIP zero clients and PCoIP host cards in a remote workstation. The parameters in this page are applied after you click Apply. To configure the bandwidth used with a VMware View virtual desktop, adjust the PCoIP GPO session variables. See VMware View 4 to PCoIP Client - HP t310 | PCoIP Administrator's Guide - Page 86
to a non-zero value. Note: The firmware implements a Slow WAN) After initiating a PCoIP session, users may temporarily notice low User Interface Language The Language page lets you change the user interface language. Note: This setting affects the local OSD GUI. It is only available on the client - HP t310 | PCoIP Administrator's Guide - Page 87
PCoIP Administrator's Guide Figure 4-37: Administrative Web Interface Language Page Figure 4-38: OSD Language Page Table 4-18: Language Page Parameters For a list of supported languages and keyboard layouts, see section Appendix B. Parameters Description Language Configure the OSD language. - HP t310 | PCoIP Administrator's Guide - Page 88
PCoIP Administrator's Guide Parameters Keyboard Layout Description Change the layout of the keyboard. When the user starts a session, this setting is pushed to the virtual machine. If the PCoIP "Use Enhanced Keyboard on Windows Client if available" GPO is set to allow the keyboard layout setting, - HP t310 | PCoIP Administrator's Guide - Page 89
session. This applies to sessions between PCoIP zero clients and PCoIP host cards in a remote workstation. To configure the image quality settings for a VMware View virtual desktop, adjust the PCoIP session variables. See VMware View 4 to PCoIP Client WAN Network Guidelines for more information - HP t310 | PCoIP Administrator's Guide - Page 90
PCoIP Administrator's Guide Figure 4-41: Administrative Web Interface Image Page (Host) Note: When the Use Client Image Settings field is not selected, the text boxes on this page are replaced with sliders, as shown below. Figure 4-42: Administrative Web Interface Image - HP t310 | PCoIP Administrator's Guide - Page 91
PCoIP Administrator's Guide Figure 4-43: Administrative Web Interface Image Page (Client) TER0606004 Issue 16 91 - HP t310 | PCoIP Administrator's Guide - Page 92
PCoIP Administrator's Guide Figure 4-44: OSD Image Page Note: In the OSD, this page is available from the Options->User Settings menu. Table 4-20: Image Page Parameters For more details about adjusting the image quality, see section 9.5. Parameter Description Use Client Image Settings This - HP t310 | PCoIP Administrator's Guide - Page 93
PCoIP Host Software is installed. The slider appears in the host software's Image tab. This setting does not work in PCoIP sessions with VMware View default (recommended) setting. Warning: Activating the Disable build-to-lossless feature will degrade the image presented to the user by the zero client - HP t310 | PCoIP Administrator's Guide - Page 94
Support. Note: There is no Disable Build to Lossless setting on the OSD as it is an administrator-only parameter. This setting does not work in PCoIP sessions with VMware View and client network parameters view l Session statistics view l Update of the host topology settings with the client settings - HP t310 | PCoIP Administrator's Guide - Page 95
will override any manually configured NTP server. It will also enable NTP if it is disabled. Note: The zero client does not get time zone or Daylight Saving Time (DST) information from the NTP server. Note: To simplify system troubleshooting, set the NTP parameters to allow user events to correlate - HP t310 | PCoIP Administrator's Guide - Page 96
disabled by default. The Password page is not available on these devices. You can enable password protection through the PCoIP Management Console for these devices. Note: This parameter affects the Administrative Web Interface and the local OSD GUI. Take care when updating the client password as the - HP t310 | PCoIP Administrator's Guide - Page 97
. Note: Contact the client vendor for more information when an authorized password reset is required. This option is not available through the Administrative Web Interface. It is only available through the OSD. 4.15 Resetting the Parameters to Factory Default Values The Reset Parameters page lets - HP t310 | PCoIP Administrator's Guide - Page 98
PCoIP Administrator's Guide Figure 4-49: Administrative Web Interface Reset Page (Client) Figure 4-50: OSD Reset Page Table 4-23: Reset Parameters Parameter Description Reset Parameters When you click this button, a prompt appears for confirmation. This is to prevent accidental resets. Enable - HP t310 | PCoIP Administrator's Guide - Page 99
PCoIP Administrator's Guide Parameter Description Note: This field is only available from the zero client. It is not Reset Parameters page for the zero client. Enable this field: The keyboard sequence does not appear on the Reset Parameters page for the zero client. The user can still reset - HP t310 | PCoIP Administrator's Guide - Page 100
PCoIP Administrator's Guide Figure 4-51: OSD Display Page Parameter Description Enable display override This option is intended for legacy systems. It configures the client to send default EDID information to the host when a monitor cannot be detected or is not attached to the client. In - HP t310 | PCoIP Administrator's Guide - Page 101
of the display connected to the DVI-1 port on the zero client. l Default EDID native resolution 1: Select the native resolution of the display connected to the DVI-2 port on the zero client. Any displays attached to the client will be set to their specified native resolutions when this option - HP t310 | PCoIP Administrator's Guide - Page 102
PCoIP Administrator's Guide 4.18 Enabling or Disabling the OSD Configuration Menus You can enable or disable the PCoIP zero client configuration menus through the PCoIP Management Console (you must have release 1.4.x or higher). Disabling the OSD Configuration menu means that to configure the device - HP t310 | PCoIP Administrator's Guide - Page 103
's Guide 4. Check the Set in Profile option for Enable Web Interface. 5. Set the option to: l True: enable the web interface for the device or group of devices. l False: disable the web interface for the device or group of devices. 3. Click Save. 4. Apply the profile to the zero client or - HP t310 | PCoIP Administrator's Guide - Page 104
the PCoIP zero client hardware for unauthorized USB devices. The host (PCoIP host card or the host virtual desktop) cannot see or access the device for an additional layer of security. The USB page is available on the host and client but the host USB permissions have a higher priority and update the - HP t310 | PCoIP Administrator's Guide - Page 105
USB devices so that they use the drivers on the virtual desktop. Bridging is a feature supported in firmware 3.3.0 or higher. This rule only affects sessions between a zero client and a soft host running VMware View 4.6 or higher. Add New: Add a device or device group to the list. This lets you - HP t310 | PCoIP Administrator's Guide - Page 106
PCoIP Administrator's Guide Parameter Description Remove: Delete a rule for a device or device group from the list. Enable EHCI (root port only) Enable this field to configure EHCI (USB 2.0) for devices connected directly to the zero client USB ports for sessions with a soft host running VMware - HP t310 | PCoIP Administrator's Guide - Page 107
. Linux kernels should be compiled with the latest PCoIP audio CODEC support. Enable Audio Line In Enable: Use the line-in connector found on the client. Disable: Use the line-in connector as a microphone input. Follow the onscreen instructions if you have Windows Vista or Windows 7 installed - HP t310 | PCoIP Administrator's Guide - Page 108
PCoIP Administrator's Guide Figure 5-3: Administrative Web Interface Power Page (Client) Table 5-4: Power Page Parameter Parameter Description Client Power Button The drop-down menu lets you configure the client Power button functionality. Options include: l Power-off not permitted l Soft - HP t310 | PCoIP Administrator's Guide - Page 109
may be useful for troubleshooting. Note: The Diagnostic options in the OSD are a subset of those available through the Administrative Web Interface. 6.1 Viewing and Clearing Event Log Messages The Event Log page lets you view and clear event log messages from the host or client. The web interface - HP t310 | PCoIP Administrator's Guide - Page 110
PCoIP Administrator's Guide Figure 6-1: Administrative Web Interface Event Log Page TER0606004 Issue 16 110 - HP t310 | PCoIP Administrator's Guide - Page 111
PCoIP Administrator's Guide Figure 6-2: OSD Event Log Page Table 6-1: Event Log Parameters Parameter Description Event log Messages View: Click filter the event logs. Options include: l Verbose (this is the default setting) l Terse Enable Syslog Enable the syslog standard for your event logs - HP t310 | PCoIP Administrator's Guide - Page 112
could configure: l zero clients to use facility 19 l Cisco routers to use facility 20 l VMware ESX hosts to use facility 21 Note: The default facility is set to "19 - local use 3". Cisco routers default to "23 - local use 7". This field lets you collect enhanced log messages for one of the following - HP t310 | PCoIP Administrator's Guide - Page 113
PCoIP Administrator's Guide is Disconnected, click this button to initiate a PCoIP session between the client and its peer device. If the connection state , this field is blank. 6.3 Viewing PCoIP Protocol Statistics The Session Statistics page lets you view current statistics when a session is active - HP t310 | PCoIP Administrator's Guide - Page 114
PCoIP Administrator's Guide Figure 6-4: Administrative Web Interface Session Statistics Page (Host) TER0606004 Issue 16 114 - HP t310 | PCoIP Administrator's Guide - Page 115
PCoIP Administrator's Guide Figure 6-5: Administrative Web Interface Session Statistics Page (Client) Figure 6-6: OSD Session Statistics Page TER0606004 Issue 16 115 - HP t310 | PCoIP Administrator's Guide - Page 116
PCoIP Administrator's Guide Table 6-3: Session Statistics Page Parameters Parameters Description Connection State The current (or last) state of the PCoIP Latency The minimum, average, and maximum round-trip PCoIP system (for example, host to client and then back to host) and network latency in - HP t310 | PCoIP Administrator's Guide - Page 117
with the Host Information and Power State The Host CPU page lets you view and modify the host information. You can view the current state of the power as well as power off the host. Note: The Host CPU page is only available on a host. It is not available on the client. TER0606004 Issue 16 117 - HP t310 | PCoIP Administrator's Guide - Page 118
PCoIP Administrator's Guide Figure 6-7: Administrative Web Interface Host CPU Page Table 6-4: Host CPU Page Parameters Parameters Description Host Identity The identity string of the host computer (if data is available). Current Power State The current state of the power for the host (e.g., - HP t310 | PCoIP Administrator's Guide - Page 119
PCoIP Administrator's Guide Figure 6-8: Administrative Web Interface Audio Diagnostics Page 6.6 Viewing a Test Pattern on the Client's Display The Display page lets you initiate and view a test pattern on the client's display. Note: The test pattern only appears on the Display page when the client - HP t310 | PCoIP Administrator's Guide - Page 120
l 1600x1200 l 1920x1200 Click Start to begin the test pattern. Click Stop to stop the test. 6.7 Resetting the Device Processor The PCoIP Processor page lets you reset the host or client and view the uptime of the client PCoIP processor since the last boot. Figure 6-10: Administrative Web Interface - HP t310 | PCoIP Administrator's Guide - Page 121
details about configuring the NTP settings, see section 4.13. Time Since Boot (Uptime) View the uptime of the PCoIP processor since the last boot. Reset PCoIP Processor Click this button to reset the host or client. 6.8 Determining if a Device is Reachable The Ping page lets you ping a device to - HP t310 | PCoIP Administrator's Guide - Page 122
PCoIP Administrator's Guide Figure 6-12: OSD Ping Page Table 6-7: Ping Page Parameters Parameter Description Destination IP address or FQDN to ping Interval Interval between ping packets Packet Size - HP t310 | PCoIP Administrator's Guide - Page 123
PCoIP Administrator's Guide 7 Viewing Device Information The Information page lets you see details about the device. The Administrative Web Interface shows version, VPD, and attached device information. The OSD lets you view the device version information. 7.1 Viewing the Version Information The - HP t310 | PCoIP Administrator's Guide - Page 124
PCoIP Administrator's Guide Figure 7-2: OSD Version Page Table 7-1: OSD Version Page Parameters Parameters Description VPD Information (Vital Product Data): Information provisioned by the factory to uniquely identify each host or client: l MAC Address: Host/client unique MAC address l Unique - HP t310 | PCoIP Administrator's Guide - Page 125
PCoIP Administrator's Guide 7.2 Viewing the Attached Devices The Attached Devices page lets you see the type and status of the monitor and USB hardware currently attached to the client. Figure 7-3: Administrative Web Interface Attached Devices Page (Host) Note: The attached USB device information is - HP t310 | PCoIP Administrator's Guide - Page 126
PCoIP Administrator's Guide Figure 7-4: Administrative Web Interface Attached Devices Page (Client) Table 7-2: Attached Devices Page Statistics Statistic Description Displays This section displays the model, status, mode, resolution, serial number, vendor identification (VID), product - HP t310 | PCoIP Administrator's Guide - Page 127
Statistic PCoIP Administrator's Guide Description l Connected: The device is detected and authorized in a PCoIP session. TER0606004 Issue 16 127 - HP t310 | PCoIP Administrator's Guide - Page 128
PCoIP Administrator's Guide 8 Uploading to the Device You can use the options in this menu to upload new firmware, an OSD logo to a device, or to manage your certificates. These options are not available through the OSD. 8.1 Uploading Firmware to the Device The Firmware page lets you upload a new - HP t310 | PCoIP Administrator's Guide - Page 129
PC or workstation. 11. Reset the client. 12. Start the PCoIP session as per usual. 8.2 Uploading a Logo to the Device The OSD Logo page lets you upload an image to the device. This image appears on the Connect page of the local GUI On Screen Display (OSD). The VMware View Advanced page includes an - HP t310 | PCoIP Administrator's Guide - Page 130
was successful. 6. Reset the client. 8.3 Uploading the Certificate The Certificate Upload page lets you upload and manage your CA root and client certificates. You can upload up to 16 certificates. As of Firmware Release 3.5, the PCoIP protocol reads just one 802.1X client certificate for 802.1X - HP t310 | PCoIP Administrator's Guide - Page 131
PCoIP Administrator's Guide 8.3.1 Uploading Certificates for 802.1X Authentication The following are some general guidelines when using 802.1X authentication. For detailed information, see Knowledge Base support topic 15134-1063 on the Teradici support site. l 802.1X authentication requires two - HP t310 | PCoIP Administrator's Guide - Page 132
the mouse and keyboard settings. l Set the preferred PCoIP protocol image quality. l Configure the display topology. l Configure the touch screen. 9.1 Configuring VMware View Certificate Checking The VMware View page lets users select how the client behaves if it cannot verify a secure connection to - HP t310 | PCoIP Administrator's Guide - Page 133
PCoIP Administrator's Guide Table 9-1: VMware View Page Parameters Parameter Description Reject the unverifiable connection Configure the client to reject the connection if a trusted, valid certificate is not installed. Warn if the connection may be insecure Configure the client to display a - HP t310 | PCoIP Administrator's Guide - Page 134
Speed Configure the speed of the mouse cursor. Note: You can also configure the mouse speed through the PCoIP host software. See the PCoIP Host Software for Windows User Guide (TER0810001) for more details. 9.3 Changing the Keyboard Repeat Settings The Keyboard page lets you change the keyboard - HP t310 | PCoIP Administrator's Guide - Page 135
Topology The Display Topology page lets users change a display's position, rotation, and resolution for a PCoIP session. To apply the display topology feature to a PCoIP session between a zero client and a Virtual Machine (VM), you must have VMware View 4.5 or later. TER0606004 Issue 16 135 - HP t310 | PCoIP Administrator's Guide - Page 136
for Windows User Guide (TER0810001). Always change the display topology settings using the Display Topology tab on the zero client OSD->Options->User Settings interface. Do not try to change these settings using the Windows Display Settings in a virtual machine when using VMware View. To view the - HP t310 | PCoIP Administrator's Guide - Page 137
PCoIP Administrator's Guide Parameter Display Layout Alignment Primary Description are applied when the device is reset one display PCoIP session and the display that is requested for the Windows taskbar after you initiate the session). l Port 1: Select to configure DVI-1 port on the zero client - HP t310 | PCoIP Administrator's Guide - Page 138
PCoIP Administrator's Guide Parameter Position Rotation PCoIP session between a virtual machine or host and a zero client. The zero client detects the supported display resolutions of the monitor and populates them to the drop-down menu. By default, the display's native resolution is used. Resets - HP t310 | PCoIP Administrator's Guide - Page 139
to either DVI 1 or DVI 2. 3. Plug in the power. 4. Disconnect the zero client session. This initiates the calibration on the touch screen. Note: Once the touch screen is calibrated, the co-ordinates are saved in flash. You can manually recalibrate the screen as required through the OSD Touch Screen - HP t310 | PCoIP Administrator's Guide - Page 140
and calibration instructions. 9.6.3 Configuring the Zero Client to Automatically Log into a VMware View Host To VMware View Login window. If you choose to set this up, the user needs to touch Connect at the VMware View Login window (otherwise, the user must enter the username and password - HP t310 | PCoIP Administrator's Guide - Page 141
PCoIP Administrator's Guide 1. Log into the Administrative Web Interface. 2. From the Configuration menu, select Session. 3. In the Session Connection Type drop-down list, select View Connection Server + Auto-Logon. 4. Enter the VMware View Connection server's DNS name or IP address. 5. Fill out the - HP t310 | PCoIP Administrator's Guide - Page 142
PCoIP Administrator's Guide 10 About the Overlay Windows Overlay pages display pertinent information to users during a PCoIP session. These pages occasionally appear on top of the user when the client network cable is disconnected or when no PCoIP protocol traffic is received by the client for more - HP t310 | PCoIP Administrator's Guide - Page 143
PCoIP Administrator's Guide 10.3 USB Device Not Authorized Overlay If an unauthorized USB device to the zero client or through a full speed (USB 1.1) hub. If such a device is connected to the zero client through a high speed hub, an overlay appears with the message "USB device not supported behind - HP t310 | PCoIP Administrator's Guide - Page 144
not supported". PCoIP Administrator's Guide Figure 10-6: Resolution Not Supported Overlay 10.7 Half Duplex Overlay PCoIP technology is the host going into display power save mode. l When a video source to the host does not correspond to the video port used on the client, an overlay appears with the - HP t310 | PCoIP Administrator's Guide - Page 145
PCoIP Administrator's Guide Figure 10-9: Source Signal on Other Port Overlay TER0606004 Issue 16 145 - HP t310 | PCoIP Administrator's Guide - Page 146
PCoIP Administrator's Guide 11 Using Smart Cards with PCoIP Zero Clients Firmware 3.2.0 and higher provides pre-session and in-session smart-card support for PCoIP zero clients connecting to VMware View 4.5 or later virtual desktops. Note: Before using smart cards with PCoIP zero clients, be sure - HP t310 | PCoIP Administrator's Guide - Page 147
PCoIP Administrator's Guide l HID Omnikey 5321 l Gemalto PC USB-SW 11.1.3 CAC Smart Card Properties For smart card authentication and SSO, the smart card must meet one of these specifications: l GSC-IS v2.0 and v2.1 cards (firmware 3.2.0 or later) l PIV transitional cards (firmware 3.4.0 or later) - HP t310 | PCoIP Administrator's Guide - Page 148
a Smart Card from a zero client to a Virtual Machine brokered by VMware View, see Using PCoIP Zero Clients with VMware View 4 User Guide (TER0904005). To set up a connection: 1. From the VMware View Login page, click Connect. This establishes a session from a PCoIP zero client with a smart card to - HP t310 | PCoIP Administrator's Guide - Page 149
PCoIP Administrator's Guide If the smart card contains multiple certificates, the "Select Certificate" prompt appears. If the smart card contains only one certificate, this prompt does not appear and the certificate is automatically selected. Figure 11-2: Select Certificate Prompt 2. Click Details. - HP t310 | PCoIP Administrator's Guide - Page 150
PCoIP Administrator's Guide Figure 11-4: Smart Card Holder Verification Window 4. When the PIN is successfully authenticated, a window appears that lists VM(s) or VM pool(s) entitled to the user. Select the VM or VM pool to which you want to connect. A PCoIP session is established to the virtual - HP t310 | PCoIP Administrator's Guide - Page 151
PCoIP Administrator's Guide Appendix A: Usage Examples Overview This section provides detailed examples to help you determine how best to configure your devices. A.1 Peer-to-Peer Direct Connection Example This example provides an overview of how to configure a client and host for a direct - HP t310 | PCoIP Administrator's Guide - Page 152
PCoIP Administrator's Guide 5. From the DNS Name or IP Address field, enter the IP address for the example, https://192.168.42.76). 2. Login to the host Administrative Web Interface (using a password if enabled). 3. From the Configuration menu, select the Session page. TER0606004 Issue 16 152 - HP t310 | PCoIP Administrator's Guide - Page 153
PCoIP Administrator's Guide 4. From the Session Connection Type field, select Direct from Client. 5. Set the Accept Any Peer box: l Enable: Allow all zero clients to connect to the host l Disable: Allow only one zero client access to the host. Enter the client MAC address in the Peer MAC Address - HP t310 | PCoIP Administrator's Guide - Page 154
also use the OSD or PCoIP Management Console to configure the client. To configure the client for DHCP and SLP discovery: 1. From a browser, enter the IP address for the client, e.g., https//192.168.0.111. 2. Login to the client Administrative Web Interface (with a password if enabled). 3. From the - HP t310 | PCoIP Administrator's Guide - Page 155
PCoIP Administrator's Guide 8. Enable the Enable SLP Discovery box. 9. Click Apply to accept the changes. 10. Click Continue to complete the configuration. 11. From the Configuration menu, select the Network page. TER0606004 Issue 16 155 - HP t310 | PCoIP Administrator's Guide - Page 156
IP address is leased from the DHCP server. For future configuration, get the IP address from the DHCP server. 14. Click Reset to reset the PCoIP processor for the client. A.2.2 Configuring the Host for Host DHCP and SLP Discovery To configure the host for DHCP and SLP discovery: 1. From a browser - HP t310 | PCoIP Administrator's Guide - Page 157
PCoIP Administrator's Guide 4. Enable the Enable SLP Discovery box. 5. Click Apply to accept the changes. 6. Click Continue to complete the configuration. 7. From the Configuration menu, select the Network page. Figure 12-3: Host Network Page DHCP Configuration TER0606004 Issue 16 157 - HP t310 | PCoIP Administrator's Guide - Page 158
Reset to reset the PCoIP processor. Note: The host does not reset immediately. It waits until the host PC restarts, enters standby, hibernates, or powers off. A.2.3 Initiating an SLP Discovery Session To start a PCoIP specific class of IEEE-compatible bidirectional USB printers and a specific - HP t310 | PCoIP Administrator's Guide - Page 159
PCoIP Administrator's Guide 1. Open the USB Permissions page. 2. In the Authorization section, click Add new a class of printers. 5. Select Printer from the Sub Class drop-down menu to authorize a specific class of printers (otherwise, the sub class and protocol could be left as "Any"). 6. Select - HP t310 | PCoIP Administrator's Guide - Page 160
PCoIP Administrator's Guide Figure 12-5: USB Permissions Example: Entering Vendor ID and Product ID 4. Click Apply to save the changes to flash and complete the configuration. Figure 12-6: USB Permissions Example: Vendor ID and Product ID Authorization TER0606004 Issue 16 160 - HP t310 | PCoIP Administrator's Guide - Page 161
PCoIP Administrator's Guide Appendix B: Client Language and Keyboard Support The client firmware can support various languages and keyboard layouts. B.1 Languages Supported by the Client l English (default) l French l German l Greek l Spanish l Italian l Portuguese l Korean l Japanese l - HP t310 | PCoIP Administrator's Guide - Page 162
PCoIP Administrator's Guide l Hungarian l Italian ISO-8859-1 l Japanese 106/109 l Japanese 106x (ctrl and shift swapped) l Korean Dubeolsik ISO-8859-1 l Latin American l Latin American (accent keys) l Latvian (QWERTY) l - HP t310 | PCoIP Administrator's Guide - Page 163
PCoIP Administrator's Guide l United States of America Emacs optimized layout l United States of America ISO-8859-1 l United States of America ISO-8859-1 (accent keys) l United States of America
-
 1
1 -
 2
2 -
 3
3 -
 4
4 -
 5
5 -
 6
6 -
 7
7 -
8
-
9
-
10
-
11
-
12
-
13
-
14
-
15
-
16
-
17
-
18
-
19
-
20
-
21
-
22
-
23
-
24
-
25
-
26
-
27
-
28
-
29
-
30
-
31
-
32
-
33
-
34
-
35
-
36
-
37
-
38
-
39
-
40
-
41
-
42
-
43
-
44
-
45
-
46
-
47
-
48
-
49
-
50
-
51
-
52
-
53
-
54
-
55
-
56
-
57
-
58
-
59
-
60
-
61
-
62
-
63
-
64
-
65
-
66
-
67
-
68
-
69
-
70
-
71
-
72
-
73
-
74
-
75
-
76
-
77
-
78
-
79
-
80
-
81
-
82
-
83
-
84
-
85
-
86
-
87
-
88
-
89
-
90
-
91
-
92
-
93
-
94
-
95
-
96
-
97
-
98
-
99
-
100
-
101
-
102
-
103
-
104
-
105
-
106
-
107
-
108
-
109
-
110
-
111
-
112
-
113
-
114
-
115
-
116
-
117
-
118
-
119
-
120
-
121
-
122
-
123
-
124
-
125
-
126
-
127
-
128
-
129
-
130
-
131
-
132
-
133
-
134
-
135
-
136
-
137
-
138
-
139
-
140
-
141
-
142
-
143
-
144
-
145
-
146
-
147
-
148
-
149
-
150
-
151
-
152
-
153
-
154
-
155
-
156
-
157
-
158
-
159
-
160
-
161
-
162
-
163
 |
 |

PCoIP Administrator's Guide
TER0606004
Issue 16