HP t310 PCoIP Administrator's Guide - Page 137
Horizontal, Vertical, Horizontal layout, Center, Bottom, Vertical layout, Right, Port 1
 |
View all HP t310 manuals
Add to My Manuals
Save this manual to your list of manuals |
Page 137 highlights
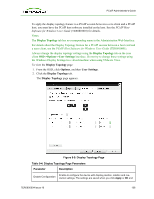
PCoIP Administrator's Guide Parameter Display Layout Alignment Primary Description are applied when the device is reset. Select whether you want a horizontal or vertical layout for your displays (A and B). This setting should reflect the physical layout of the displays on your desk. l Horizontal: Select to arrange A and B horizontally, with A located to the left of B. l Vertical: Select to arrange A and B vertically, with A located above B. Note: A maximum of two displays can be enabled at the same time. Select how you want displays A and B aligned when they are different sizes. Note: This setting affects which area of the screen to use when you move the cursor from one display to the other. The alignment options that appear in the drop-down list depend on whether you have selected a horizontal or vertical display layout. Horizontal layout: l Top: Select to align A and B at the top. With this setting, use the top area of the screen when navigating between displays of different sizes. l Center: Select to horizontally center A and B. With this setting, use the center area of the screen when navigating between displays of different sizes. l Bottom: Select to align A and B at the bottom. With this setting, use the bottom area of the screen when navigating between displays of different sizes. Vertical layout: l Left: Select to align A and B on the left. With this setting, use the left area of the screen when navigating between displays of different sizes. l Center: Select to vertically center A and B. With this setting, use the center area of the screen when navigating between displays of different sizes. l Right: Select to align A and B on the right. With this setting, use the right area of the screen when navigating between displays of different sizes. Configure which DVI port on the zero client that you want as the primary port. Note: The display that is connected to the primary port becomes the primary display (i.e., the display that contains the OSD menus before you initiate a PCoIP session and the display that is requested for the Windows taskbar after you initiate the session). l Port 1: Select to configure DVI-1 port on the zero client as the primary port. l Port 2: Select to configure DVI-2 port on the zero client as the primary port. TER0606004 Issue 16 137
-
 1
1 -
2
-
3
-
4
-
5
-
6
-
7
-
8
-
9
-
10
-
11
-
12
-
13
-
14
-
15
-
16
-
17
-
18
-
19
-
20
-
21
-
22
-
23
-
24
-
25
-
26
-
27
-
28
-
29
-
30
-
31
-
32
-
33
-
34
-
35
-
36
-
37
-
38
-
39
-
40
-
41
-
42
-
43
-
44
-
45
-
46
-
47
-
48
-
49
-
50
-
51
-
52
-
53
-
54
-
55
-
56
-
57
-
58
-
59
-
60
-
61
-
62
-
63
-
64
-
65
-
66
-
67
-
68
-
69
-
70
-
71
-
72
-
73
-
74
-
75
-
76
-
77
-
78
-
79
-
80
-
81
-
82
-
83
-
84
-
85
-
86
-
87
-
88
-
89
-
90
-
91
-
92
-
93
-
94
-
95
-
96
-
97
-
98
-
99
-
100
-
101
-
102
-
103
-
104
-
105
-
106
-
107
-
108
-
109
-
110
-
111
-
112
-
113
-
114
-
115
-
116
-
117
-
118
-
119
-
120
-
121
-
122
-
123
-
124
-
125
-
126
-
127
-
128
-
129
-
130
-
131
-
 132
132 -
 133
133 -
 134
134 -
 135
135 -
 136
136 -
 137
137 -
 138
138 -
 139
139 -
 140
140 -
 141
141 -
 142
142 -
143
-
144
-
145
-
146
-
147
-
148
-
149
-
150
-
151
-
152
-
153
-
154
-
155
-
156
-
157
-
158
-
159
-
160
-
161
-
162
-
163
 |
 |