HP t310 PCoIP Administrator's Guide - Page 139
Installing the Touch Screen to the Zero Client, 9.6.2 Setting up the Touch Screen as a Bridged
 |
View all HP t310 manuals
Add to My Manuals
Save this manual to your list of manuals |
Page 139 highlights
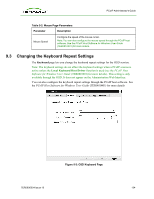
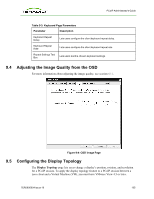
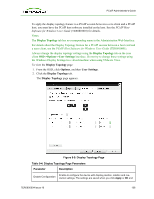
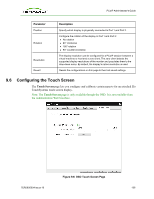
PCoIP Administrator's Guide Table 9-5: OSD Touch Screen Page Parameters Parameter Description Enable right click on hold Select this checkbox to let users generate a right-click when they touch the screen and hold it for a few seconds. If disabled, right-clicking is not supported. Right click delay Slide the pointer to the position (between Long and Short) to determine how long the users must touch and hold the screen to generate a right-click. Touch screen calibration When you first connect the touch screen to the zero client, the calibration program starts. At the touch screen, touch each of the three targets as they appear. To test the calibration, run your finger along the monitor and ensure that the cursor follows it. If it is not successful, the calibration program automatically restarts. Once calibrated, the coordinates are stored in flash. To manually start the calibration program, from the OSD Touch Screen page, click Start. Follow the onscreen prompts. 9.6.1 Installing the Touch Screen to the Zero Client 1. Plug in the touch screen's USB cable to the zero client's USB port. 2. Attach the monitor cable from the touch screen to the DVI 1 port on the zero client. Note: You can attach a non-touch screen monitor to the zero client in addition to the touch screen. (You cannot attach multiple touch screens to the zero client.) Because the touch screen must be attached to DVI1, the second non-touch screen monitor must be attached to DVI 2. If you only have the touch screen attached to the zero client, it can be attached to either DVI 1 or DVI 2. 3. Plug in the power. 4. Disconnect the zero client session. This initiates the calibration on the touch screen. Note: Once the touch screen is calibrated, the co-ordinates are saved in flash. You can manually recalibrate the screen as required through the OSD Touch Screen page. 5. Follow the touch screen prompts. You can test the calibration with your finger (the cursor should move with your finger). If the screen is not properly calibrated, the system automatically restarts the calibration program. 9.6.2 Setting up the Touch Screen as a Bridged Device Note: This procedure is optional and only necessary if you want the touch screen to be set up as a bridged device. While a session is active a user may want the touch screen to be controlled by a driver running on the host. To set this up the touch screen must be added to the list of bridge devices. TER0606004 Issue 16 139
-
 1
1 -
2
-
3
-
4
-
5
-
6
-
7
-
8
-
9
-
10
-
11
-
12
-
13
-
14
-
15
-
16
-
17
-
18
-
19
-
20
-
21
-
22
-
23
-
24
-
25
-
26
-
27
-
28
-
29
-
30
-
31
-
32
-
33
-
34
-
35
-
36
-
37
-
38
-
39
-
40
-
41
-
42
-
43
-
44
-
45
-
46
-
47
-
48
-
49
-
50
-
51
-
52
-
53
-
54
-
55
-
56
-
57
-
58
-
59
-
60
-
61
-
62
-
63
-
64
-
65
-
66
-
67
-
68
-
69
-
70
-
71
-
72
-
73
-
74
-
75
-
76
-
77
-
78
-
79
-
80
-
81
-
82
-
83
-
84
-
85
-
86
-
87
-
88
-
89
-
90
-
91
-
92
-
93
-
94
-
95
-
96
-
97
-
98
-
99
-
100
-
101
-
102
-
103
-
104
-
105
-
106
-
107
-
108
-
109
-
110
-
111
-
112
-
113
-
114
-
115
-
116
-
117
-
118
-
119
-
120
-
121
-
122
-
123
-
124
-
125
-
126
-
127
-
128
-
129
-
130
-
131
-
132
-
133
-
 134
134 -
 135
135 -
 136
136 -
 137
137 -
 138
138 -
 139
139 -
 140
140 -
 141
141 -
 142
142 -
 143
143 -
 144
144 -
145
-
146
-
147
-
148
-
149
-
150
-
151
-
152
-
153
-
154
-
155
-
156
-
157
-
158
-
159
-
160
-
161
-
162
-
163
 |
 |