HP t310 PCoIP Administrator's Guide - Page 129
Uploading a Logo to the Device, Reset, OSD Logo, Connect, VMware View Advanced
 |
View all HP t310 manuals
Add to My Manuals
Save this manual to your list of manuals |
Page 129 highlights
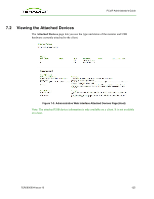
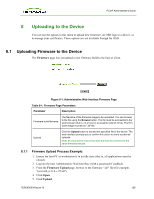
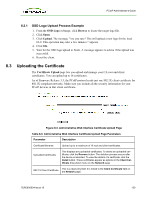
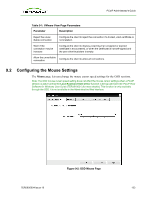
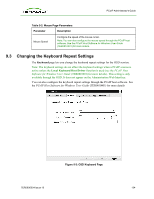
PCoIP Administrator's Guide 6. Click OK to confirm that you want to proceed with the upload. When the firmware upload completes, the message "Success Flash successfully programmed! You must reset the device for the changes to take effect" appears. 7. Click Reset. The message "The PCoIP processor will reset on the next host system restart; your changes will take effect then. Are you sure you want to proceed?" appears. 8. Click OK. 9. Repeat steps 2 through 6 on the client but do not restart the client. 10. Restart the host PC or workstation. 11. Reset the client. 12. Start the PCoIP session as per usual. 8.2 Uploading a Logo to the Device The OSD Logo page lets you upload an image to the device. This image appears on the Connect page of the local GUI On Screen Display (OSD). The VMware View Advanced page includes an option "Use OSD Logo for View Banner," which lets you configure whether the OSD logo appears on the View login screen instead of the View banner. For more details, see 4.7.3. Note: This option is only available on the client. It is not available on the host. Figure 8-2: Administrative Web Interface OSD Logo Upload Page (Client) Table 8-2: OSD Logo Page Parameters Parameter Description OSD logo filename Specify the filename of the logo image you want to upload. You can browse to the target file using the Browse button. The file must be accessible to the web browser (that is, on a local or accessible network drive). The 24-bits-per-pixel image must be in BMP format and its dimensions cannot exceed 256 pixels in width and 64 pixels in height. If the file extension is incorrect, an error message appears. Upload Click Upload to transfer the specified image file to the client. A message to confirm the upload appears. TER0606004 Issue 16 129
-
 1
1 -
2
-
3
-
4
-
5
-
6
-
7
-
8
-
9
-
10
-
11
-
12
-
13
-
14
-
15
-
16
-
17
-
18
-
19
-
20
-
21
-
22
-
23
-
24
-
25
-
26
-
27
-
28
-
29
-
30
-
31
-
32
-
33
-
34
-
35
-
36
-
37
-
38
-
39
-
40
-
41
-
42
-
43
-
44
-
45
-
46
-
47
-
48
-
49
-
50
-
51
-
52
-
53
-
54
-
55
-
56
-
57
-
58
-
59
-
60
-
61
-
62
-
63
-
64
-
65
-
66
-
67
-
68
-
69
-
70
-
71
-
72
-
73
-
74
-
75
-
76
-
77
-
78
-
79
-
80
-
81
-
82
-
83
-
84
-
85
-
86
-
87
-
88
-
89
-
90
-
91
-
92
-
93
-
94
-
95
-
96
-
97
-
98
-
99
-
100
-
101
-
102
-
103
-
104
-
105
-
106
-
107
-
108
-
109
-
110
-
111
-
112
-
113
-
114
-
115
-
116
-
117
-
118
-
119
-
120
-
121
-
122
-
123
-
 124
124 -
 125
125 -
 126
126 -
 127
127 -
 128
128 -
 129
129 -
 130
130 -
 131
131 -
 132
132 -
 133
133 -
 134
134 -
135
-
136
-
137
-
138
-
139
-
140
-
141
-
142
-
143
-
144
-
145
-
146
-
147
-
148
-
149
-
150
-
151
-
152
-
153
-
154
-
155
-
156
-
157
-
158
-
159
-
160
-
161
-
162
-
163
 |
 |