HP t310 PCoIP Administrator's Guide - Page 158
A.2.3 Initiating an SLP Discovery Session, A.3 USB Permissions Example
 |
View all HP t310 manuals
Add to My Manuals
Save this manual to your list of manuals |
Page 158 highlights
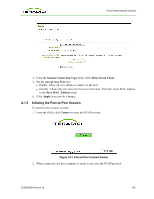
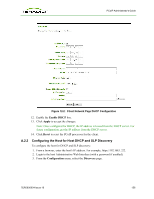
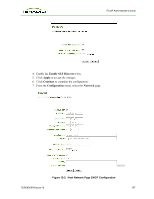
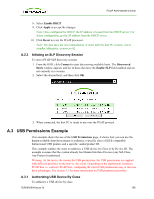
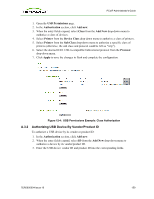
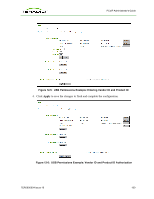
PCoIP Administrator's Guide 8. Select Enable DHCP. 9. Click Apply to accept the changes. Note: Once configured for DHCP, the IP address is leased from the DHCP server. For future configuration, get the IP address from the DHCP server. 10. Click Reset to reset the PCoIP processor. Note: The host does not reset immediately. It waits until the host PC restarts, enters standby, hibernates, or powers off. A.2.3 Initiating an SLP Discovery Session To start a PCoIP SLP discovery session: 1. From the OSD, click Connect to start discovering available hosts. The Discovered Hosts window appears and list of hosts that have the Enable SLP field enabled and are not currently in a session. 2. Select the desired host, and then click OK. 3. When connected, the host PC is ready to use over the PCoIP protocol. A.3 USB Permissions Example This example shows the use of the USB Permissions page. It shows how you can use the human-readable drop-down menus to authorize a specific class of IEEE-compatible bidirectional USB printers and a specific vendor/product ID. This example outlines the steps to authorize a USB device by Class or by Device ID. The example assumes that the system already has Human Interface Devices (any Sub Class, Any Protocol) authorized. Warning: As the host is the master for USB permissions, the USB permissions are applied with different priorities on the host vs. the client. Depending on the deployment, hardware PCoIP host vs. software PCoIP host, configuring the client USB permissions may or may not have advantages. See section 5.1 for more information on USB permission priorities. A.3.1 Authorizing USB Device By Class To authorize a USB device by class: TER0606004 Issue 16 158
-
 1
1 -
2
-
3
-
4
-
5
-
6
-
7
-
8
-
9
-
10
-
11
-
12
-
13
-
14
-
15
-
16
-
17
-
18
-
19
-
20
-
21
-
22
-
23
-
24
-
25
-
26
-
27
-
28
-
29
-
30
-
31
-
32
-
33
-
34
-
35
-
36
-
37
-
38
-
39
-
40
-
41
-
42
-
43
-
44
-
45
-
46
-
47
-
48
-
49
-
50
-
51
-
52
-
53
-
54
-
55
-
56
-
57
-
58
-
59
-
60
-
61
-
62
-
63
-
64
-
65
-
66
-
67
-
68
-
69
-
70
-
71
-
72
-
73
-
74
-
75
-
76
-
77
-
78
-
79
-
80
-
81
-
82
-
83
-
84
-
85
-
86
-
87
-
88
-
89
-
90
-
91
-
92
-
93
-
94
-
95
-
96
-
97
-
98
-
99
-
100
-
101
-
102
-
103
-
104
-
105
-
106
-
107
-
108
-
109
-
110
-
111
-
112
-
113
-
114
-
115
-
116
-
117
-
118
-
119
-
120
-
121
-
122
-
123
-
124
-
125
-
126
-
127
-
128
-
129
-
130
-
131
-
132
-
133
-
134
-
135
-
136
-
137
-
138
-
139
-
140
-
141
-
142
-
143
-
144
-
145
-
146
-
147
-
148
-
149
-
150
-
151
-
152
-
 153
153 -
 154
154 -
 155
155 -
 156
156 -
 157
157 -
 158
158 -
 159
159 -
 160
160 -
 161
161 -
 162
162 -
 163
163
 |
 |