HP t310 PCoIP Administrator's Guide - Page 128
Uploading to the Device, 8.1 Uploading Firmware to the Device
 |
View all HP t310 manuals
Add to My Manuals
Save this manual to your list of manuals |
Page 128 highlights
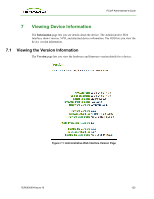
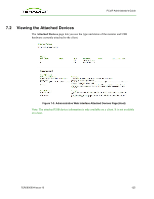
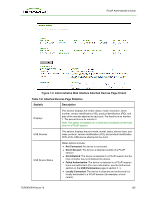
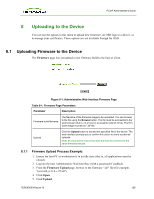
PCoIP Administrator's Guide 8 Uploading to the Device You can use the options in this menu to upload new firmware, an OSD logo to a device, or to manage your certificates. These options are not available through the OSD. 8.1 Uploading Firmware to the Device The Firmware page lets you upload a new firmware build to the host or client. Figure 8-1: Administrative Web Interface Firmware Page Table 8-1: Firmware Page Parameters Parameter Description Firmware build filename The filename of the firmware image to be uploaded. You can browse to the file using the Browse button. The file must be accessible to the web browser (that is, on a local or accessible network drive). The firmware image must be an ".all" file. Upload Click the Upload button to transfer the specified file to the device. The web interface prompts you to confirm this action to avoid accidental uploads. Note: It's important to ensure that both the host and client have the same firmware release. 8.1.1 Firmware Upload Process Example: 1. Ensure the host PC or workstation is in an idle state (that is, all applications must be closed). 2. Log into the host Administrative Web Interface (with a password if enabled). 3. From the Firmware Upload page, browse to the firmware ".all" file (for example, "tera1x00_rel1-9-v175.all"). 4. Click Open. 5. Click Upload. TER0606004 Issue 16 128
-
 1
1 -
2
-
3
-
4
-
5
-
6
-
7
-
8
-
9
-
10
-
11
-
12
-
13
-
14
-
15
-
16
-
17
-
18
-
19
-
20
-
21
-
22
-
23
-
24
-
25
-
26
-
27
-
28
-
29
-
30
-
31
-
32
-
33
-
34
-
35
-
36
-
37
-
38
-
39
-
40
-
41
-
42
-
43
-
44
-
45
-
46
-
47
-
48
-
49
-
50
-
51
-
52
-
53
-
54
-
55
-
56
-
57
-
58
-
59
-
60
-
61
-
62
-
63
-
64
-
65
-
66
-
67
-
68
-
69
-
70
-
71
-
72
-
73
-
74
-
75
-
76
-
77
-
78
-
79
-
80
-
81
-
82
-
83
-
84
-
85
-
86
-
87
-
88
-
89
-
90
-
91
-
92
-
93
-
94
-
95
-
96
-
97
-
98
-
99
-
100
-
101
-
102
-
103
-
104
-
105
-
106
-
107
-
108
-
109
-
110
-
111
-
112
-
113
-
114
-
115
-
116
-
117
-
118
-
119
-
120
-
121
-
122
-
 123
123 -
 124
124 -
 125
125 -
 126
126 -
 127
127 -
 128
128 -
 129
129 -
 130
130 -
 131
131 -
 132
132 -
 133
133 -
134
-
135
-
136
-
137
-
138
-
139
-
140
-
141
-
142
-
143
-
144
-
145
-
146
-
147
-
148
-
149
-
150
-
151
-
152
-
153
-
154
-
155
-
156
-
157
-
158
-
159
-
160
-
161
-
162
-
163
 |
 |
