Kyocera KM-3035 3035/4035/5035 Operation Guide Rev-6.0 - Page 114
NOTES, Margin/Centering [Margin/Imag. shift] key. The Margin
 |
View all Kyocera KM-3035 manuals
Add to My Manuals
Save this manual to your list of manuals |
Page 114 highlights
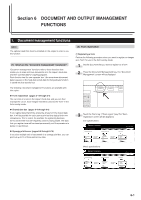
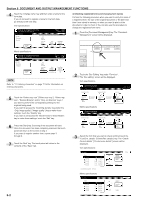
Section 5 OTHER CONVENIENT FUNCTIONS @ Selecting the repeat copy mode This procedure allow you to select the repeat copy mode so that you can make any necessary number of additional copies later. 1 Touch the "Edit" key. Then, in the resulting screen, touch the "Modify Copy" key. The "Modify Copy" screen will be displayed. Inch specifications Ready to Job build. Place originals then press Start key. Job Build - Step1 Off Border Erase None Margin/ Centering Basic Auto Select orig.size None Page # Quality Off Modify Copy Edit 2 sided copy-Left Finished page # : 0 Set End Insert page Metric specifications Ready to Job build. Set original. Press Start key. Job Build - Step1 Off Erase Mode None Margin/ Imag.shift Basic Auto Select size orig. None Page numbering Quality None Modify copy Edit 2-sided Copy-Left Finished page #: 0 Set End Insert blank page NOTES • To make additional copies with the repeat copy mode, refer to "(2) Printing out with the repeat copy mode" on page 5-43. • The setting in regard to whether or not to use the repeat copy mode can only be made in the first step of the job build mode and will apply to all steps in the copy job. 2 Touch the "On" key to select the repeat copy mode. Inch specifications Ready to Job build. Place originals then press Start key. Modify Copy Back Set Close Off When select [On], data can be saved. Yo u c a n r e c a l l a n d r e - p r i n t a t a ny t i m e. Yo u c a n s e t t h e p a s swo r d t o s e c u r e On saved document. Metric specifications Ready to Job build. Set original. Press Start key. Modify copy Back Set Close Off When select [On], job can be saved. WhenYtohuecmanodreecisalsl eatn[dOrne]-,pirtincat nat anytime. On save aYojoubcdaantaseatnadpraespsrwinot ritdatnoystiemceu.re saved And ydoouccuamnesnet.t that other user are not able to reprint. 3 Touch the "Close" key. The touch panel will return to the screen in step 1. # Selecting the margin mode or the centering/image shift mode This procedure selects the margin mode or the centering/image shift mode in order to create a margin space or center the copy image. 1 Touch the "Edit" key. Then, in the resulting screen, touch the "Margin/Centering" ["Margin/Imag. shift"] key. The "Margin/ Centering" ["Margin/Imag. shift"] screen will be displayed. Inch specifications Ready to Job build. Place originals then press Start key. Job Build - Step1 Off Border Erase None Margin/ Centering Basic Auto Select orig.size None Page # Quality Off Modify Copy Edit 2 sided copy-Left Finished page # : 0 Set End Insert page Metric specifications Ready to Job build. Set original. Press Start key. Job Build - Step1 Off Erase Mode None Margin/ Imag.shift Basic Auto Select size orig. None Page numbering Quality None Modify copy Edit 2-sided Copy-Left Finished page #: 0 Set End Insert blank page NOTE The setting in regard to the margin mode or the centering/image shift mode can only be made in the first step of the job build mode and will apply to all steps in the copy job. 2 Touch the "Margin" key or the "Centering" ["Imag.shift"] key, as appropriate. For more detailed information on these two settings, refer to the explanation for the margin mode on page 5-6 or the centering/image shift mode on page 5-8, as appropriate. Inch specifications Ready to Job build. Place originals then press Start key. Margin/Centering Back Set Close None Margin Centering Metric specifications Ready to Job build. Set original. Press Start key. Margin/Image shift Reposition image to left/right or top/bottom, and also center image on paper. Back Set Close None Margin Image shift Reposition image to left/right or top/bottom and center image on paper. 3 Touch the "Close" key. The touch panel will return to the screen in step 1. 5-68
-
 1
1 -
2
-
3
-
4
-
5
-
6
-
7
-
8
-
9
-
10
-
11
-
12
-
13
-
14
-
15
-
16
-
17
-
18
-
19
-
20
-
21
-
22
-
23
-
24
-
25
-
26
-
27
-
28
-
29
-
30
-
31
-
32
-
33
-
34
-
35
-
36
-
37
-
38
-
39
-
40
-
41
-
42
-
43
-
44
-
45
-
46
-
47
-
48
-
49
-
50
-
51
-
52
-
53
-
54
-
55
-
56
-
57
-
58
-
59
-
60
-
61
-
62
-
63
-
64
-
65
-
66
-
67
-
68
-
69
-
70
-
71
-
72
-
73
-
74
-
75
-
76
-
77
-
78
-
79
-
80
-
81
-
82
-
83
-
84
-
85
-
86
-
87
-
88
-
89
-
90
-
91
-
92
-
93
-
94
-
95
-
96
-
97
-
98
-
99
-
100
-
101
-
102
-
103
-
104
-
105
-
106
-
107
-
108
-
 109
109 -
 110
110 -
 111
111 -
 112
112 -
 113
113 -
 114
114 -
 115
115 -
 116
116 -
 117
117 -
 118
118 -
 119
119 -
120
-
121
-
122
-
123
-
124
-
125
-
126
-
127
-
128
-
129
-
130
-
131
-
132
-
133
-
134
-
135
-
136
-
137
-
138
-
139
-
140
-
141
-
142
-
143
-
144
-
145
-
146
-
147
-
148
-
149
-
150
-
151
-
152
-
153
-
154
-
155
-
156
-
157
-
158
-
159
-
160
-
161
-
162
-
163
-
164
-
165
-
166
-
167
-
168
-
169
-
170
-
171
-
172
-
173
-
174
-
175
-
176
-
177
-
178
-
179
-
180
-
181
-
182
-
183
-
184
-
185
-
186
-
187
-
188
-
189
-
190
-
191
-
192
-
193
-
194
-
195
-
196
-
197
-
198
-
199
-
200
-
201
-
202
-
203
-
204
-
205
-
206
-
207
-
208
-
209
-
210
-
211
-
212
-
213
-
214
-
215
-
216
-
217
-
218
-
219
-
220
-
221
-
222
-
223
-
224
-
225
-
226
-
227
-
228
-
229
-
230
-
231
-
232
-
233
-
234
-
235
-
236
-
237
-
238
-
239
-
240
-
241
-
242
-
243
-
244
-
245
-
246
-
247
-
248
-
249
-
250
-
251
-
252
-
253
-
254
-
255
-
256
-
257
-
258
-
259
-
260
-
261
-
262
-
263
-
264
-
265
-
266
-
267
-
268
-
269
-
270
-
271
-
272
-
273
-
274
-
275
-
276
-
277
-
278
-
279
-
280
-
281
-
282
-
283
-
284
-
285
-
286
-
287
-
288
-
289
-
290
-
291
-
292
-
293
-
294
-
295
-
296
 |
 |
