Kyocera KM-3035 3035/4035/5035 Operation Guide Rev-6.0 - Page 64
Touch the Close key. The touch panel will return to the, numbers printed on.
 |
View all Kyocera KM-3035 manuals
Add to My Manuals
Save this manual to your list of manuals |
Page 64 highlights
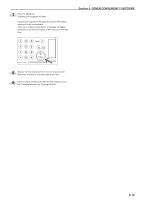
Section 5 OTHER CONVENIENT FUNCTIONS 11 If you want the last page number that is printed to be on a copy other than that for the last original, touch the "Setting last page" key. The "Setting last page" screen will be displayed. Inch specifications Ready to copy. Paper size Set 11x81/2" Page # None Start page # Register Start # Setting 1st page Finish Page # Last page Setting last page Setting start # Denominator # Auto Set denominator # Back Check direction Check direction of original top side. Close Rear Left top corner Metric specifications Ready to copy. Paper size Set Page numbering None P.1 -1- 1/n Start page # 1 Setting 1st page Last page # Last page Setting last page Register Start # 1 Setting Start page Denominator # Auto Set Denomin. # Back Close Check direction Check direction of original. Back Edge Left top corner 12 Touch the "Manual" key. The screen to designate the last page will be displayed. Inch specifications Ready to copy. Paper size Set 11x81/2" Setting last page Last page Manual Back Close Check direction Check direction of original top side. Rear Left top corner Metric specifications Ready to copy. Setting last page Last page Manual Paper size Set Back Close Check direction Check direction of original. Back Edge Left top corner 13 Touch the "+" key or the "-" key to select, counting from the final copy, how many pages you do NOT want to have page numbers printed on. Inch specifications Ready to copy. Paper size Set 11x81/2" Setting last page Last page Manual Page + Back Check direction Check direction of original top side. Close Rear Left top corner Metric specifications Ready to copy. Setting last page Last page Manual Page Paper size Set Back Close Check direction Check direction of original. Back Edge Left top corner 14 Touch the "Close" key. The touch panel will return to the screen in step 11. If you selected the "1/n" style, the "Set denominator #" ["Set Denomin. #"] key will be displayed. 15 If you want to manually select the denominator for the page numbers, touch the "Set denominator #" ["Set Denomin. #"] key. The "Setting denominator #" screen will be displayed. Inch specifications Ready to copy. Paper size Set 11x81/2" Page # None Start page # Register Start # Setting 1st page Finish Page # Last page Setting last page Setting start # Denominator # Auto Set denominator # Back Check direction Check direction of original top side. Close Rear Left top corner Metric specifications Ready to copy. Paper size Set Page numbering None P.1 -1- 1/n Start page # 1 Setting 1st page Last page # Last page Setting last page Register Start # 1 Setting Start page Denominator # Auto Set Denomin. # Back Close Check direction Check direction of original. Back Edge Left top corner 5-18
-
 1
1 -
2
-
3
-
4
-
5
-
6
-
7
-
8
-
9
-
10
-
11
-
12
-
13
-
14
-
15
-
16
-
17
-
18
-
19
-
20
-
21
-
22
-
23
-
24
-
25
-
26
-
27
-
28
-
29
-
30
-
31
-
32
-
33
-
34
-
35
-
36
-
37
-
38
-
39
-
40
-
41
-
42
-
43
-
44
-
45
-
46
-
47
-
48
-
49
-
50
-
51
-
52
-
53
-
54
-
55
-
56
-
57
-
58
-
 59
59 -
 60
60 -
 61
61 -
 62
62 -
 63
63 -
 64
64 -
 65
65 -
 66
66 -
 67
67 -
 68
68 -
 69
69 -
70
-
71
-
72
-
73
-
74
-
75
-
76
-
77
-
78
-
79
-
80
-
81
-
82
-
83
-
84
-
85
-
86
-
87
-
88
-
89
-
90
-
91
-
92
-
93
-
94
-
95
-
96
-
97
-
98
-
99
-
100
-
101
-
102
-
103
-
104
-
105
-
106
-
107
-
108
-
109
-
110
-
111
-
112
-
113
-
114
-
115
-
116
-
117
-
118
-
119
-
120
-
121
-
122
-
123
-
124
-
125
-
126
-
127
-
128
-
129
-
130
-
131
-
132
-
133
-
134
-
135
-
136
-
137
-
138
-
139
-
140
-
141
-
142
-
143
-
144
-
145
-
146
-
147
-
148
-
149
-
150
-
151
-
152
-
153
-
154
-
155
-
156
-
157
-
158
-
159
-
160
-
161
-
162
-
163
-
164
-
165
-
166
-
167
-
168
-
169
-
170
-
171
-
172
-
173
-
174
-
175
-
176
-
177
-
178
-
179
-
180
-
181
-
182
-
183
-
184
-
185
-
186
-
187
-
188
-
189
-
190
-
191
-
192
-
193
-
194
-
195
-
196
-
197
-
198
-
199
-
200
-
201
-
202
-
203
-
204
-
205
-
206
-
207
-
208
-
209
-
210
-
211
-
212
-
213
-
214
-
215
-
216
-
217
-
218
-
219
-
220
-
221
-
222
-
223
-
224
-
225
-
226
-
227
-
228
-
229
-
230
-
231
-
232
-
233
-
234
-
235
-
236
-
237
-
238
-
239
-
240
-
241
-
242
-
243
-
244
-
245
-
246
-
247
-
248
-
249
-
250
-
251
-
252
-
253
-
254
-
255
-
256
-
257
-
258
-
259
-
260
-
261
-
262
-
263
-
264
-
265
-
266
-
267
-
268
-
269
-
270
-
271
-
272
-
273
-
274
-
275
-
276
-
277
-
278
-
279
-
280
-
281
-
282
-
283
-
284
-
285
-
286
-
287
-
288
-
289
-
290
-
291
-
292
-
293
-
294
-
295
-
296
 |
 |
