Kyocera KM-3035 3035/4035/5035 Operation Guide Rev-6.0 - Page 118
DOCUMENT AND OUTPUT MANAGEMENT FUNCTIONS, Checking registered forms and changing form names
 |
View all Kyocera KM-3035 manuals
Add to My Manuals
Save this manual to your list of manuals |
Page 118 highlights
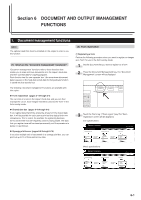
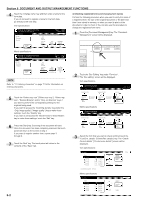
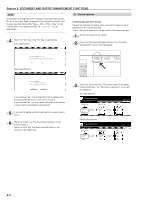
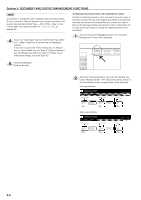
Section 6 DOCUMENT AND OUTPUT MANAGEMENT FUNCTIONS 4 Touch the "Change name" key and then enter a name for the form data. If you do not want to register a name for the form data, go directly to the next step. Inch specifications Ready to register form(s). Place originals then press Start key. Form registration Form box Documents Form006 Change name Auto Select orig. size Auto size Select regi. size Basic Original 11x81/2" Register 81/2x11" 25/10/'01 19:20 Cancel 100% Reduce /Enlarge Quality Back Edge Orig. set direction Edit 2 Checking registered forms and changing form names Perform the following procedure when you want to verify the name of a registered form, the size of the original document or the date and time it was stored in memory, or when you want to print out the document in order to check it. You can also use this procedure to change the registered form name. 1 Press the [Document Management] key. The "Document Management" screen will be displayed. Metric specifications Ready to register form(s). Set original. Press Start key. Form registration Form box Documents FORM006 Change name Auto Select size orig. Auto size Select regi. size Basic Original Register A4 A4 25/10/'01 19:20 Job cancel 100% Reduce/ Enlarge Quality Back Edge Orig. set direction Edit NOTE Refer to "11. Entering characters" on page 7-104 for information on entering characters. 2 Touch the "Box Editing" key under "Form box". The "Box editing" screen will be displayed. Inch specifications Select function. Document Management Shared Data Box Synergy Print Box Form box 25/10/'01 19:20 End 5 Touch the "Select orig. size" ["Select size orig."], "Select regi. size", "Reduce/Enlarge" and/or "Orig. set direction" keys if you want to perform the corresponding settings for the originals being used. If you want to access the "Scanning density" key and/or the "Orig. image quality" ["Image quality"] key to make those settings, touch the "Quality" key. If you want to set access the "Border Erase" ["Erase Mode"] key to make those settings, touch the "Edit" key. 6 Press the [Start] key. Scanning of the document will start. Once the document has been completely scanned, the touch panel will return to the screen in step 3. If you want to register another form, repeat steps 3 through 6. 7 Touch the "End" key. The touch panel will return to the contents of the "Basic" tab. 6-2 Document reg. Box Editing Document printing Document reg. Box Editing Document printing Form reg. Box Editing Metric specifications Select function. Document Management Shared Data Box Synergy Print Box 25/10/'01 19:20 End Form box Document registr. Box Editing Document printing Document registr. Box Editing Document printing Form registr. Box Editing 3 Select the form that you want to check and then touch the "Conf/Crrt. details" ["Check/Rev. details"] key. The "Check/ Correct details" ["Check/revise details"] screen will be displayed. Inch specifications Box editing Form Form 005 Form 004 11x81/2" 01/04/19 11x81/2" 01/04/19 Form 003 Form 002 Form 001 81/2x11" 01/04/19 11x81/2" 01/04/19 11x81/2" 01/04/19 001/005 Document Management - Form box Up Down Order of indication Conf/Crrt. details Delete Close Metric specifications Box editing Form Form 007 A4 Form 006 A4 Form 005 A4 Form 004 A4 Form 003 A4 Document Management - Form box 25/10/01 25/10/01 25/10/01 25/10/01 25/10/01 001/007 Up Down Order of indication Check/Rev. details Delete Close
-
 1
1 -
2
-
3
-
4
-
5
-
6
-
7
-
8
-
9
-
10
-
11
-
12
-
13
-
14
-
15
-
16
-
17
-
18
-
19
-
20
-
21
-
22
-
23
-
24
-
25
-
26
-
27
-
28
-
29
-
30
-
31
-
32
-
33
-
34
-
35
-
36
-
37
-
38
-
39
-
40
-
41
-
42
-
43
-
44
-
45
-
46
-
47
-
48
-
49
-
50
-
51
-
52
-
53
-
54
-
55
-
56
-
57
-
58
-
59
-
60
-
61
-
62
-
63
-
64
-
65
-
66
-
67
-
68
-
69
-
70
-
71
-
72
-
73
-
74
-
75
-
76
-
77
-
78
-
79
-
80
-
81
-
82
-
83
-
84
-
85
-
86
-
87
-
88
-
89
-
90
-
91
-
92
-
93
-
94
-
95
-
96
-
97
-
98
-
99
-
100
-
101
-
102
-
103
-
104
-
105
-
106
-
107
-
108
-
109
-
110
-
111
-
112
-
 113
113 -
 114
114 -
 115
115 -
 116
116 -
 117
117 -
 118
118 -
 119
119 -
 120
120 -
 121
121 -
 122
122 -
 123
123 -
124
-
125
-
126
-
127
-
128
-
129
-
130
-
131
-
132
-
133
-
134
-
135
-
136
-
137
-
138
-
139
-
140
-
141
-
142
-
143
-
144
-
145
-
146
-
147
-
148
-
149
-
150
-
151
-
152
-
153
-
154
-
155
-
156
-
157
-
158
-
159
-
160
-
161
-
162
-
163
-
164
-
165
-
166
-
167
-
168
-
169
-
170
-
171
-
172
-
173
-
174
-
175
-
176
-
177
-
178
-
179
-
180
-
181
-
182
-
183
-
184
-
185
-
186
-
187
-
188
-
189
-
190
-
191
-
192
-
193
-
194
-
195
-
196
-
197
-
198
-
199
-
200
-
201
-
202
-
203
-
204
-
205
-
206
-
207
-
208
-
209
-
210
-
211
-
212
-
213
-
214
-
215
-
216
-
217
-
218
-
219
-
220
-
221
-
222
-
223
-
224
-
225
-
226
-
227
-
228
-
229
-
230
-
231
-
232
-
233
-
234
-
235
-
236
-
237
-
238
-
239
-
240
-
241
-
242
-
243
-
244
-
245
-
246
-
247
-
248
-
249
-
250
-
251
-
252
-
253
-
254
-
255
-
256
-
257
-
258
-
259
-
260
-
261
-
262
-
263
-
264
-
265
-
266
-
267
-
268
-
269
-
270
-
271
-
272
-
273
-
274
-
275
-
276
-
277
-
278
-
279
-
280
-
281
-
282
-
283
-
284
-
285
-
286
-
287
-
288
-
289
-
290
-
291
-
292
-
293
-
294
-
295
-
296
 |
 |
