Kyocera KM-3035 3035/4035/5035 Operation Guide Rev-6.0 - Page 74
Touch the Bind & Fold key., Once you have finished scanning all of the originals, touch
 |
View all Kyocera KM-3035 manuals
Add to My Manuals
Save this manual to your list of manuals |
Page 74 highlights
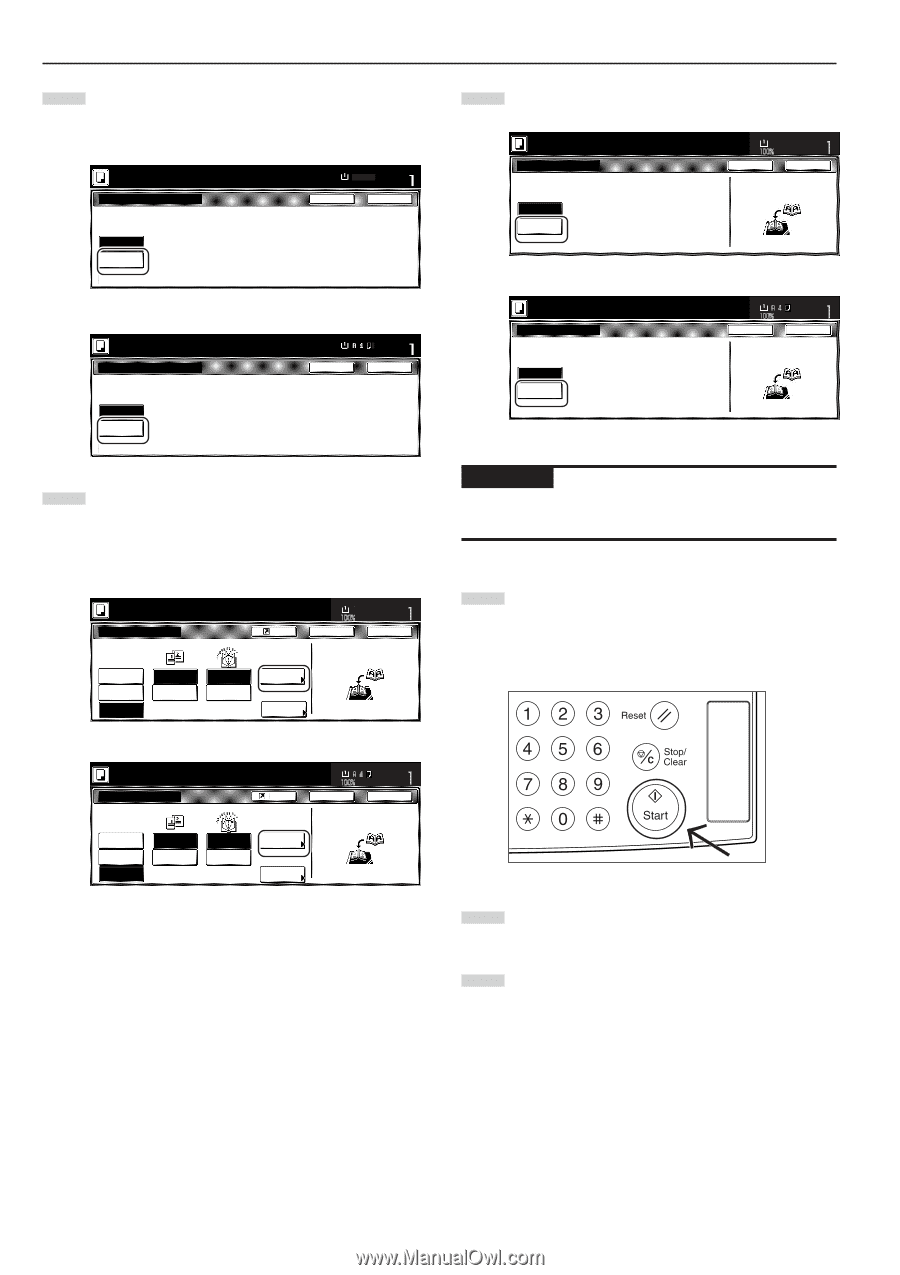
Section 5 OTHER CONVENIENT FUNCTIONS 7 Touch the "Bind & Fold" key. * It is possible for you to center staple and fold, up to 10 copy sheets (40 layout pages) at one time. Inch specifications Set first page. Press "Start" key. Saddle Stitch Pape Set 81/2x11" 100% Back Close Off Bind & Fold Metric specifications Set first page. Press "START" button. Saddle Stitch Off Bind & Fold Paper size Set Back Close 8 If you want to add covers, touch the "Copy on front cvr" ["Copy on front cov."] key. The "Copy on front cover" screen will be displayed. At this point, if you do NOT want to copy onto the covers, go directly to step 10. Inch specifications Set first page. Press "Start" key. Booklet Original None Booklet Book ➔Booklet Book Left Book Right Finishing Open from left Open from right Register Copy front Off Copy on front cvr None Saddle Stitch Paper size Set 11x81/2" Back Close Check direction Set the book original top side direct to back. Metric specifications Set first page. Press "START" button. Booklet Original Finished None Booklet Book RBooklet Book Left Book Right Left binding Right binding Register Copy front Off Copy on front cov. None Center Staple Paper size Set Back Close Check direction Set book original top side direction to back. 9 Touch the "On" key. Inch specifications Set first page. Press "Start" key. Copy on front cover When selecting "ON" for copying on the Off front cover, follow the instruction. 1. Scan front cover book original On 2. Start scan book originals Paper size Set 11x81/2" Back Close Check direction Set the book original top side direct to back. Metric specifications Set first page. Press "START" button. Copy on front cover Off When selecting "ON" for copying on the front cover, follow the instruction. 1. Scan front cover book original. On 2. Start scan book originals. Paper size Set Back Close Check direction Set book original top side direction to back. IMPORTANT! If you DO want to copy onto the covers, be absolutely certain to set the original that you want to have copied onto the cover first. 10 Press the [Start] key. Scanning of the original will start. When a message appears telling you to set the next original, go to the next step. 11 Replace the first original with the next one and press the [Start] key. Scanning of that next original will start. 12 Once you have finished scanning all of the originals, touch the "Scanning finished" key. Copying will start. 5-28
-
 1
1 -
2
-
3
-
4
-
5
-
6
-
7
-
8
-
9
-
10
-
11
-
12
-
13
-
14
-
15
-
16
-
17
-
18
-
19
-
20
-
21
-
22
-
23
-
24
-
25
-
26
-
27
-
28
-
29
-
30
-
31
-
32
-
33
-
34
-
35
-
36
-
37
-
38
-
39
-
40
-
41
-
42
-
43
-
44
-
45
-
46
-
47
-
48
-
49
-
50
-
51
-
52
-
53
-
54
-
55
-
56
-
57
-
58
-
59
-
60
-
61
-
62
-
63
-
64
-
65
-
66
-
67
-
68
-
 69
69 -
 70
70 -
 71
71 -
 72
72 -
 73
73 -
 74
74 -
 75
75 -
 76
76 -
 77
77 -
 78
78 -
 79
79 -
80
-
81
-
82
-
83
-
84
-
85
-
86
-
87
-
88
-
89
-
90
-
91
-
92
-
93
-
94
-
95
-
96
-
97
-
98
-
99
-
100
-
101
-
102
-
103
-
104
-
105
-
106
-
107
-
108
-
109
-
110
-
111
-
112
-
113
-
114
-
115
-
116
-
117
-
118
-
119
-
120
-
121
-
122
-
123
-
124
-
125
-
126
-
127
-
128
-
129
-
130
-
131
-
132
-
133
-
134
-
135
-
136
-
137
-
138
-
139
-
140
-
141
-
142
-
143
-
144
-
145
-
146
-
147
-
148
-
149
-
150
-
151
-
152
-
153
-
154
-
155
-
156
-
157
-
158
-
159
-
160
-
161
-
162
-
163
-
164
-
165
-
166
-
167
-
168
-
169
-
170
-
171
-
172
-
173
-
174
-
175
-
176
-
177
-
178
-
179
-
180
-
181
-
182
-
183
-
184
-
185
-
186
-
187
-
188
-
189
-
190
-
191
-
192
-
193
-
194
-
195
-
196
-
197
-
198
-
199
-
200
-
201
-
202
-
203
-
204
-
205
-
206
-
207
-
208
-
209
-
210
-
211
-
212
-
213
-
214
-
215
-
216
-
217
-
218
-
219
-
220
-
221
-
222
-
223
-
224
-
225
-
226
-
227
-
228
-
229
-
230
-
231
-
232
-
233
-
234
-
235
-
236
-
237
-
238
-
239
-
240
-
241
-
242
-
243
-
244
-
245
-
246
-
247
-
248
-
249
-
250
-
251
-
252
-
253
-
254
-
255
-
256
-
257
-
258
-
259
-
260
-
261
-
262
-
263
-
264
-
265
-
266
-
267
-
268
-
269
-
270
-
271
-
272
-
273
-
274
-
275
-
276
-
277
-
278
-
279
-
280
-
281
-
282
-
283
-
284
-
285
-
286
-
287
-
288
-
289
-
290
-
291
-
292
-
293
-
294
-
295
-
296
 |
 |