Kyocera KM-3035 3035/4035/5035 Operation Guide Rev-6.0 - Page 271
Misfeed in Built-in Finisher optional JAM 80 to 84
 |
View all Kyocera KM-3035 manuals
Add to My Manuals
Save this manual to your list of manuals |
Page 271 highlights
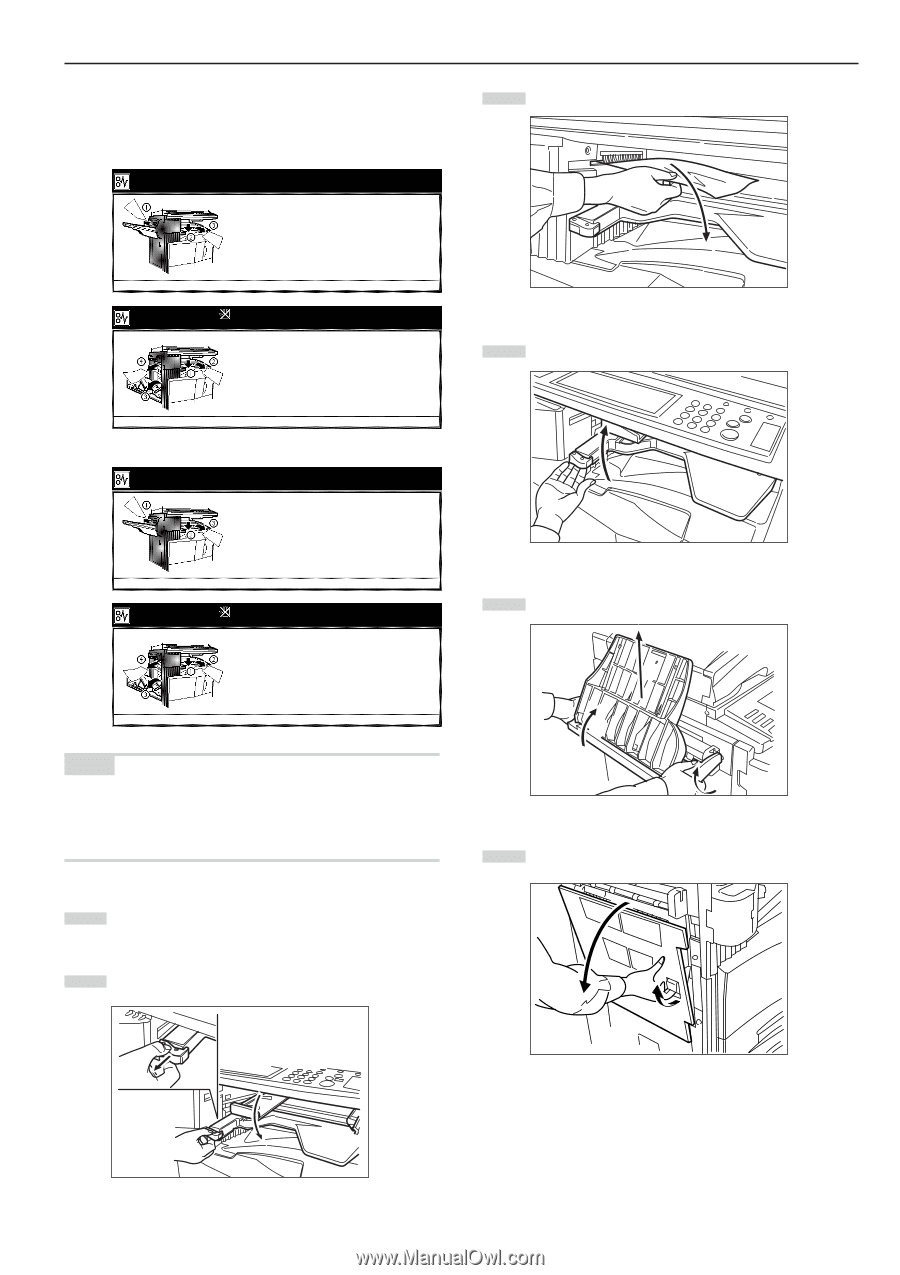
3 Misfeed in Built-in Finisher (optional) (JAM 80 to 84) If the message below appears, a misfeed has occurred in the Built-in Finisher. Remove the misfed paper using the procedure below. Inch specifications Paper misfeed. 1. Remove any paper in output part of Finisher 2. Pull the tray of finisher down. 3. Remove the paper if there is a paper. 4. Set the tray JAM 84 Paper misfeed. Careful for Drum. 1. Lower inner tray of finisher. 2. Remove the paper. 3. Remove the eject tray, open left cover of machine. 4. Remove the paper. 5. Close cover and set the tray. JAM 83 Metric specifications Paper misfeed. 1. Remove any paper in output part of Finisher. 2. Put Finisher tray down. 3. Remove any paper. 4. Set tray back. Paper misfeed. Careful for Drum. 1. Put inner tray of Finisher down. 2. Remove any paper. 3. Remove output tray, open left cover of machine. 4. Remove paper. 5. Close cover and set tray. JAM 84 JAM 83 NOTE The drum area inside the copier is extremely sensitive to dirt and damage. When removing the jammed paper, be sure not to touch the drum area that is located inside the machine with your hands, or with jewelry such as watches and rings, etc. 1 Remove the misfed paper in the Built-in Finisher output section. 2 Lower the Built-in Finisher tray. Section 9 TROUBLESHOOTING 3 Remove the misfed paper. 4 Raise the Built-in Finisher tray back into its original position. 5 Remove the tray. 3 1 2 6 Pull up the left cover 1 handle to open the left cover 1. 9-11
-
 1
1 -
2
-
3
-
4
-
5
-
6
-
7
-
8
-
9
-
10
-
11
-
12
-
13
-
14
-
15
-
16
-
17
-
18
-
19
-
20
-
21
-
22
-
23
-
24
-
25
-
26
-
27
-
28
-
29
-
30
-
31
-
32
-
33
-
34
-
35
-
36
-
37
-
38
-
39
-
40
-
41
-
42
-
43
-
44
-
45
-
46
-
47
-
48
-
49
-
50
-
51
-
52
-
53
-
54
-
55
-
56
-
57
-
58
-
59
-
60
-
61
-
62
-
63
-
64
-
65
-
66
-
67
-
68
-
69
-
70
-
71
-
72
-
73
-
74
-
75
-
76
-
77
-
78
-
79
-
80
-
81
-
82
-
83
-
84
-
85
-
86
-
87
-
88
-
89
-
90
-
91
-
92
-
93
-
94
-
95
-
96
-
97
-
98
-
99
-
100
-
101
-
102
-
103
-
104
-
105
-
106
-
107
-
108
-
109
-
110
-
111
-
112
-
113
-
114
-
115
-
116
-
117
-
118
-
119
-
120
-
121
-
122
-
123
-
124
-
125
-
126
-
127
-
128
-
129
-
130
-
131
-
132
-
133
-
134
-
135
-
136
-
137
-
138
-
139
-
140
-
141
-
142
-
143
-
144
-
145
-
146
-
147
-
148
-
149
-
150
-
151
-
152
-
153
-
154
-
155
-
156
-
157
-
158
-
159
-
160
-
161
-
162
-
163
-
164
-
165
-
166
-
167
-
168
-
169
-
170
-
171
-
172
-
173
-
174
-
175
-
176
-
177
-
178
-
179
-
180
-
181
-
182
-
183
-
184
-
185
-
186
-
187
-
188
-
189
-
190
-
191
-
192
-
193
-
194
-
195
-
196
-
197
-
198
-
199
-
200
-
201
-
202
-
203
-
204
-
205
-
206
-
207
-
208
-
209
-
210
-
211
-
212
-
213
-
214
-
215
-
216
-
217
-
218
-
219
-
220
-
221
-
222
-
223
-
224
-
225
-
226
-
227
-
228
-
229
-
230
-
231
-
232
-
233
-
234
-
235
-
236
-
237
-
238
-
239
-
240
-
241
-
242
-
243
-
244
-
245
-
246
-
247
-
248
-
249
-
250
-
251
-
252
-
253
-
254
-
255
-
256
-
257
-
258
-
259
-
260
-
261
-
262
-
263
-
264
-
265
-
 266
266 -
 267
267 -
 268
268 -
 269
269 -
 270
270 -
 271
271 -
 272
272 -
 273
273 -
 274
274 -
 275
275 -
 276
276 -
277
-
278
-
279
-
280
-
281
-
282
-
283
-
284
-
285
-
286
-
287
-
288
-
289
-
290
-
291
-
292
-
293
-
294
-
295
-
296
 |
 |