Kyocera KM-3035 3035/4035/5035 Operation Guide Rev-6.0 - Page 149
Scanning restrictions, Access the screen that contains the copy restriction setting
 |
View all Kyocera KM-3035 manuals
Add to My Manuals
Save this manual to your list of manuals |
Page 149 highlights
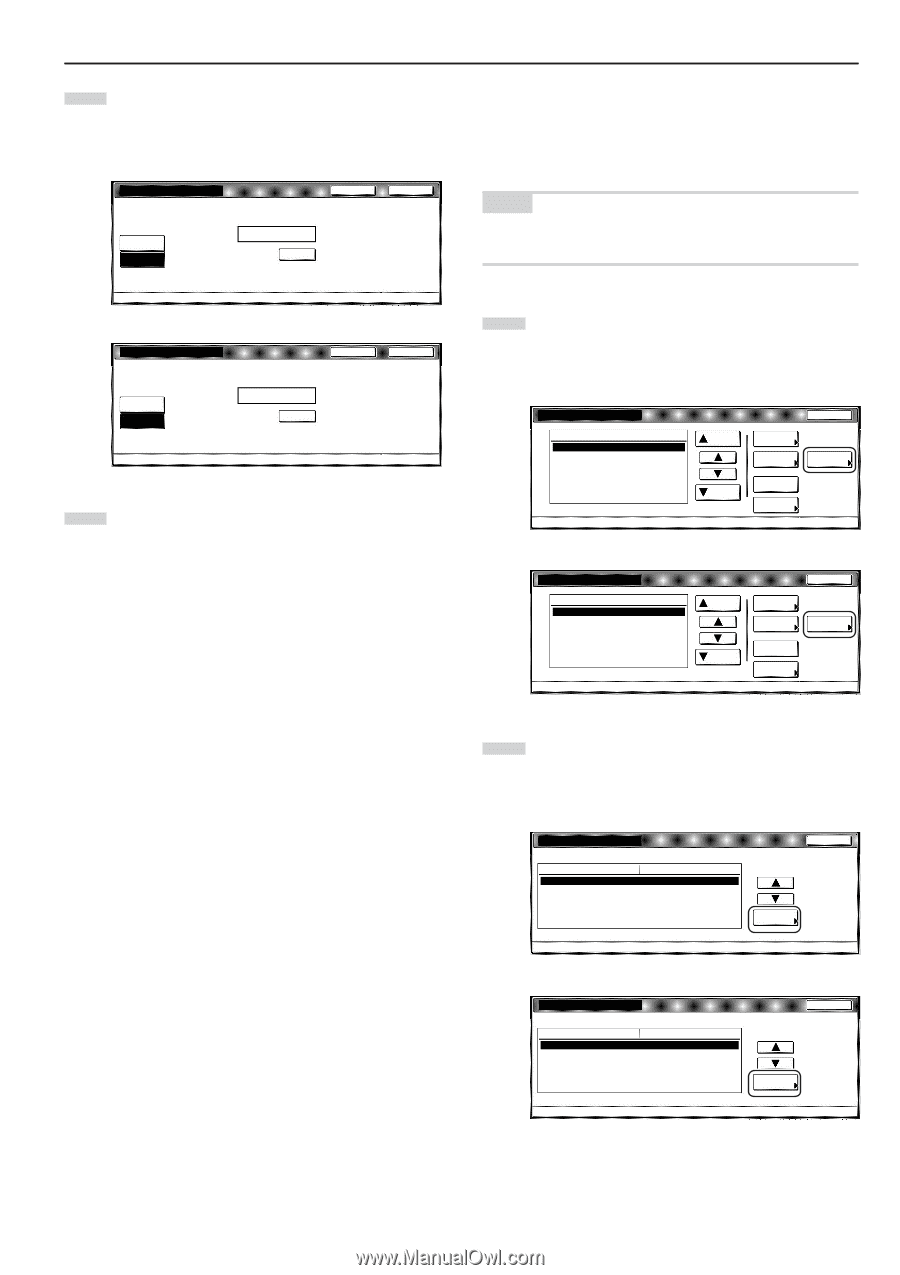
4 Use the numeric keys on the keypad to enter the maximum number of copies and printouts that can be made in total under this ID-code. The limit can be set to any 1-page increment up to 999,999. Inch specifications Output limitation Back Close No limit Counter limit (1~999,999) Limited value 999,999 Clear Management - Management edit - New register Metric specifications Output limitation Back No limit Counter limit (1~999,999) Limited value 999,999 Clear Close Management - Management edit - New register 5 Touch the "Close" key. The touch panel will return to the screen in step 2. Section 7 COPIER MANAGEMENT FUNCTIONS Scanning restrictions Perform the following procedure when you want to set the maximum number of originals that can be scanned under the corresponding department ID-code when the optional Printer/Scanner Kit is installed in your copier. NOTE This setting will only be available when "On" is selected as the "Scanner function management ON/OFF" setting. 1 Access the screen that contains the copy restriction setting items. (See "Register new department ID-codes" on page 7-4 or "Change restrictions for use" on page 7-20.) Inch specifications Management edit Department 01 02 0001 0014 00000015 00000016 00000017 1st Sales Dept. 2nd Sales Dept. 3rd Sales Dept. 4th Sales Dept. 5th Sales Dept. 6th Sales Dept. 7th Sales Dept. Default setting - Management 001/010 Up Down Order of indication Mgt. Inf. correction Delete Register Close Limit in use Metric specifications Management edit Department 01 02 0001 0014 00000015 00000016 00000017 1st Sales Dept. 2nd Sales Dept. 3rd Sales Dept. 4th Sales Dept. 5th Sales Dept. 6th Sales Dept. 7th Sales Dept. Default setting - Management 001/010 Up Down Order of indication Mgt. Inf. correction Delete Register Close Limit in use 2 Select "Scanner limitation" under the "Setting item" column on the left side of the touch panel and then touch the "Change #" key. The "Scanner limitation" screen will be displayed. Inch specifications Limit in use 0007 1st Sales Dept. Setting item Copy limitation Printer limitation Output limitation Scanner limitation Fax Transm. Limitation On On No limit No limit No limit Value Close Change # Default setting - Management - Management edit Metric specifications Limit in use 0007 1st Sales Dept. Setting item Copy limitation Printer limitation Output limitation Scanner limitation Fax Transm. Limitation On On No limit No limit No limit Value Close Change # Default setting - Management - Management edit 7-11
-
 1
1 -
2
-
3
-
4
-
5
-
6
-
7
-
8
-
9
-
10
-
11
-
12
-
13
-
14
-
15
-
16
-
17
-
18
-
19
-
20
-
21
-
22
-
23
-
24
-
25
-
26
-
27
-
28
-
29
-
30
-
31
-
32
-
33
-
34
-
35
-
36
-
37
-
38
-
39
-
40
-
41
-
42
-
43
-
44
-
45
-
46
-
47
-
48
-
49
-
50
-
51
-
52
-
53
-
54
-
55
-
56
-
57
-
58
-
59
-
60
-
61
-
62
-
63
-
64
-
65
-
66
-
67
-
68
-
69
-
70
-
71
-
72
-
73
-
74
-
75
-
76
-
77
-
78
-
79
-
80
-
81
-
82
-
83
-
84
-
85
-
86
-
87
-
88
-
89
-
90
-
91
-
92
-
93
-
94
-
95
-
96
-
97
-
98
-
99
-
100
-
101
-
102
-
103
-
104
-
105
-
106
-
107
-
108
-
109
-
110
-
111
-
112
-
113
-
114
-
115
-
116
-
117
-
118
-
119
-
120
-
121
-
122
-
123
-
124
-
125
-
126
-
127
-
128
-
129
-
130
-
131
-
132
-
133
-
134
-
135
-
136
-
137
-
138
-
139
-
140
-
141
-
142
-
143
-
 144
144 -
 145
145 -
 146
146 -
 147
147 -
 148
148 -
 149
149 -
 150
150 -
 151
151 -
 152
152 -
 153
153 -
 154
154 -
155
-
156
-
157
-
158
-
159
-
160
-
161
-
162
-
163
-
164
-
165
-
166
-
167
-
168
-
169
-
170
-
171
-
172
-
173
-
174
-
175
-
176
-
177
-
178
-
179
-
180
-
181
-
182
-
183
-
184
-
185
-
186
-
187
-
188
-
189
-
190
-
191
-
192
-
193
-
194
-
195
-
196
-
197
-
198
-
199
-
200
-
201
-
202
-
203
-
204
-
205
-
206
-
207
-
208
-
209
-
210
-
211
-
212
-
213
-
214
-
215
-
216
-
217
-
218
-
219
-
220
-
221
-
222
-
223
-
224
-
225
-
226
-
227
-
228
-
229
-
230
-
231
-
232
-
233
-
234
-
235
-
236
-
237
-
238
-
239
-
240
-
241
-
242
-
243
-
244
-
245
-
246
-
247
-
248
-
249
-
250
-
251
-
252
-
253
-
254
-
255
-
256
-
257
-
258
-
259
-
260
-
261
-
262
-
263
-
264
-
265
-
266
-
267
-
268
-
269
-
270
-
271
-
272
-
273
-
274
-
275
-
276
-
277
-
278
-
279
-
280
-
281
-
282
-
283
-
284
-
285
-
286
-
287
-
288
-
289
-
290
-
291
-
292
-
293
-
294
-
295
-
296
 |
 |