Kyocera KM-3035 3035/4035/5035 Operation Guide Rev-6.0 - Page 56
(3) Erasing blemishes from the edges of copies using individual border settings (Individual border erase mode)
 |
View all Kyocera KM-3035 manuals
Add to My Manuals
Save this manual to your list of manuals |
Page 56 highlights
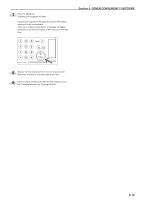
Section 5 OTHER CONVENIENT FUNCTIONS (3) Erasing blemishes from the edges of copies using individual border settings (Individual border erase mode) Inch specifications With this mode, shadows, lines, etc., that occur around the edges of copies made from sheet originals can be erased, but in this case you can designate separate widths for each of the top, bottom, left and right borders. The width of each border to be erased can be set to any 1/8" increment between 0 and 2". (The area that will be erased as the top border is shown as a, the bottom border is shown as b, the left border as c, and the right border as d, in the illustration.) Metric specifications With this mode, shadows, lines, etc., that occur around the edges of copies made from sheet originals can be erased, but in this case you can designate separate widths for each of the top, bottom, left and right borders. The width of each border to be erased can be set to any 1 mm increment between 0 and 50 mm. (The area that will be erased as the top border is shown as a, the bottom border is shown as b, the left border as c, and the right border as d, in the illustration.) NOTE The default settings for the border widths are the same values as that set for the sheet erase mode. 1 Set the original to be copied. 2 Touch the "Function" tab. The content of the "Function" tab will be displayed. 3 Touch the "Border Erase" ["Erase Mode"] key. The "Border Erase" ["Erase Mode"] screen will be displayed. Inch specifications Ready to copy. Paper size Set 11x81/2" Select paper Exposure mode Orig.image quality Sort/ Finished Basic 2 sided/ Separation Reduce /Enlarge Margin/ Centering Border Erase User choice Select orig. size Auto Selection Page # Cover Mode Function Combine Batch scanning Forms Overlay Booklet Program Up Down Metric specifications Ready to copy. Select paper Exposure mode Image quality Sort/ Finished Basic 2-sided/ Split Reduce/ Enlarge Margin/ Imag. shift Erase Mode User choice Select size orig. Auto selection Page numbering Cover Mode Function Merge copy Large # of originals Form overlay Booklet Program Paper size Set Up Down If you want to select the sheet erase mode or the book erase mode, go to the next step. If you want to select the individual border erase mode, go directly to step 6. 5-12
-
 1
1 -
2
-
3
-
4
-
5
-
6
-
7
-
8
-
9
-
10
-
11
-
12
-
13
-
14
-
15
-
16
-
17
-
18
-
19
-
20
-
21
-
22
-
23
-
24
-
25
-
26
-
27
-
28
-
29
-
30
-
31
-
32
-
33
-
34
-
35
-
36
-
37
-
38
-
39
-
40
-
41
-
42
-
43
-
44
-
45
-
46
-
47
-
48
-
49
-
50
-
 51
51 -
 52
52 -
 53
53 -
 54
54 -
 55
55 -
 56
56 -
 57
57 -
 58
58 -
 59
59 -
 60
60 -
 61
61 -
62
-
63
-
64
-
65
-
66
-
67
-
68
-
69
-
70
-
71
-
72
-
73
-
74
-
75
-
76
-
77
-
78
-
79
-
80
-
81
-
82
-
83
-
84
-
85
-
86
-
87
-
88
-
89
-
90
-
91
-
92
-
93
-
94
-
95
-
96
-
97
-
98
-
99
-
100
-
101
-
102
-
103
-
104
-
105
-
106
-
107
-
108
-
109
-
110
-
111
-
112
-
113
-
114
-
115
-
116
-
117
-
118
-
119
-
120
-
121
-
122
-
123
-
124
-
125
-
126
-
127
-
128
-
129
-
130
-
131
-
132
-
133
-
134
-
135
-
136
-
137
-
138
-
139
-
140
-
141
-
142
-
143
-
144
-
145
-
146
-
147
-
148
-
149
-
150
-
151
-
152
-
153
-
154
-
155
-
156
-
157
-
158
-
159
-
160
-
161
-
162
-
163
-
164
-
165
-
166
-
167
-
168
-
169
-
170
-
171
-
172
-
173
-
174
-
175
-
176
-
177
-
178
-
179
-
180
-
181
-
182
-
183
-
184
-
185
-
186
-
187
-
188
-
189
-
190
-
191
-
192
-
193
-
194
-
195
-
196
-
197
-
198
-
199
-
200
-
201
-
202
-
203
-
204
-
205
-
206
-
207
-
208
-
209
-
210
-
211
-
212
-
213
-
214
-
215
-
216
-
217
-
218
-
219
-
220
-
221
-
222
-
223
-
224
-
225
-
226
-
227
-
228
-
229
-
230
-
231
-
232
-
233
-
234
-
235
-
236
-
237
-
238
-
239
-
240
-
241
-
242
-
243
-
244
-
245
-
246
-
247
-
248
-
249
-
250
-
251
-
252
-
253
-
254
-
255
-
256
-
257
-
258
-
259
-
260
-
261
-
262
-
263
-
264
-
265
-
266
-
267
-
268
-
269
-
270
-
271
-
272
-
273
-
274
-
275
-
276
-
277
-
278
-
279
-
280
-
281
-
282
-
283
-
284
-
285
-
286
-
287
-
288
-
289
-
290
-
291
-
292
-
293
-
294
-
295
-
296
 |
 |
