Kyocera KM-3035 3035/4035/5035 Operation Guide Rev-6.0 - Page 49
Ready to copy., to copy.
 |
View all Kyocera KM-3035 manuals
Add to My Manuals
Save this manual to your list of manuals |
Page 49 highlights
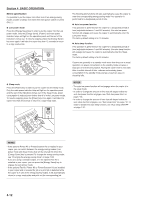
4 Touch the "2 sided / 1 sided" ["2-sided / 1-sided"] key or the "Book / 1 sided" ["Book / 1-sided"] key, as appropriate to the type of originals being copied and the type of finished copies to be made. Inch specifications Ready to copy. Paper size Set 11x81/2" 2 sided/Separation Register Back Close 1 sided ➔1 sided 2 sided ➔1 sided Book ➔1 sided 1 sided ➔2 sided 2 sided ➔2 sided Book ➔2 sided Metric specifications Ready to copy. 2-sided / Split Able to copy 1 sided (separate) or 2 sided copy using 1 sided original, Book original or 2 sided original. Register Paper size Set Back Close 1-sided R1-sided 2-sided R1-sided Book R1-sided 1-sided R2-sided 2-sided R2-sided Book R2-sided Able to copy 1-sided (separate) or 2-sided copy using 1-sided original, book original or 2-sided original. 5 Specify the binding direction of the originals. Inch specifications ady to copy. to copy. Separation Original Registe on Original Register 1 sided d ➔2 sided 2 sided d ➔2 sided Book d ➔2 sided Open from left/right Open from top 1 sided ➔2 sided 2 sided ➔2 sided Book ➔2 sided Open from left Open from right Metric specifications Ready to copy. to copy. ided / Split R Original Original Register ed sided ed sided k sided 1-sided R2-sided 2-sided R2-sided Book R2-sided Left/Right binding Top binding -sided R2-sided -sided R2-sided Book R2-sided Left binding Right binding Section 5 OTHER CONVENIENT FUNCTIONS 6 Follow the instructions on the right side of the touch panel and verify the direction in which the originals were set. IMPORTANT! If the designation for the direction that the originals are set is not correct, copying may be accomplished incorrectly. Inch specifications Paper size Set 11x81/2" Paper size Set 11x81/2" Register Back Check direction Check direction of original top side. Close Register Back Close Check direction Set the book original top side direct to back. Rear Left top corner Metric specifications Paper size Set Paper size Set Register Back Close Check direction Check direction of original. Register Back Close Check direction Set book original top side direction to back. Back Edge Left top corner 7 Press the [Start] key. Scanning of the originals will start. If you set the originals in the optional Document Processor, copying will start automatically. If you set an original on the platen, a message will appear telling you to set the next original. In this case, go to the next step. 8 Replace the first original with the next one and press the [Start] key. Scanning of that next original will start. 9 Once you have finished scanning all of the originals, touch the "Scanning finished" key. Copying will start. 5-5
-
 1
1 -
2
-
3
-
4
-
5
-
6
-
7
-
8
-
9
-
10
-
11
-
12
-
13
-
14
-
15
-
16
-
17
-
18
-
19
-
20
-
21
-
22
-
23
-
24
-
25
-
26
-
27
-
28
-
29
-
30
-
31
-
32
-
33
-
34
-
35
-
36
-
37
-
38
-
39
-
40
-
41
-
42
-
43
-
 44
44 -
 45
45 -
 46
46 -
 47
47 -
 48
48 -
 49
49 -
 50
50 -
 51
51 -
 52
52 -
 53
53 -
 54
54 -
55
-
56
-
57
-
58
-
59
-
60
-
61
-
62
-
63
-
64
-
65
-
66
-
67
-
68
-
69
-
70
-
71
-
72
-
73
-
74
-
75
-
76
-
77
-
78
-
79
-
80
-
81
-
82
-
83
-
84
-
85
-
86
-
87
-
88
-
89
-
90
-
91
-
92
-
93
-
94
-
95
-
96
-
97
-
98
-
99
-
100
-
101
-
102
-
103
-
104
-
105
-
106
-
107
-
108
-
109
-
110
-
111
-
112
-
113
-
114
-
115
-
116
-
117
-
118
-
119
-
120
-
121
-
122
-
123
-
124
-
125
-
126
-
127
-
128
-
129
-
130
-
131
-
132
-
133
-
134
-
135
-
136
-
137
-
138
-
139
-
140
-
141
-
142
-
143
-
144
-
145
-
146
-
147
-
148
-
149
-
150
-
151
-
152
-
153
-
154
-
155
-
156
-
157
-
158
-
159
-
160
-
161
-
162
-
163
-
164
-
165
-
166
-
167
-
168
-
169
-
170
-
171
-
172
-
173
-
174
-
175
-
176
-
177
-
178
-
179
-
180
-
181
-
182
-
183
-
184
-
185
-
186
-
187
-
188
-
189
-
190
-
191
-
192
-
193
-
194
-
195
-
196
-
197
-
198
-
199
-
200
-
201
-
202
-
203
-
204
-
205
-
206
-
207
-
208
-
209
-
210
-
211
-
212
-
213
-
214
-
215
-
216
-
217
-
218
-
219
-
220
-
221
-
222
-
223
-
224
-
225
-
226
-
227
-
228
-
229
-
230
-
231
-
232
-
233
-
234
-
235
-
236
-
237
-
238
-
239
-
240
-
241
-
242
-
243
-
244
-
245
-
246
-
247
-
248
-
249
-
250
-
251
-
252
-
253
-
254
-
255
-
256
-
257
-
258
-
259
-
260
-
261
-
262
-
263
-
264
-
265
-
266
-
267
-
268
-
269
-
270
-
271
-
272
-
273
-
274
-
275
-
276
-
277
-
278
-
279
-
280
-
281
-
282
-
283
-
284
-
285
-
286
-
287
-
288
-
289
-
290
-
291
-
292
-
293
-
294
-
295
-
296
 |
 |
