Sharp MX-M260 MX-M260 MX-M310 Operation Manual - Page 29
BYPASS FEED special paper
 |
View all Sharp MX-M260 manuals
Add to My Manuals
Save this manual to your list of manuals |
Page 29 highlights
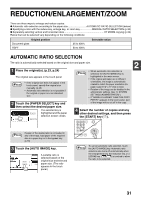
COPY FUNCTIONS BYPASS FEED (special paper) The bypass tray must be used to feed special papers such as transparency film and labels. The bypass tray can also be used to feed standard copy paper. 1 Place the original(s). (p.23, p.24) 2 Insert the paper (print face down) all the way into the bypass tray. For paper that can be used in the bypass tray, see "PAPER" (p.16). To load paper, see "Loading paper in the bypass tray" (p.19). 3 Touch the [PAPER SELECT] key or the tray in the image of the machine in the touch panel, and select the bypass tray. EXPOSURE AUTO 8½x11 Set the type of paper that you loaded in the bypass tray. (p.21) PAPER SELECT 4 Select the number of copies and any other desired copy settings, and then press the [START] key ( ). LOGOUT UT 2 100% Shifting the starting position of copying When copying on a special size of paper in the bypass tray, the starting position of printing can be shifted vertically for fine adjustment of the image position. To adjust the starting position of printing, follow the steps below. This function can only be used when feeding special sizes of paper from the bypass tray. 1 Touch the [PAPER SELECT] key and then touch the [EXTRA IMAGE ADJUST] key on the bypass tray. 2 Use the key or key to adjust the printing position, and then touch the [OK] key. • The position can be adjusted from -0.5 inch to +0.5 inch in 0.02 inch increments. • When a setting from -0.5 inch to -0.02 inch is selected, the starting position of printing is moved to front from the standard position. When a setting from +0.02 inch to +0.5 inch is selected, the starting position of printing is moved to rear. READY TO COPY. EXTRA IMAGE ADJUST 0.00 (-0.5 0.5) inch TO FRONT TO REAR 0 OK 27
-
 1
1 -
2
-
3
-
4
-
5
-
6
-
7
-
8
-
9
-
10
-
11
-
12
-
13
-
14
-
15
-
16
-
17
-
18
-
19
-
20
-
21
-
22
-
23
-
 24
24 -
 25
25 -
 26
26 -
 27
27 -
 28
28 -
 29
29 -
 30
30 -
 31
31 -
 32
32 -
 33
33 -
 34
34 -
35
-
36
-
37
-
38
-
39
-
40
-
41
-
42
-
43
-
44
-
45
-
46
-
47
-
48
-
49
-
50
-
51
-
52
-
53
-
54
-
55
-
56
-
57
-
58
-
59
-
60
-
61
-
62
-
63
-
64
-
65
-
66
-
67
-
68
-
69
-
70
-
71
-
72
-
73
-
74
-
75
-
76
-
77
-
78
-
79
-
80
-
81
-
82
-
83
-
84
-
85
-
86
-
87
-
88
-
89
-
90
-
91
-
92
-
93
-
94
-
95
-
96
-
97
-
98
-
99
-
100
-
101
-
102
-
103
-
104
-
105
-
106
-
107
-
108
-
109
-
110
-
111
-
112
-
113
-
114
-
115
-
116
-
117
-
118
-
119
-
120
-
121
-
122
-
123
-
124
-
125
-
126
-
127
-
128
-
129
-
130
-
131
-
132
-
133
-
134
-
135
-
136
-
137
-
138
-
139
-
140
-
141
-
142
-
143
-
144
-
145
-
146
-
147
-
148
-
149
-
150
-
151
-
152
-
153
-
154
-
155
-
156
-
157
-
158
-
159
-
160
-
161
-
162
-
163
-
164
-
165
-
166
-
167
-
168
 |
 |
