Sharp MX-M260 MX-M260 MX-M310 Operation Manual - Page 64
Setting Up Destination Information
 |
View all Sharp MX-M260 manuals
Add to My Manuals
Save this manual to your list of manuals |
Page 64 highlights
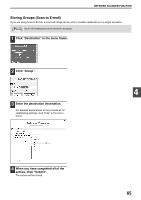
NETWORK SCANNER FUNCTION SETTING UP DESTINATION INFORMATION To store the name and address of a destination in a one-touch key, click "Destination" in the Web page menu frame. "Destination" can also be used to edit or clear stored destinations. (p.66) A total of 200 destinations can be stored, including E-mail, FTP, Desktop, and Group destinations. Stored destinations can be selected in the machine's touch panel when transmission is performed. * Multiple e-mail addresses (up to 100) can be stored as a group. Note that this may reduce the maximum number of destinations (normally 200) that can be stored. Click here. E-mail: FTP: Desktop: Group: See below Refer to page 63. Refer to page 64. Refer to page 65. Note Make sure that the address book screen (p.71) does not appear in the machine's touch panel when you store, edit, or delete destinations. Destinations cannot be edited or deleted when the address book screen appears. Storing destinations for Scan to E-mail 1 Click "Destination" in the menu frame. 3 Enter the destination information. For detailed explanations of the procedures for establishing settings, click "Help" in the menu frame. 2 Click "E-mail". Note If user authentication is enabled and you wish to allow login using the above stored information, select the "It adds also to the Sender List." checkbox and enter the "Login Name" (maximum of 32 characters). The login name must be the same as the login name stored in the LDAP server. 4 When you have completed all of the entries, click "Submit". The entries will be stored. Note To perform Scan to E-mail, the SMTP server settings must first be established. Click "Application" in the Web page, click "SMTP" in the screen that appears, and then enter the settings under "SMTP Setup" (p.59). 62
-
 1
1 -
2
-
3
-
4
-
5
-
6
-
7
-
8
-
9
-
10
-
11
-
12
-
13
-
14
-
15
-
16
-
17
-
18
-
19
-
20
-
21
-
22
-
23
-
24
-
25
-
26
-
27
-
28
-
29
-
30
-
31
-
32
-
33
-
34
-
35
-
36
-
37
-
38
-
39
-
40
-
41
-
42
-
43
-
44
-
45
-
46
-
47
-
48
-
49
-
50
-
51
-
52
-
53
-
54
-
55
-
56
-
57
-
58
-
 59
59 -
 60
60 -
 61
61 -
 62
62 -
 63
63 -
 64
64 -
 65
65 -
 66
66 -
 67
67 -
 68
68 -
 69
69 -
70
-
71
-
72
-
73
-
74
-
75
-
76
-
77
-
78
-
79
-
80
-
81
-
82
-
83
-
84
-
85
-
86
-
87
-
88
-
89
-
90
-
91
-
92
-
93
-
94
-
95
-
96
-
97
-
98
-
99
-
100
-
101
-
102
-
103
-
104
-
105
-
106
-
107
-
108
-
109
-
110
-
111
-
112
-
113
-
114
-
115
-
116
-
117
-
118
-
119
-
120
-
121
-
122
-
123
-
124
-
125
-
126
-
127
-
128
-
129
-
130
-
131
-
132
-
133
-
134
-
135
-
136
-
137
-
138
-
139
-
140
-
141
-
142
-
143
-
144
-
145
-
146
-
147
-
148
-
149
-
150
-
151
-
152
-
153
-
154
-
155
-
156
-
157
-
158
-
159
-
160
-
161
-
162
-
163
-
164
-
165
-
166
-
167
-
168
 |
 |
