Sharp MX-M260 MX-M260 MX-M310 Operation Manual - Page 71
Restricting Use Of The Network Scanner, Function User Authentication
 |
View all Sharp MX-M260 manuals
Add to My Manuals
Save this manual to your list of manuals |
Page 71 highlights
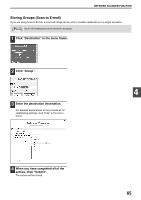
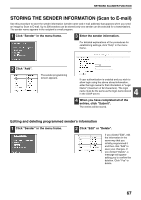
NETWORK SCANNER FUNCTION RESTRICTING USE OF THE NETWORK SCANNER FUNCTION (USER AUTHENTICATION) Use of the network scanner function can be restricted by means of user passwords stored in an LDAP server. Settings required for user authentication To implement user authentication, the following settings are required: • Enable user authentication (step 3 on page 58) • Configure LDAP server settings (p.60) • Store login names (p.67) Logging in when user authentication is enabled To use the network scanner function when user authentication is enabled, you must first log in. Follow these steps: 1 Press the [SCAN] key on the operation panel. The login screen will appear in the touch panel. COPY PRINT ON LINE DATA SCAN DATA FAX LINE DATA JOB STATUS SYSTEM SETTINGS If you will use the [SELECT FROM SENDER LIST] key, go to step 3. 2 Touch the [LOGIN NAME] key, [E-MAIL ADDRESS] key. USER AUTHENTICATION LOGIN NAME SENDER NAME : E-MAIL ADDRESS PASSWORD A text entry screen will appear when each key is touched. Enter the LOGIN NAME, SENDER NAME, and E-MAIL ADDRESS. (Go to step 4.) 3 Touch the [SELECT FROM SENDER LIST] key. The sender list screen OK appears. When you select your login name, SELECT FROM SENDER LIST sender name and e-mail address are entered. 4 4 Enter the password. For the password, enter the user password that is stored in the server. PASSWORD CANCEL OK SPACE ABC abc AB/ab 12#$% 5 Touch the [OK] key. If the login name and password are valid, the initial screen (p.70) of scanner mode appears. Note • To logout, press the [LOGOUT] key( ). If audit mode is enabled, you will also log out of your account. • To switch to a mode other than network scanner mode, you must log out. 69
-
 1
1 -
2
-
3
-
4
-
5
-
6
-
7
-
8
-
9
-
10
-
11
-
12
-
13
-
14
-
15
-
16
-
17
-
18
-
19
-
20
-
21
-
22
-
23
-
24
-
25
-
26
-
27
-
28
-
29
-
30
-
31
-
32
-
33
-
34
-
35
-
36
-
37
-
38
-
39
-
40
-
41
-
42
-
43
-
44
-
45
-
46
-
47
-
48
-
49
-
50
-
51
-
52
-
53
-
54
-
55
-
56
-
57
-
58
-
59
-
60
-
61
-
62
-
63
-
64
-
65
-
 66
66 -
 67
67 -
 68
68 -
 69
69 -
 70
70 -
 71
71 -
 72
72 -
 73
73 -
 74
74 -
 75
75 -
 76
76 -
77
-
78
-
79
-
80
-
81
-
82
-
83
-
84
-
85
-
86
-
87
-
88
-
89
-
90
-
91
-
92
-
93
-
94
-
95
-
96
-
97
-
98
-
99
-
100
-
101
-
102
-
103
-
104
-
105
-
106
-
107
-
108
-
109
-
110
-
111
-
112
-
113
-
114
-
115
-
116
-
117
-
118
-
119
-
120
-
121
-
122
-
123
-
124
-
125
-
126
-
127
-
128
-
129
-
130
-
131
-
132
-
133
-
134
-
135
-
136
-
137
-
138
-
139
-
140
-
141
-
142
-
143
-
144
-
145
-
146
-
147
-
148
-
149
-
150
-
151
-
152
-
153
-
154
-
155
-
156
-
157
-
158
-
159
-
160
-
161
-
162
-
163
-
164
-
165
-
166
-
167
-
168
 |
 |
