Sharp MX-M260 MX-M260 MX-M310 Operation Manual - Page 65
Storing destinations for Scan to FTP
 |
View all Sharp MX-M260 manuals
Add to My Manuals
Save this manual to your list of manuals |
Page 65 highlights
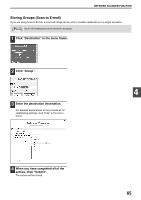
NETWORK SCANNER FUNCTION Storing destinations for Scan to FTP 1 Click "Destination" in the menu frame. 2 Click "FTP". Note If you select the "Enable Hyperlink to FTP server to be e-mailed" checkbox and select a previously stored recipient (p.62) from "E-mail Destination", an e-mail will be sent to the recipient informing them of the file format and location of the scanned image data. A hyperlink to the file server to which the scanned image data was sent appears in the e-mail, and the recipient can click the hyperlink to go directly to the location where the image data is stored. 4 When you have completed all of the entries, click "Submit". The entries will be stored. 3 Enter the destination information. 4 For detailed explanations of the procedures for establishing settings, click "Help" in the menu frame. Note If you entered a host name in "Hostname or IP Address", you will need to enter the DNS server or WINS server settings. Click "Application" in the menu frame and then click "DNS" or "WINS" in the page that appears to configure the corresponding settings. To perform Scan to FTP (Hyperlink), you must also click "SMTP" and then enter the settings under "SMTP Setup" for the SMTP server (p.59). 63
-
 1
1 -
2
-
3
-
4
-
5
-
6
-
7
-
8
-
9
-
10
-
11
-
12
-
13
-
14
-
15
-
16
-
17
-
18
-
19
-
20
-
21
-
22
-
23
-
24
-
25
-
26
-
27
-
28
-
29
-
30
-
31
-
32
-
33
-
34
-
35
-
36
-
37
-
38
-
39
-
40
-
41
-
42
-
43
-
44
-
45
-
46
-
47
-
48
-
49
-
50
-
51
-
52
-
53
-
54
-
55
-
56
-
57
-
58
-
59
-
 60
60 -
 61
61 -
 62
62 -
 63
63 -
 64
64 -
 65
65 -
 66
66 -
 67
67 -
 68
68 -
 69
69 -
 70
70 -
71
-
72
-
73
-
74
-
75
-
76
-
77
-
78
-
79
-
80
-
81
-
82
-
83
-
84
-
85
-
86
-
87
-
88
-
89
-
90
-
91
-
92
-
93
-
94
-
95
-
96
-
97
-
98
-
99
-
100
-
101
-
102
-
103
-
104
-
105
-
106
-
107
-
108
-
109
-
110
-
111
-
112
-
113
-
114
-
115
-
116
-
117
-
118
-
119
-
120
-
121
-
122
-
123
-
124
-
125
-
126
-
127
-
128
-
129
-
130
-
131
-
132
-
133
-
134
-
135
-
136
-
137
-
138
-
139
-
140
-
141
-
142
-
143
-
144
-
145
-
146
-
147
-
148
-
149
-
150
-
151
-
152
-
153
-
154
-
155
-
156
-
157
-
158
-
159
-
160
-
161
-
162
-
163
-
164
-
165
-
166
-
167
-
168
 |
 |
