Sharp MX-M260 MX-M260 MX-M310 Operation Manual - Page 99
Using The Administrator Settings
 |
View all Sharp MX-M260 manuals
Add to My Manuals
Save this manual to your list of manuals |
Page 99 highlights
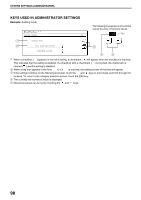
USING THE ADMINISTRATOR SETTINGS When using the administrator settings for the first time, change the factory default administrator password to a Note new code. (Step 3 to step 5) 1 Press the [SYSTEM SETTINGS] key. DATA LINE DATA OB STATUS SYSTEM SETTINGS 2 Touch the [ADMINISTRATOR SETTINGS] key. SYSTEM SETTINGS TOTAL COUNT TRAY SETTINGS KEYBOARD SELECT DISPLAY CONTRAST ADDRESS CONTROL LIST PRINT RECEIVE MODE ADMINISTRATOR SETTINGS EXIT CLOCK FAX DATA FORWARD 3 Use the numeric keys to enter the five-digit administrator password. Each time a digit is entered, the dash (-) that ADMINISTRATOR PASSWORD indicates the digit will change to an asterisk ( ). The factory default setting for the administrator password is 00000. 4 Touch a key to select the desired category of administrator settings. SYSTEM SETTINGS ACCOUNT CONTROL ENERGY SAVE COPY SETTINGS PRINT SETTINGS LIST PRINT CHANGE ADMINISTRATOR PASSWORD OPERATION SETTINGS SCANNER SETTINGS PRODUCT KEY EXIT DEVICE CONTROL FAX SETTINGS 5 Use the numeric keys to enter the new 5-digit administrator password. Use a number for the administrator password 00000 ----- that has not been programmed as an account number for auditing mode (a number that has been programmed as an account number cannot be used). The entered number will be the new administrator password. Be sure to remember this number. 6 Touch the [OK] key. You will return to the screen of step 4. This completes the procedure for changing OK the administrator password. If you wish to configure another program, touch the key of the desired program in the screen of step 4. 7 Press the [CLEAR ALL] key ( ) to exit the setting. 6 Example: To change the administrator password, touch the [CHANGE ADMINISTRATOR PASSWORD] key. • Each time you need to configure a program, use this procedure to select the program. • In the following steps, the setting screen for the selected program appears. Refer to the explanation of the program to select the desired setting (the explanations of the programs begin on page 103). 97
-
 1
1 -
2
-
3
-
4
-
5
-
6
-
7
-
8
-
9
-
10
-
11
-
12
-
13
-
14
-
15
-
16
-
17
-
18
-
19
-
20
-
21
-
22
-
23
-
24
-
25
-
26
-
27
-
28
-
29
-
30
-
31
-
32
-
33
-
34
-
35
-
36
-
37
-
38
-
39
-
40
-
41
-
42
-
43
-
44
-
45
-
46
-
47
-
48
-
49
-
50
-
51
-
52
-
53
-
54
-
55
-
56
-
57
-
58
-
59
-
60
-
61
-
62
-
63
-
64
-
65
-
66
-
67
-
68
-
69
-
70
-
71
-
72
-
73
-
74
-
75
-
76
-
77
-
78
-
79
-
80
-
81
-
82
-
83
-
84
-
85
-
86
-
87
-
88
-
89
-
90
-
91
-
92
-
93
-
 94
94 -
 95
95 -
 96
96 -
 97
97 -
 98
98 -
 99
99 -
 100
100 -
 101
101 -
 102
102 -
 103
103 -
 104
104 -
105
-
106
-
107
-
108
-
109
-
110
-
111
-
112
-
113
-
114
-
115
-
116
-
117
-
118
-
119
-
120
-
121
-
122
-
123
-
124
-
125
-
126
-
127
-
128
-
129
-
130
-
131
-
132
-
133
-
134
-
135
-
136
-
137
-
138
-
139
-
140
-
141
-
142
-
143
-
144
-
145
-
146
-
147
-
148
-
149
-
150
-
151
-
152
-
153
-
154
-
155
-
156
-
157
-
158
-
159
-
160
-
161
-
162
-
163
-
164
-
165
-
166
-
167
-
168
 |
 |
