Sharp MX-M260 MX-M260 MX-M310 Operation Manual - Page 58
Settings And Programming, Required For The Network, Scanner Feature
 |
View all Sharp MX-M260 manuals
Add to My Manuals
Save this manual to your list of manuals |
Page 58 highlights
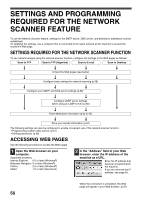
SETTINGS AND PROGRAMMING REQUIRED FOR THE NETWORK SCANNER FEATURE To use the Network Scanner feature, settings for the SMTP server, DNS server, and destination addresses must be established. To establish the settings, use a computer that is connected to the same network as the machine to access the machine's Web page. SETTINGS REQUIRED FOR THE NETWORK SCANNER FUNCTION To use transmit images using the network scanner function, configure the settings in the Web pages as follows: Scan to FTP Scan to FTP (Hyperlink) Scan to E-mail Scan to Desktop Access the Web pages (see below) Configure basic settings for network scanning (p.58) Configure your SMTP and DNS server settings (p.59) Configure LDAP server settings (when using an LDAP server) (p.60) Store destination information (p.62 to 65) Store your sender information (p.67) The following settings can also be configured to enable convenient use of the network scanner function: • Programming custom index names. (p.61) • Setting passwords. (p.68) ACCESSING WEB PAGES Use the following procedure to access the Web pages. 1 Open the Web browser on your computer. Supported browsers: Internet Explorer: 6.0 or later (Windows®) Netscape Navigator: 9 or later (Windows®) Firefox: 2.0 or later (Windows®) Safari: 1.5 or later (Macintosh) 2 In the "Address" field of your Web browser, enter the IP address of the machine as a URL. Enter the IP address that has been programmed in the machine. If you do not know the IP address, see page 89. When the connection is completed, the Web page will appear in your Web browser. (p.57) 56
-
 1
1 -
2
-
3
-
4
-
5
-
6
-
7
-
8
-
9
-
10
-
11
-
12
-
13
-
14
-
15
-
16
-
17
-
18
-
19
-
20
-
21
-
22
-
23
-
24
-
25
-
26
-
27
-
28
-
29
-
30
-
31
-
32
-
33
-
34
-
35
-
36
-
37
-
38
-
39
-
40
-
41
-
42
-
43
-
44
-
45
-
46
-
47
-
48
-
49
-
50
-
51
-
52
-
 53
53 -
 54
54 -
 55
55 -
 56
56 -
 57
57 -
 58
58 -
 59
59 -
 60
60 -
 61
61 -
 62
62 -
 63
63 -
64
-
65
-
66
-
67
-
68
-
69
-
70
-
71
-
72
-
73
-
74
-
75
-
76
-
77
-
78
-
79
-
80
-
81
-
82
-
83
-
84
-
85
-
86
-
87
-
88
-
89
-
90
-
91
-
92
-
93
-
94
-
95
-
96
-
97
-
98
-
99
-
100
-
101
-
102
-
103
-
104
-
105
-
106
-
107
-
108
-
109
-
110
-
111
-
112
-
113
-
114
-
115
-
116
-
117
-
118
-
119
-
120
-
121
-
122
-
123
-
124
-
125
-
126
-
127
-
128
-
129
-
130
-
131
-
132
-
133
-
134
-
135
-
136
-
137
-
138
-
139
-
140
-
141
-
142
-
143
-
144
-
145
-
146
-
147
-
148
-
149
-
150
-
151
-
152
-
153
-
154
-
155
-
156
-
157
-
158
-
159
-
160
-
161
-
162
-
163
-
164
-
165
-
166
-
167
-
168
 |
 |
