Sharp MX-M260 MX-M260 MX-M310 Operation Manual - Page 76
Transmission Methods For Scan To E-mail
 |
View all Sharp MX-M260 manuals
Add to My Manuals
Save this manual to your list of manuals |
Page 76 highlights
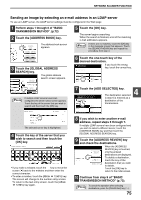
NETWORK SCANNER FUNCTION TRANSMISSION METHODS FOR SCAN TO E-MAIL The destination for a Scan to E-mail transmission can be selected from the address book or entered manually. You can also use an e-mail address stored on an LDAP server. It is possible to select multiple destinations for a Scan to E-mail transmission using a combination of these methods. Use the following procedure when you wish to enter the e-mail address manually or use an e-mail address stored on an LDAP server. Sending an image by entering an e-mail address manually 1 Perform steps 1 through 6 of "BASIC TRANSMISSION METHOD". (p.72) 2 Touch the [ADDRESS ENTRY] key. ADDRESS BOOK ADDRESS REVIEW ADDRESS ENTRY SEND SETTINGS The e-mail address entry screen appears. 5 If you wish to enter another e-mail address, repeat steps 2 through 4. If you wish to select an e-mail address from the address book screen, follow steps 7 and 8 of "BASIC TRANSMISSION METHOD" (p.72 to 73). If you wish to select an e-mail address in an LDAP server, follow the steps in "Sending an image by selecting an e-mail address in an LDAP server" (p.75). Note If you frequently transmit to a fixed group of destinations, you can store the destinations as a group (p.65). 3 Touch the keys on the keyboard to enter the e-mail address. E-MAIL ADDRESS [email protected] CANCEL OK SPACE ABC abc AB/ab 12#$% • If you make a mistake, touch the key to move the cursor ( ) back to the mistake and then enter the correct character. • To enter a number, touch the [AB/ab 12#$%] key. The screen will change to the number entry screen. To return to the text entry screen, touch the [AB/ab 12#$%] key again. 4 Touch the [OK] key. CANCEL OK 6 Touch the [ADDRESS REVIEW] key and check the destinations. ADDRESS BOOK ADDRESS REVIEW ADDRESS ENTRY SEND SETTINGS When the [ADDRESS REVIEW] key is touched, only the entered destinations are displayed. To delete a destination, touch the key of the destination that you wish to delete. Touch the [OK] key to return to the initial screen. Note The entered or selected destinations appear in the address review screen as one touch keys. A maximum of 18 characters of the name or e-mail address can appear in each key. 7 Continue from step 9 of "BASIC TRANSMISSION METHOD" (p.73). Note To cancel the operation when selecting destinations, press the [CLEAR ALL] key ( ). ABC abc Caution 74 • Important points when using Scan to E-mail Be very careful not to send image data files that are too large. Your mail server's system administrator may have placed a limit on the amount of data that can be sent in one e-mail transmission. If this limit is exceeded, the e-mail will not be delivered to the recipient. Even if there is no limit and your e-mail is successfully delivered, a large data file may take a long time to be received and place a heavy burden on the recipient's network, depending on the recipient's network (Internet) connection environment. If large image data files are repeatedly sent, the resulting burden on the network may slow down the speed of other, unrelated data transmissions and in some cases, may even cause the mail server or network to go down. In cases where you need to send multiple documents, try such measures as lowering the resolution mode. • A limit can be set for the size of image files sent by Scan to E-mail in "Maximum Size of File" (p.58) in the Web page.
-
 1
1 -
2
-
3
-
4
-
5
-
6
-
7
-
8
-
9
-
10
-
11
-
12
-
13
-
14
-
15
-
16
-
17
-
18
-
19
-
20
-
21
-
22
-
23
-
24
-
25
-
26
-
27
-
28
-
29
-
30
-
31
-
32
-
33
-
34
-
35
-
36
-
37
-
38
-
39
-
40
-
41
-
42
-
43
-
44
-
45
-
46
-
47
-
48
-
49
-
50
-
51
-
52
-
53
-
54
-
55
-
56
-
57
-
58
-
59
-
60
-
61
-
62
-
63
-
64
-
65
-
66
-
67
-
68
-
69
-
70
-
 71
71 -
 72
72 -
 73
73 -
 74
74 -
 75
75 -
 76
76 -
 77
77 -
 78
78 -
 79
79 -
 80
80 -
 81
81 -
82
-
83
-
84
-
85
-
86
-
87
-
88
-
89
-
90
-
91
-
92
-
93
-
94
-
95
-
96
-
97
-
98
-
99
-
100
-
101
-
102
-
103
-
104
-
105
-
106
-
107
-
108
-
109
-
110
-
111
-
112
-
113
-
114
-
115
-
116
-
117
-
118
-
119
-
120
-
121
-
122
-
123
-
124
-
125
-
126
-
127
-
128
-
129
-
130
-
131
-
132
-
133
-
134
-
135
-
136
-
137
-
138
-
139
-
140
-
141
-
142
-
143
-
144
-
145
-
146
-
147
-
148
-
149
-
150
-
151
-
152
-
153
-
154
-
155
-
156
-
157
-
158
-
159
-
160
-
161
-
162
-
163
-
164
-
165
-
166
-
167
-
168
 |
 |
