Sharp MX-M260 MX-M260 MX-M310 Operation Manual - Page 63
Programming Custom Index Names
 |
View all Sharp MX-M260 manuals
Add to My Manuals
Save this manual to your list of manuals |
Page 63 highlights
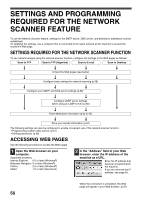
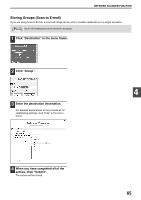
NETWORK SCANNER FUNCTION PROGRAMMING CUSTOM INDEX NAMES Stored destinations appear as one-touch keys in the Address book screen of the touch panel (p.71). Each stored destination appears in the ABC (alphabetical) index, and can also be included in one of the six custom indexes (note that these are called "group indexes" in the touch panel). To program names for the custom indexes, follow the steps below. Note • To change a previously programmed custom index name, simply overwrite the old name. • To switch between the ABC index and the custom indexes in the Address book screen, see page 71. 1 Click "Network Scanning" in the menu frame. 2 Click "Custom Index". 4 3 Enter names for groups 1 to 6. Six group indexes are available, and a name up to six characters long can be assigned to each. The names "USER 1" to "USER 6" are initially entered. Change the names as needed. 4 When you have completed all of the entries, click "Submit". The entries will be stored. 61
-
 1
1 -
2
-
3
-
4
-
5
-
6
-
7
-
8
-
9
-
10
-
11
-
12
-
13
-
14
-
15
-
16
-
17
-
18
-
19
-
20
-
21
-
22
-
23
-
24
-
25
-
26
-
27
-
28
-
29
-
30
-
31
-
32
-
33
-
34
-
35
-
36
-
37
-
38
-
39
-
40
-
41
-
42
-
43
-
44
-
45
-
46
-
47
-
48
-
49
-
50
-
51
-
52
-
53
-
54
-
55
-
56
-
57
-
 58
58 -
 59
59 -
 60
60 -
 61
61 -
 62
62 -
 63
63 -
 64
64 -
 65
65 -
 66
66 -
 67
67 -
 68
68 -
69
-
70
-
71
-
72
-
73
-
74
-
75
-
76
-
77
-
78
-
79
-
80
-
81
-
82
-
83
-
84
-
85
-
86
-
87
-
88
-
89
-
90
-
91
-
92
-
93
-
94
-
95
-
96
-
97
-
98
-
99
-
100
-
101
-
102
-
103
-
104
-
105
-
106
-
107
-
108
-
109
-
110
-
111
-
112
-
113
-
114
-
115
-
116
-
117
-
118
-
119
-
120
-
121
-
122
-
123
-
124
-
125
-
126
-
127
-
128
-
129
-
130
-
131
-
132
-
133
-
134
-
135
-
136
-
137
-
138
-
139
-
140
-
141
-
142
-
143
-
144
-
145
-
146
-
147
-
148
-
149
-
150
-
151
-
152
-
153
-
154
-
155
-
156
-
157
-
158
-
159
-
160
-
161
-
162
-
163
-
164
-
165
-
166
-
167
-
168
 |
 |
