Sharp MX-M260 MX-M260 MX-M310 Operation Manual - Page 82
Selecting The Resolution
 |
View all Sharp MX-M260 manuals
Add to My Manuals
Save this manual to your list of manuals |
Page 82 highlights
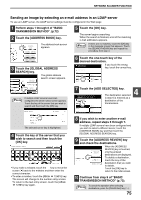
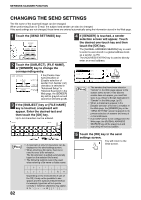
NETWORK SCANNER FUNCTION SELECTING THE RESOLUTION The resolution for scanning an original can be selected. Load the original in scanner mode and then follow the steps below. The factory default setting for the resolution is "300 dpi". Change the resolution 1 Touch the [RESOLUTION] key. QUALITY 300dpi RESOLUTION TIFF-G4 FILE FORMAT AUTO 8½X11 ORIGINAL 2 Touch the desired resolution key. 200dpi 300dpi 600dpi Touch the resolution key that is most suitable for the original. The selected key will be highlighted. 3 Touch the [OK] key. 200dpi 300dpi 600dpi You will return to the OK initial screen. Note • The resolution is initially set to 300 dpi (factory default setting). A resolution of 200 dpi or 300 dpi produces sufficiently clear image data for normal text originals. (200 dpi is equivalent to the "Fine" character mode used for facsimiles). The 600 dpi setting should only be used in cases where high-clarity image reproduction is required, such as a photograph or an illustration. Note that a high resolution setting will result in a larger file size, and transmission may not be successful if there is insufficient disk capacity in the server to which the image is sent (or if the administrator of the server has restricted the file size). If transmission is not successful, you can try such measures as reducing the number of scanned pages in the file or reducing the scan size setting for the original ("MANUALLY SETTING THE SCANNING SIZE" (p.78)). • The default resolution setting can be changed in the administrator settings. (See "INITIAL RESOLUTION SETTING" in "6. SYSTEM SETTINGS (ADMINISTRATOR)".) • The resolution setting cannot be changed once scanning has begun. 80
-
 1
1 -
2
-
3
-
4
-
5
-
6
-
7
-
8
-
9
-
10
-
11
-
12
-
13
-
14
-
15
-
16
-
17
-
18
-
19
-
20
-
21
-
22
-
23
-
24
-
25
-
26
-
27
-
28
-
29
-
30
-
31
-
32
-
33
-
34
-
35
-
36
-
37
-
38
-
39
-
40
-
41
-
42
-
43
-
44
-
45
-
46
-
47
-
48
-
49
-
50
-
51
-
52
-
53
-
54
-
55
-
56
-
57
-
58
-
59
-
60
-
61
-
62
-
63
-
64
-
65
-
66
-
67
-
68
-
69
-
70
-
71
-
72
-
73
-
74
-
75
-
76
-
 77
77 -
 78
78 -
 79
79 -
 80
80 -
 81
81 -
 82
82 -
 83
83 -
 84
84 -
 85
85 -
 86
86 -
 87
87 -
88
-
89
-
90
-
91
-
92
-
93
-
94
-
95
-
96
-
97
-
98
-
99
-
100
-
101
-
102
-
103
-
104
-
105
-
106
-
107
-
108
-
109
-
110
-
111
-
112
-
113
-
114
-
115
-
116
-
117
-
118
-
119
-
120
-
121
-
122
-
123
-
124
-
125
-
126
-
127
-
128
-
129
-
130
-
131
-
132
-
133
-
134
-
135
-
136
-
137
-
138
-
139
-
140
-
141
-
142
-
143
-
144
-
145
-
146
-
147
-
148
-
149
-
150
-
151
-
152
-
153
-
154
-
155
-
156
-
157
-
158
-
159
-
160
-
161
-
162
-
163
-
164
-
165
-
166
-
167
-
168
 |
 |
