Sharp MX-M260 MX-M260 MX-M310 Operation Manual - Page 49
Multi Shot Copy
 |
View all Sharp MX-M260 manuals
Add to My Manuals
Save this manual to your list of manuals |
Page 49 highlights
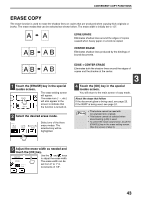
CONVENIENT COPY FUNCTIONS MULTI SHOT COPY The multi shot copy function is used to copy two or four originals onto one sheet of copy paper in a specified order. Example: Copying four originals onto one sheet of paper (Page number: 4 in 1 ( ), layout: ( )) One-sided copy of one-sided original Copy One-sided copy of two-sided original • When using the multi shot copy function, place the originals, select the desired paper size, and select the copy mode before selecting the multi shot copy function in the special modes screen. • When using the multi shot copy function, the appropriate copy ratio will be automatically set based on the original size, paper size, and the number of originals to be copied onto one sheet. The minimum reduction ratio is 25%. (The minimum ratio is 50% when the RSPF is used.) Depending on the original size, paper size, and the number of originals to be copied onto one sheet, portions of original images may be cut off. 1 Touch the [MULTI SHOT] key in the SPECIAL MODES menu screen. DUAL PAGE COPY The multi shot copy 1/2 setting screen will appear. The multi shot MULTI SHOT copy icon ( , etc.) will also appear in the screen to indicate that the function is enabled. 2 Select the number of originals to be copied onto one sheet in the multi shot copy selection screen. SPECIAL MODES MULTI SHOT 2in1 4in1 OK CANCEL OK LAYOUT BORDER 4 Select a borderline setting. 3 CANCEL OK LAYOUT BORDER Select [ ], [ ], or [ ]. 5 Touch the [OK] key in the multi shot setting screen. You will return to the special modes menu screen. 6 Touch the [OK] key in the special modes menu screen. You will return to the main screen of copy mode. 7 Select the number of copies and any other desired copy settings, and then press the [START] key ( ). 3 Select the layout. CANCEL OK LAYOUT BORDER Select the order in which the originals will appear on the copy. 8 [When using the RSPF:] Copying will start after all originals have been scanned. 9 [When using the document glass:] Replace the original with the next original and press the [START] key ( ). Repeat this step until all originals have been scanned, and then touch the [READ-END] key if necessary. Note • The images may be rotated depending on the number of originals and the orientation of the originals and copy paper. • To cancel the multi shot copy function, touch the [CANCEL] key in the multi shot setting screen (the screen of step 2) . 47
-
 1
1 -
2
-
3
-
4
-
5
-
6
-
7
-
8
-
9
-
10
-
11
-
12
-
13
-
14
-
15
-
16
-
17
-
18
-
19
-
20
-
21
-
22
-
23
-
24
-
25
-
26
-
27
-
28
-
29
-
30
-
31
-
32
-
33
-
34
-
35
-
36
-
37
-
38
-
39
-
40
-
41
-
42
-
43
-
 44
44 -
 45
45 -
 46
46 -
 47
47 -
 48
48 -
 49
49 -
 50
50 -
 51
51 -
 52
52 -
 53
53 -
 54
54 -
55
-
56
-
57
-
58
-
59
-
60
-
61
-
62
-
63
-
64
-
65
-
66
-
67
-
68
-
69
-
70
-
71
-
72
-
73
-
74
-
75
-
76
-
77
-
78
-
79
-
80
-
81
-
82
-
83
-
84
-
85
-
86
-
87
-
88
-
89
-
90
-
91
-
92
-
93
-
94
-
95
-
96
-
97
-
98
-
99
-
100
-
101
-
102
-
103
-
104
-
105
-
106
-
107
-
108
-
109
-
110
-
111
-
112
-
113
-
114
-
115
-
116
-
117
-
118
-
119
-
120
-
121
-
122
-
123
-
124
-
125
-
126
-
127
-
128
-
129
-
130
-
131
-
132
-
133
-
134
-
135
-
136
-
137
-
138
-
139
-
140
-
141
-
142
-
143
-
144
-
145
-
146
-
147
-
148
-
149
-
150
-
151
-
152
-
153
-
154
-
155
-
156
-
157
-
158
-
159
-
160
-
161
-
162
-
163
-
164
-
165
-
166
-
167
-
168
 |
 |
