Sharp MX-M260 MX-M260 MX-M310 Operation Manual - Page 45
Erase Copy
 |
View all Sharp MX-M260 manuals
Add to My Manuals
Save this manual to your list of manuals |
Page 45 highlights
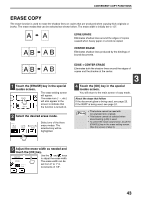
CONVENIENT COPY FUNCTIONS ERASE COPY The erase function is used to erase the shadow lines on copies that are produced when copying thick originals or books. The erase modes that can be selected are shown below. The erase width is initially set to 1/2". EDGE ERASE Eliminates shadow lines around the edges of copies caused when heavy paper or a book is copied. CENTER ERASE Eliminates shadow lines produced by the bindings of bound documents. 1 Touch the [ERASE] key in the special modes screen. The erase setting screen will appear. FT ERASE The erase icon ( , etc.) will also appear in the JOB screen to indicate that PY BUILD MU the function is turned on. 2 Select the desired erase mode. ERASE EDGE ERASE CENTER ERASE EDGE+CENTER ERASE Select one of the three erase modes. The selected key will be highlighted. EDGE + CENTER ERASE Eliminates both the shadow lines around the edges of copies and the shadow at the center. 3 4 Touch the [OK] key in the special modes screen. You will return to the main screen of copy mode. About the steps that follow If the document glass is being used, see page 23. If the RSPF is being used, see page 24. Note • This feature cannot be used with non-standard size originals. • This feature cannot be selected when mixed feeding (p.26) is used. • To cancel the erase copy function, touch the [CANCEL] key in the erase setting screen. (See the screen of step 3.) 3 Adjust the erase width as needed and touch the [OK] key. CANCEL Use the and keys OK to adjust the erase width. EDGE The erase width can be 1/2 (0 1) inch set from 0" to 1" in increments of 1/8". 43
-
 1
1 -
2
-
3
-
4
-
5
-
6
-
7
-
8
-
9
-
10
-
11
-
12
-
13
-
14
-
15
-
16
-
17
-
18
-
19
-
20
-
21
-
22
-
23
-
24
-
25
-
26
-
27
-
28
-
29
-
30
-
31
-
32
-
33
-
34
-
35
-
36
-
37
-
38
-
39
-
 40
40 -
 41
41 -
 42
42 -
 43
43 -
 44
44 -
 45
45 -
 46
46 -
 47
47 -
 48
48 -
 49
49 -
 50
50 -
51
-
52
-
53
-
54
-
55
-
56
-
57
-
58
-
59
-
60
-
61
-
62
-
63
-
64
-
65
-
66
-
67
-
68
-
69
-
70
-
71
-
72
-
73
-
74
-
75
-
76
-
77
-
78
-
79
-
80
-
81
-
82
-
83
-
84
-
85
-
86
-
87
-
88
-
89
-
90
-
91
-
92
-
93
-
94
-
95
-
96
-
97
-
98
-
99
-
100
-
101
-
102
-
103
-
104
-
105
-
106
-
107
-
108
-
109
-
110
-
111
-
112
-
113
-
114
-
115
-
116
-
117
-
118
-
119
-
120
-
121
-
122
-
123
-
124
-
125
-
126
-
127
-
128
-
129
-
130
-
131
-
132
-
133
-
134
-
135
-
136
-
137
-
138
-
139
-
140
-
141
-
142
-
143
-
144
-
145
-
146
-
147
-
148
-
149
-
150
-
151
-
152
-
153
-
154
-
155
-
156
-
157
-
158
-
159
-
160
-
161
-
162
-
163
-
164
-
165
-
166
-
167
-
168
 |
 |
