Sharp MX-M260 MX-M260 MX-M310 Operation Manual - Page 75
Using the RSPF, Using the document glass
 |
View all Sharp MX-M260 manuals
Add to My Manuals
Save this manual to your list of manuals |
Page 75 highlights
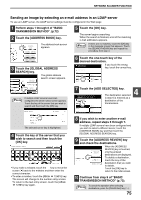
NETWORK SCANNER FUNCTION 8 Touch the one-touch key of the desired destination. READY TO SEND. TEST1 TEST2 TEST3 TEST4 TEST5 TEST6 TEST7 TEST8 FREQUENT USE ABCD EFGHI JKLMN OP The key you touched is highlighted. If you touch the wrong key, touch the key again to cancel the selection. The key display will return to normal. Note • Refer to pages 62 to 65 for information on programming one-touch key destinations. • When touching a one-touch key, corresponding information from the e-mail destination screen is shown in the message display. • The destination e-mail address for Scan to E-mail can be entered manually, or you can search for a destination in an LDAP server on the network (p.74 to 75). • Multiple destinations can be specified for a Scan to E-mail transmission (p.74). 9 Enter a file name for the scanned image. (p.82) ADDRESS BOOK ADDRESS REVIEW If the send settings are not changed, a file name is assigned based on the items specified in the ADDRESS ENTRY Web page. SEND SETTINGS Note When sending an image by Scan to E-mail, a subject and sender's name can be entered. Normally the subject and sender are automatically entered based on the information stored in "Reply E-mail Address" in "SMTP Setup" in the Web page. If user authentication is enabled, the e-mail address of the user who logged in is used as the sender. Using the RSPF 10 Press the [START] key ( ). Scanning begins. When scanning is finished, "SENDING. PRESS [C] TO CANCEL." appears in the touch panel and transmission begins. When transmission is finished, "SENDING COMPLETED." appears in the touch panel. Using the document glass 10 Press the [START] key ( ). The original is scanned and the [READ-END] key appears. 4 11 If you have another page to scan, change pages and then press the [START] key ( ). Repeat this sequence until all pages have been scanned. Note If no action is taken for one minute, scanning automatically ends and transmission begins. 12 After the final page is scanned, touch the [READ-END] key. ESS [START]. "SENDING. PRESS [C] TO CANCEL." appears in EAD-END]. the touch panel and transmission begins. READ-END When transmission is finished, "SENDING COMPLETED." appears in the touch panel. Note • To cancel transmission while "SCANNING ORIGINAL." appears in the display or before the [READ-END] key is touched, press the [CLEAR] key ( ) or the [CLEAR ALL] key ( ). If you press the [CLEAR] key ( ), the destination and scan settings are saved. To cancel a transmission, press the [JOB STATUS] key and cancel the job. (p.83) • If you exceed the number of pages that can be scanned while scanning an original, "THE MEMORY BECOMES FULL." will appear in the touch panel. To send the data that has been scanned to that point, touch the [SEND] key. To cancel the transmission, touch the [CANCEL] key. • If a misfeed occurs while an original is being scanned, remove the original according to the instructions in the touch panel. To resume scanning after removing the misfeed, press the [START] key ( ). 73
-
 1
1 -
2
-
3
-
4
-
5
-
6
-
7
-
8
-
9
-
10
-
11
-
12
-
13
-
14
-
15
-
16
-
17
-
18
-
19
-
20
-
21
-
22
-
23
-
24
-
25
-
26
-
27
-
28
-
29
-
30
-
31
-
32
-
33
-
34
-
35
-
36
-
37
-
38
-
39
-
40
-
41
-
42
-
43
-
44
-
45
-
46
-
47
-
48
-
49
-
50
-
51
-
52
-
53
-
54
-
55
-
56
-
57
-
58
-
59
-
60
-
61
-
62
-
63
-
64
-
65
-
66
-
67
-
68
-
69
-
 70
70 -
 71
71 -
 72
72 -
 73
73 -
 74
74 -
 75
75 -
 76
76 -
 77
77 -
 78
78 -
 79
79 -
 80
80 -
81
-
82
-
83
-
84
-
85
-
86
-
87
-
88
-
89
-
90
-
91
-
92
-
93
-
94
-
95
-
96
-
97
-
98
-
99
-
100
-
101
-
102
-
103
-
104
-
105
-
106
-
107
-
108
-
109
-
110
-
111
-
112
-
113
-
114
-
115
-
116
-
117
-
118
-
119
-
120
-
121
-
122
-
123
-
124
-
125
-
126
-
127
-
128
-
129
-
130
-
131
-
132
-
133
-
134
-
135
-
136
-
137
-
138
-
139
-
140
-
141
-
142
-
143
-
144
-
145
-
146
-
147
-
148
-
149
-
150
-
151
-
152
-
153
-
154
-
155
-
156
-
157
-
158
-
159
-
160
-
161
-
162
-
163
-
164
-
165
-
166
-
167
-
168
 |
 |
