Brother International PE-DESIGN PLUS2 Instruction Manual - Page 18
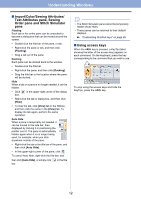
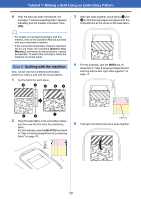
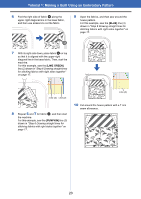
Drawing straight lines for, stitching fabrics with right, sides together, Step 6
 |
View all Brother International PE-DESIGN PLUS2 manuals
Add to My Manuals
Save this manual to your list of manuals |
Page 18 highlights
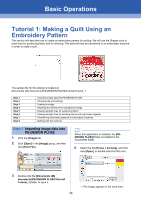
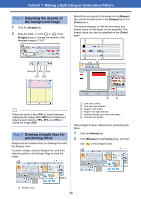
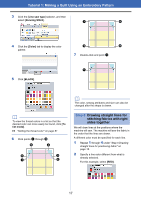
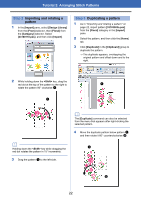
Tutorial 1: Making a Quilt Using an Embroidery Pattern 3 Click the [Line sew type] selector, and then select [Running Stitch]. g h 4 Click the [Color] tab to display the color palette. j i 7 Double-click end point k. k 5 Click [BLACK]. b To view the thread colors in a list so that the desired color can more easily be found, click [To list mode]. cc "Setting the thread color" on page 61 6 Click points a through j. e d f a c b b The color, sewing attributes and size can also be changed after the shape is drawn. Step 6 Drawing straight lines for stitching fabrics with right sides together We will draw lines at the positions where the machine will sew. The machine will sew the fabric in the order that the lines are drawn. A different color must be specified for each line. 1 Repeat 1 through 4 under "Step 5 Drawing straight lines for positioning fabric" on page 16. 2 Specify a line color different from what is already selected. For this example, select [RED]. 17
-
 1
1 -
2
-
3
-
4
-
5
-
6
-
7
-
8
-
9
-
10
-
11
-
12
-
 13
13 -
 14
14 -
 15
15 -
 16
16 -
 17
17 -
 18
18 -
 19
19 -
 20
20 -
 21
21 -
 22
22 -
 23
23 -
24
-
25
-
26
-
27
-
28
-
29
-
30
-
31
-
32
-
33
-
34
-
35
-
36
-
37
-
38
-
39
-
40
-
41
-
42
-
43
-
44
-
45
-
46
-
47
-
48
-
49
-
50
-
51
-
52
-
53
-
54
-
55
-
56
-
57
-
58
-
59
-
60
-
61
-
62
-
63
-
64
-
65
-
66
-
67
-
68
-
69
-
70
-
71
-
72
-
73
-
74
-
75
-
76
-
77
-
78
-
79
-
80
-
81
-
82
-
83
-
84
-
85
-
86
-
87
-
88
-
89
-
90
-
91
-
92
-
93
-
94
-
95
-
96
-
97
-
98
-
99
-
100
-
101
-
102
-
103
-
104
-
105
-
106
-
107
-
108
-
109
-
110
-
111
-
112
-
113
-
114
-
115
-
116
-
117
-
118
-
119
-
120
 |
 |
