Brother International PE-DESIGN PLUS2 Instruction Manual - Page 85
Tutorial 7-4: Photo Stitch 2
 |
View all Brother International PE-DESIGN PLUS2 manuals
Add to My Manuals
Save this manual to your list of manuals |
Page 85 highlights
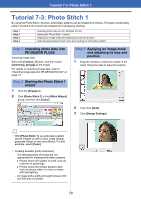
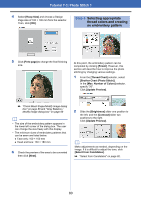
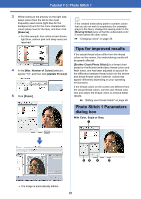
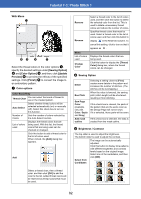
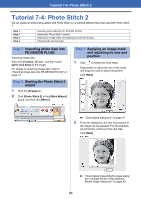
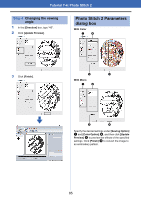
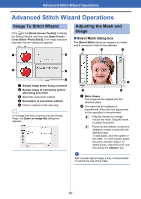
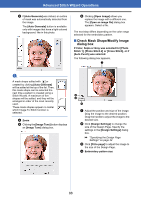
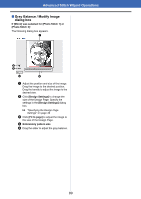
Tutorial 7-4: Photo Stitch 2 Tutorial 7-4: Photo Stitch 2 We will create an embroidery pattern with Photo Stitch 2 in a method different than that used with Photo Stitch 1. Step 1 Step 2 Step 3 Step 4 Importing photo data into PE-DESIGN PLUS2 Starting the Photo Stitch 2 wizard Applying an image mask and adjusting its size and position Changing the sewing angle Step 1 Importing photo data into PE-DESIGN PLUS2 Importing image data. Select the [Tutorial_7] folder, and then select [girl2- face.bmp] as the image. For details on importing image data, refer to "Importing image data into PE-DESIGN PLUS2" on page 73. Step 2 Starting the Photo Stitch 2 wizard 1 Click the [Image] tab. 2 Click [Photo Stitch 2] in the [Stitch Wizard] group, and then click [Mono]. Step 3 Applying an image mask and adjusting its size and position 1 Click to select the circle mask. Drag handle to adjust the size of the mask, and drag the mask to adjust its position. Click [Next]. cc "Select Mask dialog box" on page 87 2 From this dialog box, the size and position of the image can be adjusted. For this example, we will simply continue to the next step. Click [Next]. cc "Check Mask Shape/Modify Image dialog box" on page 88 and "Gray Balance / Modify Image dialog box" on page 89 84
-
 1
1 -
2
-
3
-
4
-
5
-
6
-
7
-
8
-
9
-
10
-
11
-
12
-
13
-
14
-
15
-
16
-
17
-
18
-
19
-
20
-
21
-
22
-
23
-
24
-
25
-
26
-
27
-
28
-
29
-
30
-
31
-
32
-
33
-
34
-
35
-
36
-
37
-
38
-
39
-
40
-
41
-
42
-
43
-
44
-
45
-
46
-
47
-
48
-
49
-
50
-
51
-
52
-
53
-
54
-
55
-
56
-
57
-
58
-
59
-
60
-
61
-
62
-
63
-
64
-
65
-
66
-
67
-
68
-
69
-
70
-
71
-
72
-
73
-
74
-
75
-
76
-
77
-
78
-
79
-
 80
80 -
 81
81 -
 82
82 -
 83
83 -
 84
84 -
 85
85 -
 86
86 -
 87
87 -
 88
88 -
 89
89 -
 90
90 -
91
-
92
-
93
-
94
-
95
-
96
-
97
-
98
-
99
-
100
-
101
-
102
-
103
-
104
-
105
-
106
-
107
-
108
-
109
-
110
-
111
-
112
-
113
-
114
-
115
-
116
-
117
-
118
-
119
-
120
 |
 |