Brother International PE-DESIGN PLUS2 Instruction Manual - Page 60
Exporting an FCM File for, ScanNCut Brother cutting, machine, Export for ScanNCut]
 |
View all Brother International PE-DESIGN PLUS2 manuals
Add to My Manuals
Save this manual to your list of manuals |
Page 60 highlights
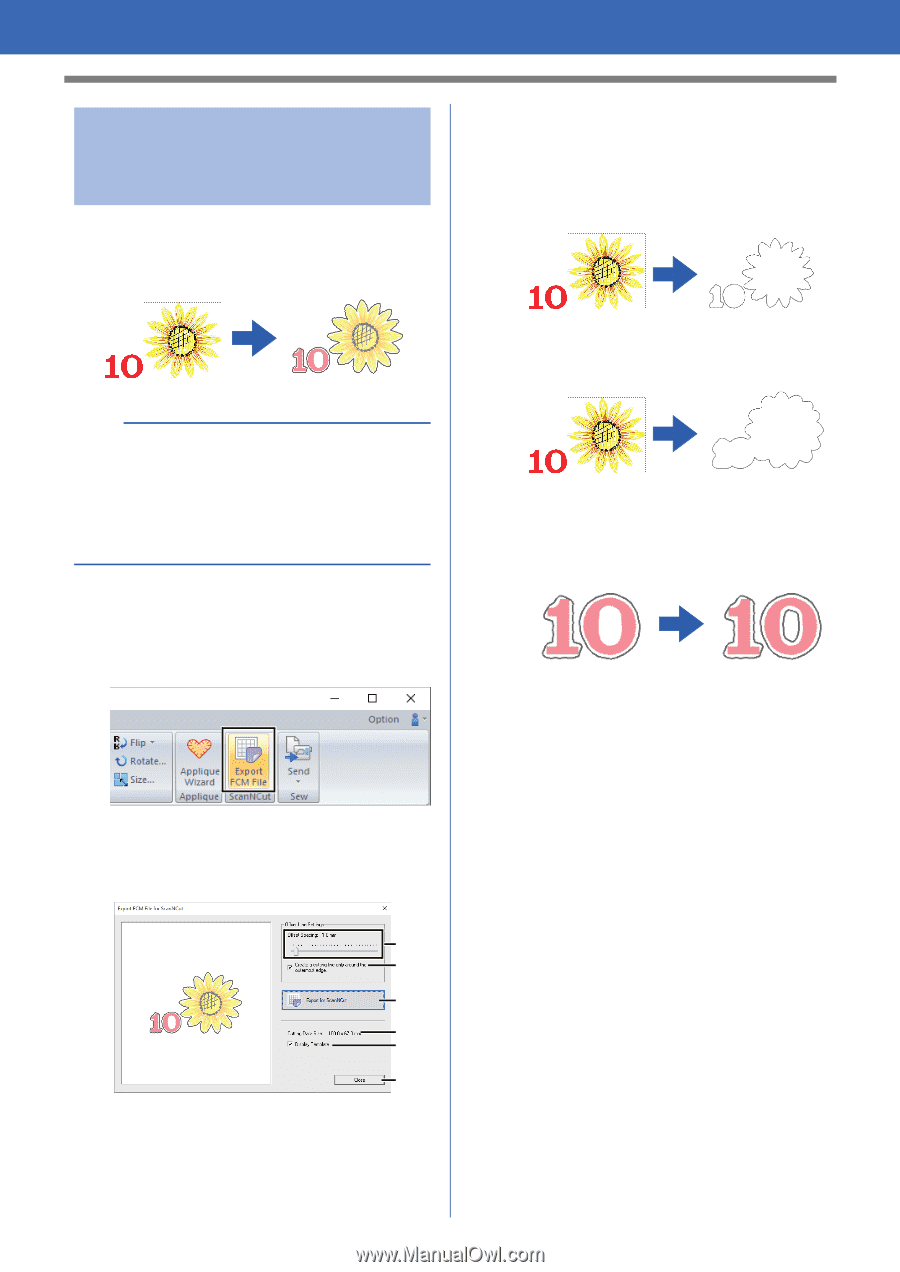
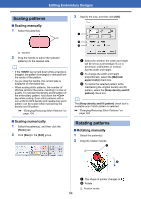
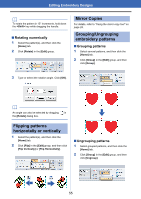
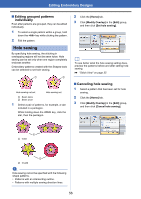
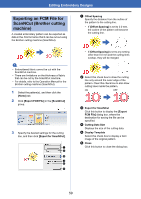
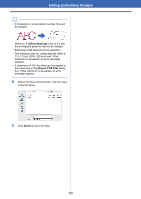
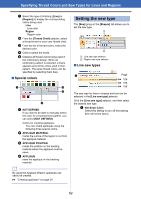
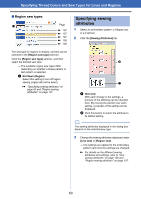
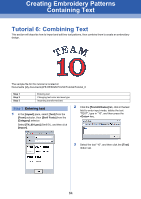
Editing Embroidery Designs Exporting an FCM File for ScanNCut (Brother cutting machine) A created embroidery pattern can be exported as data in the .fcm format so that it can be cut out using the Brother cutting machine (ScanNCut). a Offset Spacing Specify the distance from the outline of the pattern to the cutting line. • If [Offset Spacing] is set to 0.0 mm, the outline of the pattern will become the cutting line. a • Embroidered fabric cannot be cut with the ScanNCut machine. • There are limitations on the thickness of fabric that can be cut by the ScanNCut machine. • For details, refer to the Operation Manual for the Brother cutting machine (ScanNCut). 1 Select the pattern(s), and then click the [Home] tab. 2 Click [Export FCM File] in the [ScanNCut] group. 3 Specify the desired settings for the cutting line, and then click [Export for ScanNCut]. a b c d e f • If [Offset Spacing] is set to any setting other than 0.0 mm and the cutting lines overlap, they will be merged. b Select this check box to draw the cutting line only around the outer edge of the pattern. Clear this check box to also draw cutting lines inside the pattern. ON OFF c Export for ScanNCut Click this button to display the [Export FCM File] dialog box, where the destination for saving the file can be specified. d Cutting Data Size Displays the size of the cutting data. e Display Template Select this check box to display a faint image of the original pattern. f Close Click this button to close the dialog box. 59
-
 1
1 -
2
-
3
-
4
-
5
-
6
-
7
-
8
-
9
-
10
-
11
-
12
-
13
-
14
-
15
-
16
-
17
-
18
-
19
-
20
-
21
-
22
-
23
-
24
-
25
-
26
-
27
-
28
-
29
-
30
-
31
-
32
-
33
-
34
-
35
-
36
-
37
-
38
-
39
-
40
-
41
-
42
-
43
-
44
-
45
-
46
-
47
-
48
-
49
-
50
-
51
-
52
-
53
-
54
-
 55
55 -
 56
56 -
 57
57 -
 58
58 -
 59
59 -
 60
60 -
 61
61 -
 62
62 -
 63
63 -
 64
64 -
 65
65 -
66
-
67
-
68
-
69
-
70
-
71
-
72
-
73
-
74
-
75
-
76
-
77
-
78
-
79
-
80
-
81
-
82
-
83
-
84
-
85
-
86
-
87
-
88
-
89
-
90
-
91
-
92
-
93
-
94
-
95
-
96
-
97
-
98
-
99
-
100
-
101
-
102
-
103
-
104
-
105
-
106
-
107
-
108
-
109
-
110
-
111
-
112
-
113
-
114
-
115
-
116
-
117
-
118
-
119
-
120
 |
 |