Brother International PE-DESIGN PLUS2 Instruction Manual - Page 25
Tutorial 3: Changing the Stitching for Each Shape Pattern
 |
View all Brother International PE-DESIGN PLUS2 manuals
Add to My Manuals
Save this manual to your list of manuals |
Page 25 highlights
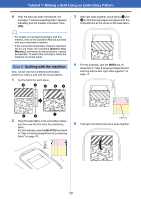
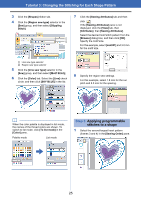
Tutorial 3: Changing the Stitching for Each Shape Pattern Tutorial 3: Changing the Stitching for Each Shape Pattern The sew type for areas within closed outlines of text patterns or shapes can be specified. The sample file for this tutorial is located at: Documents (My documents)\PE-DESIGN PLUS2\Tutorial\Tutorial_3 Step 1 Step 2 Step 3 Step 4 Importing an outline shape Applying motif stitches to line Applying programmable stitches to a shape Applying motif stitches to a shape Step 1 Importing an outline shape 1 In the [Import] pane, select [Outline Shapes] from the [From] selector, then [Misc] from the [Category] selector. Select [OL_heart01.pes], and then click [Import]. Step 2 Applying motif stitches to line Detailed line and region attribute settings can be specified from the [Sewing Attributes] pane. Now, we will specify settings for line sewing and region sewing for the largest heart pattern. 1 Click on workspace to deselect the heart pattern. While holding down the key, click the line (frame 2) and region (frame 1) of the largest heart pattern arranged in the [Sewing Order] pane. 2 Click pane. at the top of the [Sewing Order] 24
-
 1
1 -
2
-
3
-
4
-
5
-
6
-
7
-
8
-
9
-
10
-
11
-
12
-
13
-
14
-
15
-
16
-
17
-
18
-
19
-
 20
20 -
 21
21 -
 22
22 -
 23
23 -
 24
24 -
 25
25 -
 26
26 -
 27
27 -
 28
28 -
 29
29 -
 30
30 -
31
-
32
-
33
-
34
-
35
-
36
-
37
-
38
-
39
-
40
-
41
-
42
-
43
-
44
-
45
-
46
-
47
-
48
-
49
-
50
-
51
-
52
-
53
-
54
-
55
-
56
-
57
-
58
-
59
-
60
-
61
-
62
-
63
-
64
-
65
-
66
-
67
-
68
-
69
-
70
-
71
-
72
-
73
-
74
-
75
-
76
-
77
-
78
-
79
-
80
-
81
-
82
-
83
-
84
-
85
-
86
-
87
-
88
-
89
-
90
-
91
-
92
-
93
-
94
-
95
-
96
-
97
-
98
-
99
-
100
-
101
-
102
-
103
-
104
-
105
-
106
-
107
-
108
-
109
-
110
-
111
-
112
-
113
-
114
-
115
-
116
-
117
-
118
-
119
-
120
 |
 |
