Brother International PE-DESIGN PLUS2 Instruction Manual - Page 88
Advanced Stitch Wizard Operations, Image To Stitch Wizard, Adjusting the Mask and, Image
 |
View all Brother International PE-DESIGN PLUS2 manuals
Add to My Manuals
Save this manual to your list of manuals |
Page 88 highlights
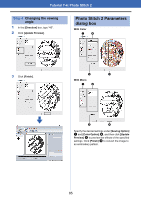
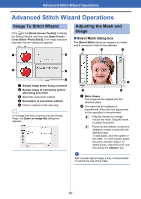
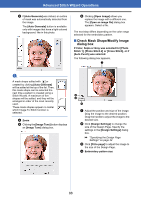
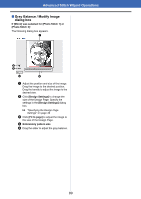
Advanced Stitch Wizard Operations Advanced Stitch Wizard Operations Image To Stitch Wizard Click in the [Quick Access Toolbar] to display the Startup Wizard, and then click [Auto Punch / Cross Stitch / Photo Stitch]. If an image has been imported, the next dialog box appears. a c Adjusting the Mask and Image ■ Select Mask dialog box The [Select Mask] dialog box appears no matter which conversion method was selected. a b d b d e a Sample image before being converted b Sample image of embroidery pattern after being converted c Select the conversion method. d Description of conversion method e Click to continue to the next step. b If no image has been imported into the Design Page, the [Open an image file] dialog box appears. e c f a Mask shapes The image will be masked with the selected shape. b The mask can be reshaped or repositioned. Select the tool appropriate for the operation to be performed. : Drag the handles to enlarge/ reduce the mask. Drag the mask to adjust its position. : Points can be entered, moved and deleted to create a mask with the desired shape. To add points, click the outline of the mask. To move a point, select the point, and then drag it. To delete points, select the point, and then press the key. a With a small original image, it may not be possible to reduce the size of the mask. 87
-
 1
1 -
2
-
3
-
4
-
5
-
6
-
7
-
8
-
9
-
10
-
11
-
12
-
13
-
14
-
15
-
16
-
17
-
18
-
19
-
20
-
21
-
22
-
23
-
24
-
25
-
26
-
27
-
28
-
29
-
30
-
31
-
32
-
33
-
34
-
35
-
36
-
37
-
38
-
39
-
40
-
41
-
42
-
43
-
44
-
45
-
46
-
47
-
48
-
49
-
50
-
51
-
52
-
53
-
54
-
55
-
56
-
57
-
58
-
59
-
60
-
61
-
62
-
63
-
64
-
65
-
66
-
67
-
68
-
69
-
70
-
71
-
72
-
73
-
74
-
75
-
76
-
77
-
78
-
79
-
80
-
81
-
82
-
 83
83 -
 84
84 -
 85
85 -
 86
86 -
 87
87 -
 88
88 -
 89
89 -
 90
90 -
 91
91 -
 92
92 -
 93
93 -
94
-
95
-
96
-
97
-
98
-
99
-
100
-
101
-
102
-
103
-
104
-
105
-
106
-
107
-
108
-
109
-
110
-
111
-
112
-
113
-
114
-
115
-
116
-
117
-
118
-
119
-
120
 |
 |