Brother International PE-DESIGN PLUS2 Instruction Manual - Page 20
Quilting with the machine, Step 8
 |
View all Brother International PE-DESIGN PLUS2 manuals
Add to My Manuals
Save this manual to your list of manuals |
Page 20 highlights
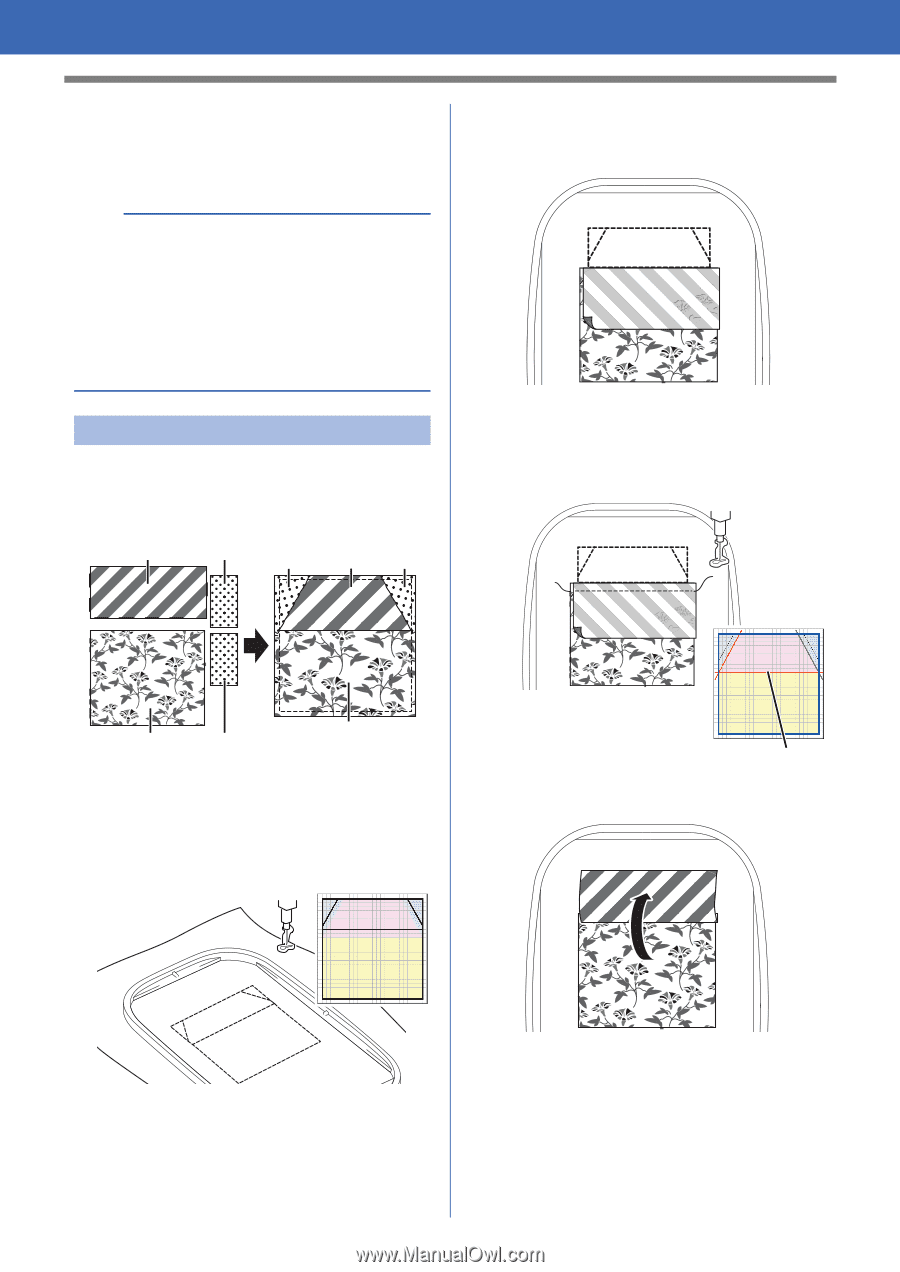
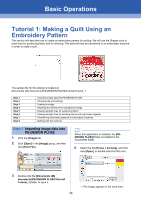
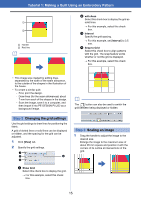
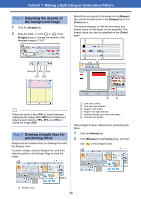
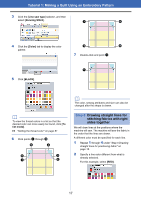
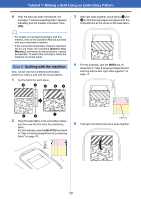
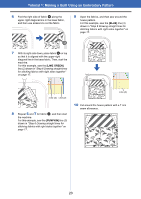
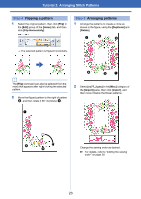
Tutorial 1: Making a Quilt Using an Embroidery Pattern 4 After the data has been transferred, the message "Finished outputting data." appears, indicating that the transfer is finished. Click [OK]. b • For details on transferring designs with this method, refer to the Operation Manual provided with your embroidery machine. • If the connected embroidery machine has been set to Link mode, the command [Send to Your Machine], mentioned in this procedure, cannot be selected. To select this command, return the machine to normal mode. Step 8 Quilting with the machine Now, we will use the transferred embroidery patterns to make a quilt with the house pattern. 1 Cut the fabric for each piece. b c d b c 3 With right sides together, place fabrics a and b so that their top edges are aligned with the horizontal line at the center of the base fabric. 4 For this example, sew the [RED] line (1) drawn first in "Step 6 Drawing straight lines for stitching fabrics with right sides together" on page 17. a d a 2 Hoop the base fabric in the embroidery frame, and then sew the first color for positioning fabric. For this example, sew the [BLACK] line drawn in "Step 5 Drawing straight lines for positioning fabric" on page 16. Line (1) 5 Fold open the fabrics that were sewn together. 19
-
 1
1 -
2
-
3
-
4
-
5
-
6
-
7
-
8
-
9
-
10
-
11
-
12
-
13
-
14
-
 15
15 -
 16
16 -
 17
17 -
 18
18 -
 19
19 -
 20
20 -
 21
21 -
 22
22 -
 23
23 -
 24
24 -
 25
25 -
26
-
27
-
28
-
29
-
30
-
31
-
32
-
33
-
34
-
35
-
36
-
37
-
38
-
39
-
40
-
41
-
42
-
43
-
44
-
45
-
46
-
47
-
48
-
49
-
50
-
51
-
52
-
53
-
54
-
55
-
56
-
57
-
58
-
59
-
60
-
61
-
62
-
63
-
64
-
65
-
66
-
67
-
68
-
69
-
70
-
71
-
72
-
73
-
74
-
75
-
76
-
77
-
78
-
79
-
80
-
81
-
82
-
83
-
84
-
85
-
86
-
87
-
88
-
89
-
90
-
91
-
92
-
93
-
94
-
95
-
96
-
97
-
98
-
99
-
100
-
101
-
102
-
103
-
104
-
105
-
106
-
107
-
108
-
109
-
110
-
111
-
112
-
113
-
114
-
115
-
116
-
117
-
118
-
119
-
120
 |
 |