Brother International PE-DESIGN PLUS2 Instruction Manual - Page 72
Small Text, Entering small text
 |
View all Brother International PE-DESIGN PLUS2 manuals
Add to My Manuals
Save this manual to your list of manuals |
Page 72 highlights
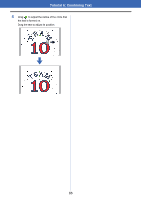
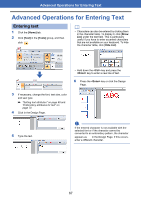
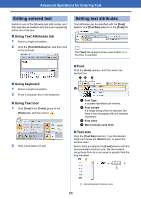
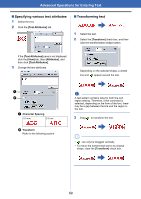
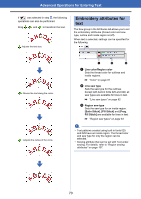
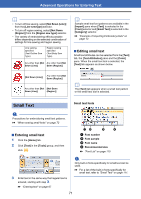
Advanced Operations for Entering Text b • To turn off line sewing, select [Not Sewn (Line)] from the [Line sew type] selector. • To turn off region sewing, select [Not Sewn (Region)] from the [Region sew type] selector. • The variety of embroidering effects possible differs depending on the selected combination of settings for line sewing and region sewing. Line sewing specified (Text Outline Sew Type) Region sewing specified (Text Body Sew Type) Any other than [Not Any other than [Not Sewn (Line)] Sewn (Region)] b Sample small text font patterns are available in the [Import] pane when [Text] is selected in the [From] selector and [Small Text] is selected in the [Category] selector. cc "Example of Importing Embroidery Data" on page 13 ■ Editing small text Small text attributes can be selected from the [Text] tab, the [Text Attributes] pane and the [Color] pane. When the small text tool is selected, the [Text] tab appears as shown below. [Not Sewn (Line)] Any other than [Not Sewn (Region)] Any other than [Not [Not Sewn Sewn (Line)] (Region)] b The [Text] tab appears when a small text pattern or the small text tool is selected. Small Text Small text fonts a Precautions for embroidering small text patterns. cc "When sewing small fonts" on page 72 ■ Entering small text 1 Click the [Home] tab. 2 Click [Text] in the [Tools] group, and then click . a b c d a Font number b Font sample c Font name d Recommended size cc "Font List" on page 110 a Only built-in fonts specifically for small text can be used. cc For a list of the built-in fonts specifically for small text, refer to "Small Text" on page 111. 3 Enter text in the same way that regular text is entered, starting with step 3. cc "Entering text" on page 67 71
-
 1
1 -
2
-
3
-
4
-
5
-
6
-
7
-
8
-
9
-
10
-
11
-
12
-
13
-
14
-
15
-
16
-
17
-
18
-
19
-
20
-
21
-
22
-
23
-
24
-
25
-
26
-
27
-
28
-
29
-
30
-
31
-
32
-
33
-
34
-
35
-
36
-
37
-
38
-
39
-
40
-
41
-
42
-
43
-
44
-
45
-
46
-
47
-
48
-
49
-
50
-
51
-
52
-
53
-
54
-
55
-
56
-
57
-
58
-
59
-
60
-
61
-
62
-
63
-
64
-
65
-
66
-
 67
67 -
 68
68 -
 69
69 -
 70
70 -
 71
71 -
 72
72 -
 73
73 -
 74
74 -
 75
75 -
 76
76 -
 77
77 -
78
-
79
-
80
-
81
-
82
-
83
-
84
-
85
-
86
-
87
-
88
-
89
-
90
-
91
-
92
-
93
-
94
-
95
-
96
-
97
-
98
-
99
-
100
-
101
-
102
-
103
-
104
-
105
-
106
-
107
-
108
-
109
-
110
-
111
-
112
-
113
-
114
-
115
-
116
-
117
-
118
-
119
-
120
 |
 |
