Brother International PE-DESIGN PLUS2 Instruction Manual - Page 43
Creating an embroidery pattern, using vector images drawn with, other image-editing applications
 |
View all Brother International PE-DESIGN PLUS2 manuals
Add to My Manuals
Save this manual to your list of manuals |
Page 43 highlights
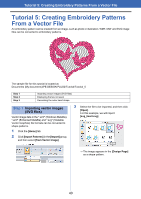
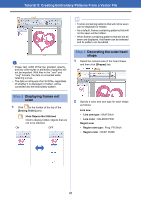
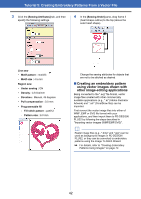
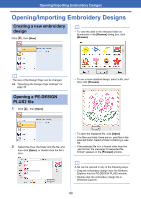
Tutorial 5: Creating Embroidery Patterns From a Vector File 3 Click the [Sewing Attributes] tab, and then specify the following settings. 4 In the [Sewing Order] pane, drag frame 2 (heart shape outline) to the top (above the outer heart shape). Line sew • Motif pattern : mot023 • Motif size : 4.5 mm Region sew • Under sewing : ON • Density : 4.8 line/mm • Direction : Manual, 45 degrees • Pull compensation : 0.0 mm • Programmable fill - Fill stitch pattern : pat012 - Pattern size : 6.0 mm Change the sewing attributes for objects that are not to be stitched as desired. ■ Creating an embroidery pattern using vector images drawn with other image-editing applications Being converted to the ".svg" file format, vector image files created with other commercially available applications (e.g., ".ai" (Adobe Illustrator Artwork) and ".cdr" (CorelDraw file)) can be imported. First convert the vector image files into either of WMF, EMF or SVG file format with your applications, and then import them to PE-DESIGN PLUS2 by following the steps described in "Importing vector images (WMF/EMF/SVG)". b Raster image files (e.g., ".bmp" and ".jpg") can be used as background images in PE-DESIGN PLUS2, or they can be converted to embroidery patterns using the Image To Stitch Wizard. cc For details, refer to "Creating Embroidery Patterns Using Images" on page 73. 42
-
 1
1 -
2
-
3
-
4
-
5
-
6
-
7
-
8
-
9
-
10
-
11
-
12
-
13
-
14
-
15
-
16
-
17
-
18
-
19
-
20
-
21
-
22
-
23
-
24
-
25
-
26
-
27
-
28
-
29
-
30
-
31
-
32
-
33
-
34
-
35
-
36
-
37
-
 38
38 -
 39
39 -
 40
40 -
 41
41 -
 42
42 -
 43
43 -
 44
44 -
 45
45 -
 46
46 -
 47
47 -
 48
48 -
49
-
50
-
51
-
52
-
53
-
54
-
55
-
56
-
57
-
58
-
59
-
60
-
61
-
62
-
63
-
64
-
65
-
66
-
67
-
68
-
69
-
70
-
71
-
72
-
73
-
74
-
75
-
76
-
77
-
78
-
79
-
80
-
81
-
82
-
83
-
84
-
85
-
86
-
87
-
88
-
89
-
90
-
91
-
92
-
93
-
94
-
95
-
96
-
97
-
98
-
99
-
100
-
101
-
102
-
103
-
104
-
105
-
106
-
107
-
108
-
109
-
110
-
111
-
112
-
113
-
114
-
115
-
116
-
117
-
118
-
119
-
120
 |
 |
