Brother International PE-DESIGN PLUS2 Instruction Manual - Page 96
Optimizing hoop changes, Step 3
 |
View all Brother International PE-DESIGN PLUS2 manuals
Add to My Manuals
Save this manual to your list of manuals |
Page 96 highlights
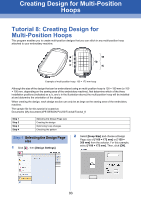
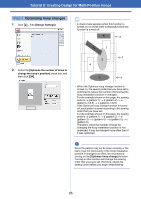
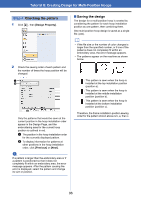
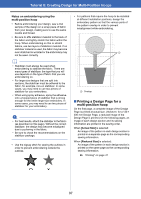
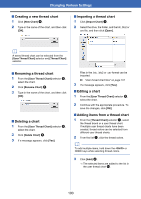
Tutorial 8: Creating Design for Multi-Position Hoops Step 3 Optimizing hoop changes 1 Click , then [Design Settings]. b • A check mark appears when this function is turned on; no check mark is displayed when this function is turned off. 5 a 2 Select the [Optimize the number of times to change the hoop's position] check box, and then click [OK]. 3 1 b 2 4 6 c • When the Optimize hoop change function is turned on, the sewing order that you have set is optimized to reduce the number of times that the hoop installation position is changed. For the example shown on this page, the sewing order is: a (pattern 1) b (pattern 2) a (patterns 3 & 5) c (patterns 4 & 6) If the Optimize hoop change function is turned off, each pattern is sewn according to the sewing order that you have set. For the example shown on this page, the sewing order is: a (pattern 1) b (pattern 2) a (pattern 3) c (pattern 4) a (pattern 5) c (pattern 6) Therefore, since the number of times for changing the hoop installation position is not optimized, it may be changed more often than if it was optimized. a Since the pattern may not be sewn correctly or the fabric may not feed evenly if the hoop installation position is changed too often, we recommend turning on the [Optimize hoop change] function. Turning on this function will change the sewing order that you have set, therefore, check the sewing order before you begin embroidering. 95
-
 1
1 -
2
-
3
-
4
-
5
-
6
-
7
-
8
-
9
-
10
-
11
-
12
-
13
-
14
-
15
-
16
-
17
-
18
-
19
-
20
-
21
-
22
-
23
-
24
-
25
-
26
-
27
-
28
-
29
-
30
-
31
-
32
-
33
-
34
-
35
-
36
-
37
-
38
-
39
-
40
-
41
-
42
-
43
-
44
-
45
-
46
-
47
-
48
-
49
-
50
-
51
-
52
-
53
-
54
-
55
-
56
-
57
-
58
-
59
-
60
-
61
-
62
-
63
-
64
-
65
-
66
-
67
-
68
-
69
-
70
-
71
-
72
-
73
-
74
-
75
-
76
-
77
-
78
-
79
-
80
-
81
-
82
-
83
-
84
-
85
-
86
-
87
-
88
-
89
-
90
-
 91
91 -
 92
92 -
 93
93 -
 94
94 -
 95
95 -
 96
96 -
 97
97 -
 98
98 -
 99
99 -
 100
100 -
 101
101 -
102
-
103
-
104
-
105
-
106
-
107
-
108
-
109
-
110
-
111
-
112
-
113
-
114
-
115
-
116
-
117
-
118
-
119
-
120
 |
 |
