Brother International PE-DESIGN PLUS2 Instruction Manual - Page 19
Transferring embroidery, patterns to embroidery, machines, Step 7
 |
View all Brother International PE-DESIGN PLUS2 manuals
Add to My Manuals
Save this manual to your list of manuals |
Page 19 highlights
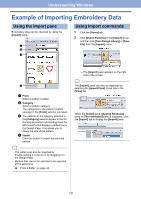
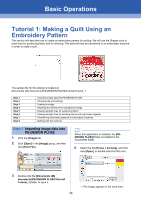
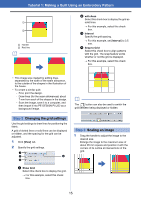
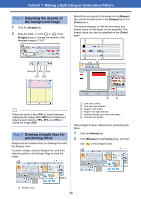
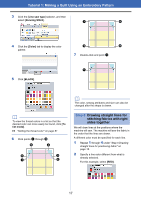
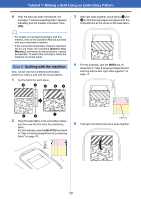
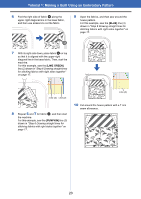
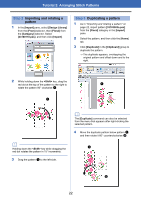
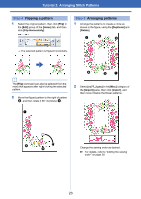
Tutorial 1: Making a Quilt Using an Embroidery Pattern 3 Click point a, and then double-click end point b to draw line (1). a b Step 7 Transferring embroidery patterns to embroidery machines You can sew a pattern transferred to your embroidery machine by writing it to media. For details, refer to the Operation Manual provided with your embroidery machine. Line (1) 4 Repeat the previous steps to draw lines (2), (3) and (4). For this example, select [LIME GREEN] for line (2), [PUMPKIN] for line (3), and [BLUE] for line (4). e c Line (3) Line (2) f d Designs can be transferred to an embroidery machine compatible with USB media or connected to a computer using a USB cable. a The "PE-DESIGN Software Key" cannot be used as USB media. Do not save embroidery files on the "PE-DESIGN Software Key" for transferring. 1 Plug the USB media into the computer, or connect the embroidery machine to the computer. 2 Click the [Home] tab. 3 Click [Send] in the [Sew] group, click [Send to USB Media] or [Send to Your Machine], and then select the desired drive. h l g i Data transfer begins. k j a Line (4) If there is already a file with the same name at the destination, the following dialog box appears. Select whether to overwrite the existing file, to stop copying or to copy the file using a different name. 18
-
 1
1 -
2
-
3
-
4
-
5
-
6
-
7
-
8
-
9
-
10
-
11
-
12
-
13
-
 14
14 -
 15
15 -
 16
16 -
 17
17 -
 18
18 -
 19
19 -
 20
20 -
 21
21 -
 22
22 -
 23
23 -
 24
24 -
25
-
26
-
27
-
28
-
29
-
30
-
31
-
32
-
33
-
34
-
35
-
36
-
37
-
38
-
39
-
40
-
41
-
42
-
43
-
44
-
45
-
46
-
47
-
48
-
49
-
50
-
51
-
52
-
53
-
54
-
55
-
56
-
57
-
58
-
59
-
60
-
61
-
62
-
63
-
64
-
65
-
66
-
67
-
68
-
69
-
70
-
71
-
72
-
73
-
74
-
75
-
76
-
77
-
78
-
79
-
80
-
81
-
82
-
83
-
84
-
85
-
86
-
87
-
88
-
89
-
90
-
91
-
92
-
93
-
94
-
95
-
96
-
97
-
98
-
99
-
100
-
101
-
102
-
103
-
104
-
105
-
106
-
107
-
108
-
109
-
110
-
111
-
112
-
113
-
114
-
115
-
116
-
117
-
118
-
119
-
120
 |
 |
