Brother International PR1055X Operation Manual - Page 27
Using the settings key
 |
View all Brother International PR1055X manuals
Add to My Manuals
Save this manual to your list of manuals |
Page 27 highlights
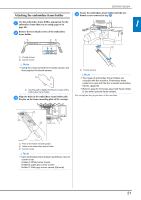
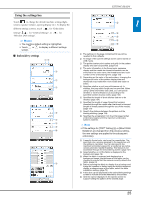
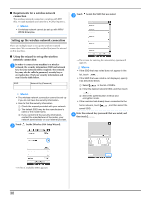
Using the settings key Touch to change the default machine settings (light, volume, speaker volume, opening display etc.). To display the different settings screens, touch for "Embroidery settings", for "General settings", or for "Wireless LAN settings". Memo • The machine default setting is highlighted. • Touch or screen. to display a different settings ■ Embroidery settings 12 3 4 5 6 7 8 9 0 A GETTING READY B 1 C D E F 1 The settings on the page containing this key will be reverted to their defaults. 2 An image of the current settings screen can be saved on USB media. 3 The guides (center point marker and grid) for the pattern display area can be specified. (page 123) 4 The color information in the thread color sequence display and the needle bar thread information can be switched to the color name, the thread brand and color number or the embroidering time. (page 123) 5 Depending on the color of the embroidery, changing the background color of the pattern display area and thumbnails may make them more visible and easier to select. 6 Specifies whether or not jump stitches are cut. In addition, the jump stitch length can be specified. When using Tajima embroidery data (.dst), you can specify whether or not the thread is cut according to the specified number of jump codes. (page 123) 7 Specifies the length of short stitches that are to be deleted. (page 124) 8 Specifies the length of upper thread that remains threaded through the needle after the thread is trimmed (length of thread passed through the eye of the needle). (page 124) 9 Specify the distance between the pattern and the basting stitching. (page 124) 0 Specifies the acceleration from the initial speed (when embroidery begins) until the maximum embroidery speed is reached. Note • If the settings for ["DST" Setting] 6 or [Short Stitch Delete] 7 are changed from the previous setting, the new settings are applied to the subsequent embroidery. A A specific thread color can be set to a needle bar. The specified color remains assigned to the needle bar until the setting is cancelled. You can also specify the maximum embroidery speed for a needle bar as well as cancel automatic needle threading. This feature is not accessible through the embroidering screen. (page 121) B Select whether or not the fabric is displayed in the background. (page 72) C When the fabric is scanned and displayed as a background image, the thickness of the fabric can be checked to ensure that the camera correctly detects the fabric. (page 74) D Before scanning the fabric to display it as a background image for a pattern or before using the built-in camera to display a camera image of the fabric, select the table installation setting. (page 73) E A blue box can be displayed in the embroidering settings screen to indicate the area detected by the camera. F Grid line can be displayed in the camera screen to support setting the pattern at the desired angle. 25
-
 1
1 -
2
-
3
-
4
-
5
-
6
-
7
-
8
-
9
-
10
-
11
-
12
-
13
-
14
-
15
-
16
-
17
-
18
-
19
-
20
-
21
-
 22
22 -
 23
23 -
 24
24 -
 25
25 -
 26
26 -
 27
27 -
 28
28 -
 29
29 -
 30
30 -
 31
31 -
 32
32 -
33
-
34
-
35
-
36
-
37
-
38
-
39
-
40
-
41
-
42
-
43
-
44
-
45
-
46
-
47
-
48
-
49
-
50
-
51
-
52
-
53
-
54
-
55
-
56
-
57
-
58
-
59
-
60
-
61
-
62
-
63
-
64
-
65
-
66
-
67
-
68
-
69
-
70
-
71
-
72
-
73
-
74
-
75
-
76
-
77
-
78
-
79
-
80
-
81
-
82
-
83
-
84
-
85
-
86
-
87
-
88
-
89
-
90
-
91
-
92
-
93
-
94
-
95
-
96
-
97
-
98
-
99
-
100
-
101
-
102
-
103
-
104
-
105
-
106
-
107
-
108
-
109
-
110
-
111
-
112
-
113
-
114
-
115
-
116
-
117
-
118
-
119
-
120
-
121
-
122
-
123
-
124
-
125
-
126
-
127
-
128
-
129
-
130
-
131
-
132
-
133
-
134
-
135
-
136
-
137
-
138
-
139
-
140
-
141
-
142
-
143
-
144
-
145
-
146
-
147
-
148
-
149
-
150
-
151
-
152
-
153
-
154
-
155
-
156
-
157
-
158
-
159
-
160
-
161
-
162
-
163
-
164
-
165
-
166
-
167
-
168
-
169
-
170
-
171
-
172
-
173
-
174
-
175
-
176
-
177
-
178
-
179
-
180
-
181
-
182
-
183
-
184
-
185
-
186
-
187
-
188
-
189
-
190
-
191
-
192
-
193
-
194
-
195
-
196
-
197
-
198
-
199
-
200
 |
 |
