Brother International PR1055X Operation Manual - Page 36
Installing the bobbin
 |
View all Brother International PR1055X manuals
Add to My Manuals
Save this manual to your list of manuals |
Page 36 highlights
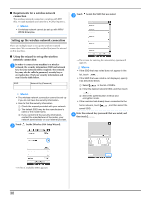
CAUTION • The thread picker can only be moved within a certain range. Do not pull it with extreme force. Grab the bobbin case latch, and remove the bobbin c case. 1 Latch Pass the thread through the thread slit and under the b tension-adjusting spring. 1 Thread slit 2 Tension-adjusting spring Pull the thread through the opening in the tensionc adjusting spring. ■ Oiling the machine After removing the bobbin case, apply oil to the machine. For details on oiling the machine, refer to "Oiling the machine" on page 178. Note • Put a drop of oil onto the hook once a day before use. Installing the bobbin Insert the bobbin into the bobbin case. a • Prewound bobbin 1 About 50 mm (2 inches). • For details, refer to "Adjusting the tension of the bobbin thread" on page 116. a 1 Magnet Tip • Metal bobbin (page 142) Note • Check that the thread winds off the bobbin clockwise as shown in the illustration. If the bobbin is installed with the thread winding off in the opposite direction, the embroidery will not be stitched correctly. 34
-
 1
1 -
2
-
3
-
4
-
5
-
6
-
7
-
8
-
9
-
10
-
11
-
12
-
13
-
14
-
15
-
16
-
17
-
18
-
19
-
20
-
21
-
22
-
23
-
24
-
25
-
26
-
27
-
28
-
29
-
30
-
 31
31 -
 32
32 -
 33
33 -
 34
34 -
 35
35 -
 36
36 -
 37
37 -
 38
38 -
 39
39 -
 40
40 -
 41
41 -
42
-
43
-
44
-
45
-
46
-
47
-
48
-
49
-
50
-
51
-
52
-
53
-
54
-
55
-
56
-
57
-
58
-
59
-
60
-
61
-
62
-
63
-
64
-
65
-
66
-
67
-
68
-
69
-
70
-
71
-
72
-
73
-
74
-
75
-
76
-
77
-
78
-
79
-
80
-
81
-
82
-
83
-
84
-
85
-
86
-
87
-
88
-
89
-
90
-
91
-
92
-
93
-
94
-
95
-
96
-
97
-
98
-
99
-
100
-
101
-
102
-
103
-
104
-
105
-
106
-
107
-
108
-
109
-
110
-
111
-
112
-
113
-
114
-
115
-
116
-
117
-
118
-
119
-
120
-
121
-
122
-
123
-
124
-
125
-
126
-
127
-
128
-
129
-
130
-
131
-
132
-
133
-
134
-
135
-
136
-
137
-
138
-
139
-
140
-
141
-
142
-
143
-
144
-
145
-
146
-
147
-
148
-
149
-
150
-
151
-
152
-
153
-
154
-
155
-
156
-
157
-
158
-
159
-
160
-
161
-
162
-
163
-
164
-
165
-
166
-
167
-
168
-
169
-
170
-
171
-
172
-
173
-
174
-
175
-
176
-
177
-
178
-
179
-
180
-
181
-
182
-
183
-
184
-
185
-
186
-
187
-
188
-
189
-
190
-
191
-
192
-
193
-
194
-
195
-
196
-
197
-
198
-
199
-
200
 |
 |
